Sony MEX-N5300BT Operating Instructions Manual
Fm/am cd bluetooth car audio
Hide thumbs
Also See for MEX-N5300BT:
- Operating instructions manual (220 pages) ,
- Operating instructions manual (44 pages) ,
- Service manual (78 pages)
Table of Contents
Advertisement
FM/AM
CD Bluetooth®
Car Audio
To cancel the demonstration (DEMO) display, see
page 18.
To switch the FM/AM tuning step, see page 7.
For the connection/installation, see page 33.
Para cancelar la pantalla de demostración (DEMO),
consulte la página 20.
Para cambiar el paso de sintonización de FM/AM,
consulte la página 7.
Para la conexión/instalación, consulte la página 35.
MEX-N5300BT/MEX-N4300BT/MXS-N4316BT
4-738-937-42(1)
Operating Instructions
Manual de instrucciones
GB
ES
Advertisement
Table of Contents

Related Manuals for Sony MEX-N5300BT


Summary of Contents for Sony MEX-N5300BT
- Page 1 To switch the FM/AM tuning step, see page 7. For the connection/installation, see page 33. Para cancelar la pantalla de demostración (DEMO), consulte la página 20. Para cambiar el paso de sintonización de FM/AM, consulte la página 7. Para la conexión/instalación, consulte la página 35. MEX-N5300BT/MEX-N4300BT/MXS-N4316BT...
- Page 2 The validity of the CE marking is restricted to changed, suspended, or terminated without only those countries where it is legally prior notice. Sony does not bear any enforced, mainly in the countries EEA responsibility in these sorts of situations.
- Page 3 Microwaves emitting from a BLUETOOTH device may affect the operation of Caution electronic medical devices. Turn off this IN NO EVENT SHALL SONY BE LIABLE FOR unit and other BLUETOOTH devices in the ANY INCIDENTAL, INDIRECT OR following locations, as it may cause an CONSEQUENTIAL DAMAGES OR OTHER accident.
-
Page 4: Table Of Contents
Switching the FM/AM Tuning Step (SONY APP) ..... . 22 (except for Argentine models)..7 Setting the Clock. -
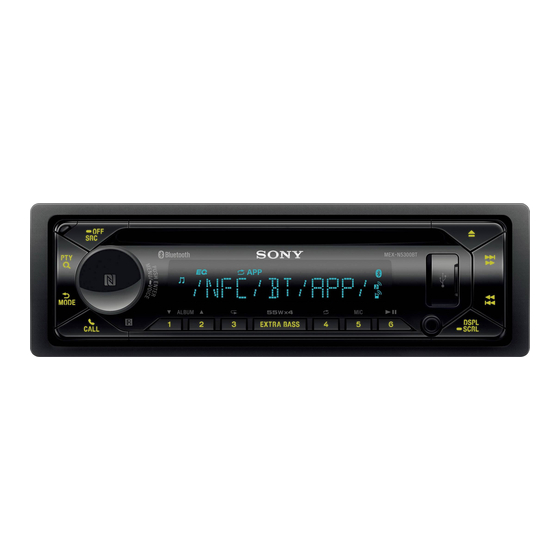
Page 5: Guide To Parts And Controls
(Android smartphone only), or the Siri Enter the browse mode during playback. function (iPhone only). (Not available when a USB device in N-Mark (MEX-N5300BT only) Android mode or iPod is connected.) Touch the control dial with Android Front panel release button smartphone to make BLUETOOTH ... - Page 6 /// Select a setup item, etc. ENTER Enter the selected item. Press and hold for more than 2 seconds to establish or terminate the “Sony | Music Center” function. / (prev/next) +/– (album +/–) VOL (volume) +/– Remove the insulation film before use.
-
Page 7: Getting Started
The alarm will only sound if the displayed. built-in amplifier is used. This setting can be configured in the general Serial numbers (MEX-N5300BT only) setup menu (page 19). Make sure the serial numbers on the bottom of the unit and the back of the front panel are matched correctly. -
Page 8: Setting The Clock
The setup is complete and the clock starts. using One-touch connection (NFC) To display the clock (MEX-N5300BT only) Press DSPL. By touching the control dial on the unit with To set the clock automatically an NFC* compatible smartphone, the unit is Select [AUTO <RDS>] in step 3. - Page 9 Touch the N-Mark part of the unit Rotate the control dial to select [SET with the N-Mark part of the DEVICE 1]* or [SET DEVICE 2]*, then smartphone. press it. flashes while the unit is in pairing standby mode. * [SET DEVICE 1] or [SET DEVICE 2] will be changed to the paired device name after pairing is complete.
- Page 10 To install the microphone Connecting with a paired For details, see “Installing the microphone BLUETOOTH device (MEX-N5300BT only)” (page 38). To use a paired device, connection with this Connecting with an iPhone/iPod unit is required. Some paired devices will (BLUETOOTH Auto Pairing) connect automatically.
-
Page 11: Connecting A Usb Device
Connecting a USB Device Listening to the Radio Turn down the volume on the unit. Connect the USB device to the unit. Listening to the Radio To connect an iPod/iPhone, use the USB Tuning step setting is required (except for connection cable for iPod (not supplied). -
Page 12: Using Radio Data System (Rds)
Using Radio Data System Playback (RDS) Playing a Disc Selecting program types (PTY) Insert the disc (label side up). Press PTY during FM reception. Rotate the control dial until the desired program type appears, then press it. The unit starts to search for a station broadcasting the selected program type. -
Page 13: Playing A Bluetooth Device
• [BT AUDIO] does not appear in the display while Before making a connection, select the USB running the “Sony | Music Center” application via mode (Android mode or MSC/MTP mode) the BLUETOOTH function. -
Page 14: Handsfree Calling (Via Bluetooth Only)
Rotate the control dial to select the desired search category, then press it to confirm. Handsfree Calling (via Repeat step 2 to search the desired BLUETOOTH only) track. Playback starts. To use a cellular phone, connect it with this To exit the “Quick-BrowZer” mode unit. -
Page 15: Available Operations During Call
Rotate the control dial to select an By redial initial from the initial list, then press Press CALL. Rotate the control dial to select a When two cellular phones are connected name from the name list, then press to the unit, rotate the control dial to select either phone, then press it. -
Page 16: Useful Functions
• What you can control with “Sony | Music Center” varies depending on the connected device. • To make use of “Sony | Music Center” features, see the details on your iPhone/Android smartphone. • For further details on “Sony | Music Center,” visit the following URL: http://www.sony.net/smcqa/... -
Page 17: Using Voice Recognition (Android Smartphone Only)
This function requires you to reply icon. connect an iPhone to the unit via Activate the “Sony | Music Center” BLUETOOTH. Availability is limited to iPhone application, then touch the [Reply] (reply) 4s or later. Make sure that your iPhone is icon. -
Page 18: Canceling The Demo Mode
BLUETOOTH (SOUND), Display setup (DISPLAY), audio source even if you do not specify a track to BLUETOOTH setup (BLUETOOTH), “Sony | play. Music Center” setup (SONY APP) • When connecting the iPhone to the USB port, “Siri Eyes Free”... -
Page 19: General Setup (General)
EDIT CUSTOM (edit custom) General Setup (GENERAL) Registers the functions (SOURCE, ATT, VOL +/–, SEEK +/–, VOICE, ON HOOK, OFF HOOK) to the steering wheel remote LANGUAGE (language) (except for India control: models) Rotate the control dial to select the Changes the display language: [ENGLISH], function you want to assign to the [SPANISH]. -
Page 20: Sound Setup (Sound)
FIRMWARE (firmware) S.WOOFER (subwoofer) (Available only while the source is off and SW LEVEL (subwoofer level) the clock is displayed.) Adjusts the subwoofer volume level: Checks/updates the firmware version. For [+6 dB] – [0 dB] – [-6 dB]. details, visit the support site on the back ([ATT] is displayed at the lowest setting.) cover. -
Page 21: Bluetooth Setup (Bluetooth)
AUTOPAIR (auto pairing) Starts BLUETOOTH pairing automatically DSPL-C (display color) (MEX-N5300BT only) when iOS device version 5.0 or later is Sets a preset color or customized color for connected via USB: [ON], [OFF]. -
Page 22: Sony | Music Center" Setup
• Do not splash liquid onto the unit. (SONY APP) Moisture condensation Do not splash liquid onto the discs. When Establish and terminate “Sony | Music moisture condensation occur inside the unit, Center” function (connection). remove the disc and wait for about an hour for it to dry out;... - Page 23 Please note that the use of this accessory with an Apple product may affect wireless performance. If you have any questions or problems concerning your unit that are not covered in this manual, consult your nearest Sony dealer.
-
Page 24: Maintenance
Maintenance Specifications Replacing the lithium battery (CR2025) Tuner section of the remote commander When the battery becomes weak, the range Tuning range: of the remote commander becomes shorter. 87.5 MHz – 108.0 MHz (at 50 kHz step) CAUTION 87.5 MHz – 108.0 MHz (at 100 kHz step) Danger of explosion if battery is incorrectly 87.5 MHz –... - Page 25 Package contents: Sampling rate: 44.1 kHz, 48 kHz Main unit (1) Supported file system: FAT16, FAT32 Remote commander (1): RM-X231 Wireless Communication Microphone (1) (MEX-N5300BT only) Parts for installation and connections Communication System: (1 set) BLUETOOTH Standard version 3.0 Optional accessories/equipment:...
- Page 26 MERCHANTABILITY AND FITNESS FOR A PARTICULAR trademarks owned by the Bluetooth SIG, Inc. and PURPOSE ARE DISCLAIMED. IN NO EVENT SHALL THE any use of such marks by Sony Corporation is under FOUNDATION OR CONTRIBUTORS BE LIABLE FOR license. Other trademarks and trade names are ANY DIRECT, INDIRECT, INCIDENTAL, SPECIAL, those of their respective owners.
-
Page 27: Troubleshooting
The display disappears while the unit is Troubleshooting operating. [BLK OUT] (black out) is set to [B.OUT-ON] The following checklist will help you remedy (page 20). problems you may encounter with your unit. Before going through the checklist below, The display/illumination flashes. - Page 28 NFC function (MEX-N5300BT only) MP3/WMA/AAC files cannot be played. The disc is incompatible with the MP3/ One-touch connection (NFC) is not WMA/AAC format and version. For details possible. on playable discs and formats, visit the If the smartphone does not respond to the support site on the back cover.
- Page 29 No ringtone. The volume of the connected audio device Adjust the volume by rotating the control is low (high). Volume level will differ depending on the dial while receiving a call. Depending on the connecting device, the audio device.
-
Page 30: Messages
BLUETOOTH, the display CD NO MUSIC automatically switches to [BT AUDIO]. Insert a disc containing playable files The “Sony | Music Center” application or (page 24). BLUETOOTH function has failed. Run the application again. CD PUSH EJT: The disc could not be ejected properly. - Page 31 APP ––––––––: A connection with the (Android Open Accessory) 2.0 is application is not established. connected to the unit while [USB MODE] is Make the “Sony | Music Center” set to [ANDROID]. connection again (page 16). – Set [USB MODE] to [MSC/MTP] (page 19).
- Page 32 OFF position, nor remove the USB device (page 23). If these solutions do not help improve the situation, consult your nearest Sony dealer. If you take the unit to be repaired because of device playback trouble, bring the device that was used at the time the problem began.
-
Page 33: Connection/Installation
• Avoid installing the unit in areas subject to dust, dirt, excessive vibration, or high temperature, such as in direct sunlight or For MEX-N5300BT near heater ducts. • Use only the supplied mounting hardware for a safe and secure installation. -
Page 34: Connection (For Mex-N5300Bt)
Connection (For MEX-N5300BT) Subwoofer* Power amplifier* White White/black striped Front speaker* Gray Gray/black striped Green Green/black striped Rear speaker* Purple Purple/black striped Black Yellow For details, see “Making connections” (page 36). Blue/white striped Orange/white striped from a wired remote control (not supplied)* ... -
Page 35: Connection (For Mex-N4300Bt/Mxs-N4316Bt)
Connection (For MEX-N4300BT/MXS-N4316BT) Subwoofer* Power amplifier* White White/black striped Front speaker* Gray Gray/black striped Green Green/black striped Rear speaker* Purple Purple/black striped Black Yellow For details, see “Making connections” (page 36). Blue/white striped For Argentine models See “Power connection diagram (Argentine models only)”... - Page 36 Be sure to first connect the black ground *6 For details on installing the microphone, see (earth) lead to a common ground (earth) “Installing the microphone (MEX-N5300BT only)” point. (page 38). *7 Depending on the type of car, use an adaptor...
- Page 37 To the car’s power connector Power connection diagram (Argentine models only) Check your car’s auxiliary power connector, and match the connections of cords correctly depending on the car. Auxiliary power connector continuous power Yellow supply power antenna (aerial) Blue/white /power amplifier striped control (REM OUT)
- Page 38 Using the wired remote control Installing the microphone To enable the wired remote control, (MEX-N5300BT only) set [STR CONTROL] in [SET STEERING] to [PRESET] (page 19). To capture your voice during handsfree calling, you need to install the microphone .
-
Page 39: Installation
Mounting the unit in the Installation dashboard • Before installing, make sure the catches on Removing the protection collar both sides of the bracket are bent and the bracket inwards 2 mm ( in). • For Japanese cars, see “Mounting the unit Before installing the unit, remove the in a Japanese car”... - Page 40 Detaching and attaching the front You may not be able to install this unit in panel some makes of Japanese cars. In such a case, consult your Sony dealer. For details, see “Detaching the Front Panel” (page 7). TOYOTA ...
- Page 41 Web: Customers in Latin America/Clientes en Latinoamérica: http://esupport.sony.com/ES/LA/ Customers in Asia Pacific/Clientes en Asia-Pacífico: http://www.sony-asia.com/section/support http://www.sony-asia.com/caraudio/ ©2018 Sony Corporation Printed in Thailand http://www.sony.net/...
Need help?
Do you have a question about the MEX-N5300BT and is the answer not in the manual?
Questions and answers