Kval 979-2 Operation Manual
Miter trim saw system
Hide thumbs
Also See for 979-2:
- Operation and service manual (112 pages) ,
- Operation manual (108 pages) ,
- System reference manual (102 pages)

Related Manuals for Kval 979-2


Summary of Contents for Kval 979-2
- Page 1 Operation Manual Published: March 11, 2022 Innovation, Quality & Honesty 979-2 Miter Trim Saw System...
- Page 2 Proprietary Notice This Manual is confidential and contains proprietary information and intellectual property of KVAL Inc., and is to be used solely by Customer as an operating manual for KVAL Inc. machines. Neither this Manual nor any of the information contained herein may be reproduced or disclosed under any circumstances without the express written permission of KVAL Inc.
- Page 3 KVAL 979-2 Operation Manual Your Feedback is Welcome: To help us design products that make your job easier and your business more successful, we'd like to gain your perspective about your user experience with our product - that is, the manual, the machinery, the software, etc.
- Page 4 KVAL 979-2 Operation Manual...
-
Page 5: Table Of Contents
Table of Contents Introduction to the 979-2 Chapter 1 Chapter 1 at a Glance.............. 1-1 Overview of the 979-2 Miter Trim Saw System......1-2 About this Manual ................1-3 Safety First!................1-4 Safety Sheet Sign-Off Sheet..............1-4 Safety Terminology of Labels..............1-4 Safety Guidelines..................1-4 Lockout-Tagout Guidelines ............ - Page 6 About the Back Section ............3-6 About the Electrical Panels............3-7 Main Electrical Panel with VPN ............3-7 System IT Administration ..............3-8 About the 979-2 Computer ..............3-8 Connections on the PLC...............3-8 About the Thermal (Brake) Resistor .............3-9 About Using the VPN................3-9 Description of the Six Light Panel ...........
-
Page 7: Chapter 1 At A Glance
This chapter provides an overview of the and important safety KVAL 979-2 Miter Trim Saw System information to follow when operating the machine. Chapter 1 at a Glance Overview of the 979-2 Miter Trim Saw System ..........page 1-2 About this Manual ..................page 1-3 Safety First! ...................... -
Page 8: Overview Of The 979-2 Miter Trim Saw System
Overview of the 979-2 Miter Trim Saw System Overview of the 979-2 Miter Trim Saw System KVAL model is designed to cut cas- 979-2 Miter Trim Saw ing for doors and windows at rates up to 25 pieces per minute for softwood material. Saws pivot between either 0- or 45-degree positions. -
Page 9: About This Manual
Overview of the 979-2 Miter Trim Saw System About this Manual This manual is part of a package delivered with the machine line. Integration Package includes the following: includes the following: Operation Manual Chapter Title Description Introduction Descriptions of Machine Line and Safety Information. -
Page 10: Safety First
See “Safety Sign-Off Sheet” on page 1-17. Safety Terminology of Labels In addition to the nameplate, KVAL machines may have other warning labels or decals that pro- vide safety information to operators. Safety labels should be clearly visible to the operator and must be replaced if missing, damaged, or illegible. - Page 11 Before performing any mainte- nance or repairs on this machine turn off the main air disconnect. Lockout and tagout this connection. See “Lockout Tagout Procedure” on page 1-9. KVAL 979-2 Operation Manual...
- Page 12 This should be done in accordance with applicable state and/or federal code requirements. Laser Warnings On some machines, laser indicators are used to set boundaries. Follow the manufacturers safety precautions. KVAL 979-2 Operation Manual...
- Page 13 Safety First! Compliance with Codes and Regulations KVAL advises that you request an on-site state safety review of your installation of this machine. This is to ensure conformance to any additional specific safety and health regula- tions which apply in your geographic area.
-
Page 14: Lockout-Tagout Guidelines
O..OFF! Shut off all power sources and isolating devices P..Place lock and tag E..ENERGY: Release stored energy to a zero-energy state R ..Recheck controls and test to ensure they are in the “OFF” state KVAL 979-2 Operation Manual... -
Page 15: Lockout Tagout Procedure
Turn Switch to the Lock and Tag out Insert Lock into hole. OFF position Note: When multiple people are working on the machine, each person needs to have a lock on the handle in the extra holes provided. KVAL 979-2 Operation Manual... -
Page 16: Lockout Tagout Air Supply
The lock and tag can now be removed (only by the person(s) who placed them), and the machine can be re-energized. The tags must be destroyed and the locks and keys returned to the lockout center. 1-10 KVAL 979-2 Operation Manual... -
Page 17: Zero-Energy To Start-Up
Replace Guards Replace all equipment guards. If part of equipment cannot be properly adjusted after start-up with guard on, contact the KVAL Service team. See “Getting Help from Kval” on page 1-13. - Page 18 Be sure to follow the P-R-O- P-E-R lockout/tagout procedures, and that those around you do also. Close the Cage Gate Verify all cage gates are securely closed. Ensure all safety protocols are in effect. 1-12 KVAL 979-2 Operation Manual...
-
Page 19: Getting Help From Kval
• Outside the U.S. and Canada, call (707) 762-7367 or fax (707) 762-0485 • Email address is service@Kvalinc.com • Hours: 6:00 AM to 4:00 PM Pacific Standard Time, Monday through Thursday 6:30 AM to 1:30 PM Pacific Standard Time, Friday 1-13 KVAL 979-2 Operation Manual... -
Page 20: Kval Return And Warranty Policy
We can only accept items for a return if they are still in their original packaging and in undam- aged, resalable condition. Returns are accepted within 45 days of purchase and with an RMA number issued by Kval Inc. Returns after 45 days of purchase or without a Kval Inc. issued RMA number will not be accepted. -
Page 21: Customer Errors
Kval provides a warranty to products that are deemed defective. Within 30 days of discovery of said defect, please notify Kval, but no more than one (1) year after delivery will the product be covered under Warranty. The repair, replacement, or payment in the manner described above shall be the exclusive remedy of Buyer for breach of Kval’s warranty or for claims based upon failure... - Page 22 Kval Return and Warranty Policy 1-16 KVAL 979-2 Operation Manual...
-
Page 23: Safety Sign-Off Sheet
Name (print):__________________Signature: __________________ Date:____/____/___ Note: It is recommended you make a copy of this sheet for new operators. If a copy is needed, you may download a PDF at the KVAL website ( http://www.kvalinc.com You may also contact our Service Department at (800) 553-5825 or email at service@kvalinc.com. - Page 24 Safety Sign-Off Sheet 1-18 KVAL 979-2 Operation Manual...
-
Page 25: Operation Of The 979-2
979-2. Chapter 2 at a Glance Quick Start ......................page 2-2 Powering Operations for the 979-2 ..............page 2-4 How to Power Up the 979-2 .................page 2-4 Home the 979-2 ....................page 2-5 How to Power Down the 979-2 ..............page 2-5 Emergency Shutdown and Recovery ............page 2-5... -
Page 26: Quick Start
Ensure factory air is present at the machine and the main air 979-2 supply valve is turned on. Power up the See “How to Power Up the 979-2” on page 2-4. 979-2 Home the See “Home the 979-2” on page 2-5. 979-2 Set the machine up for the chosen parameters. - Page 27 (Button displays Saws Active Start production by pressing the Start Sequence right the foot pedal. If finished with production and shutting the machine down, see “How to Power Down the 979-2” on page 2-5 KVAL 979-2 Operation Manual...
-
Page 28: Powering Operations For The 979-2
• Shutting down the control power • Removing power from the entire system How to Power Up the 979-2 Ensure factory air is applied to machine and main air supply is turned on. Check to make sure all E-Stop buttons are out. -
Page 29: Home The 979-2
Switch the green switch to the OFF posi- Control Circuit tion. KVAL also recommends that you turn the disconnect switch on the electrical cabinet to OFF; this helps reduce possible damage resulting from power surges from electri- cal storms. Emergency Shutdown and Recovery There are emergency shutdown (E-Stop) switch located at key points around the machine. -
Page 30: About Modes
Left Head Into machine 45 deg - 00 deg Right Head Left Head Into machine 00 deg - 45 deg Right Head Left Head Into machine 00 deg - 00 deg Right Head Left Head Into machine KVAL 979-2 Operation Manual... -
Page 31: Mechanical Set Up
Adjust both back hopper stops for a hopper width of roughly 1/8-inch larger than the stock. Adjust both front hopper stop's height to clear the stock by roughly 1/8-inch. Front Hopper Stop Rear Hopper Stop Note: Use a 1/2'' wrench to Adjust the Bolts Adjustment Bolts for Height KVAL 979-2 Operation Manual... - Page 32 NOTE: Wide jamb mode has better clamping ability than narrow jamb mode; tighter clamping produces cleaner saw cuts. Wide jamb mode can be used on narrow stock. The disadvantage is that wide jamb mode is slower by about 3 boards per minute. KVAL 979-2 Operation Manual...
-
Page 33: Description Of User Interface Screens
Jump to next page to calibrate the Miter Stop Adjustment See “About Calibration Data” on page 2-14 See “Diagnostic See “About Assigning a Pre- Screen” on set” on page 2-18 page 2-21 Screen Selection (Reduced Screen) FIGURE2- 1. KVAL 979-2 Operation Manual... -
Page 34: Machine Feed Back
In the ON position the setup mode is active the saws will be OFF. In the OFF position the setup mode is not active and the Saws will be ON. These keys may be taken out in the off position. 2-10 KVAL 979-2 Operation Manual... -
Page 35: Main Screen
About the Software Start Saws Button (Older Machines) Some previous machines may have a software button to start the saws. This button was replaced by a mechanical Start Saws Button. For description of the mechanical button, 2-11 KVAL 979-2 Operation Manual... - Page 36 The machine is now primed to perform. See “Description of User Interface Screens” on page 2-9 for full operation steps. To assign a preset to the button: See See “About Assigning a Pre-set” on page 2-18 for more information 2-12 KVAL 979-2 Operation Manual...
- Page 37 SAWS ACTIVE During machining it is recommended to use this button to shutdown the saws. This will save time of booting up the machine. See “How to Power Down the 979-2” on page 2-5 if shutting down for the night.
-
Page 38: About The Setup Screens
Use this information as a guide to help input the directional data in the calibration routines. = Reverse Direction X Axis Servo Motor Green = Forward Direction 2-14 KVAL 979-2 Operation Manual... -
Page 39: Entering Calibration Data
If it is correct, go back to the calibration screen and click to combine Combine with Offset offset and base to complete the calibration. Click the button to clear any incorrect number in the Offset box. Note: Clear Offset 2-15 KVAL 979-2 Operation Manual... -
Page 40: About The Machine Calibration Screen
• Individual parameters for each cut mode. • System wide or all cut modes as a set. Miter Stop Adjustments are an Optional choice for machines with Miter Option Setup Menu FIGURE2- 3. 2-16 KVAL 979-2 Operation Manual... - Page 41 If a discrepancy is observed on the miter stops, use this menu to adjust stop positions. About Adjusting System Cut Modes If all the lengths are out of specification the same amount. Use this menu to adjust the cutter heads. 2-17 KVAL 979-2 Operation Manual...
-
Page 42: About Assigning A Pre-Set
Enter the length in either decimal or fractional measure- ments. Select the button. Save Small Plat- form Screen Select the button to go Main back to the main menu. The previ- ously selected button will have the title and length. 2-18 KVAL 979-2 Operation Manual... -
Page 43: About Manual Operation And Chipout Routine
Close or Open Button until the Saw Car- riage moves to the desired loca- tion. Press the Exit Application button to close the user screen and return to the Main Screen Manual Operation Screen FIGURE2- 4. 2-19 KVAL 979-2 Operation Manual... -
Page 44: About The Chipout Routine
Chipout Routine Button to burn in the blocks. Starts Saws Button for the process the replace the Chipout Note: Chapter 2 of the 979-2 Service Manual Block. 2-20 KVAL 979-2 Operation Manual... -
Page 45: Diagnostic Screen
The top line will have the most current routine that is running. If the machine issue can not be resolved, call KVAL Inc. (1- 800-553-5825). Have any error code that is displayed, ready to give the KVAL representative. - Page 46 Diagnostic Screen 2-22 KVAL 979-2 Operation Manual...
-
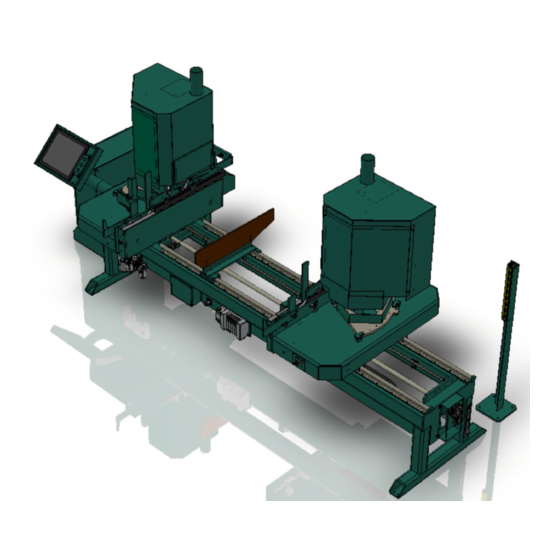
Page 47: Tour Of The 979-2
Tour of the 979-2 CHAPTER 3 This chapter describes components and assemblies of the KVAL 979-2 Miter Trim Saw System. content is geared to help operators understand the basic operation of the 979-2 Chapter 3 at a Glance Operator’s Tour .................... -
Page 48: Operator's Tour
Left or Fixed Head Safety Fence Out-Feed In-Feed Hopper, Staging area, and Feed-In Foot Pedal: Start Sequence Emergency Stop Right or Movable Head Servo Motor and Ball Screw Identification of Key Assemblies of 979-2 FIGURE 3- 1. KVAL 979-2 Operation Manual... -
Page 49: Front Section
Adjust, and lubricator Identification of Front Section Assemblies FIGURE 3- 2. About the Dog Feeds Each head contains, Dog Feeds to move the casings through he machine. Dog Feeds Moves product through machine Dog Feeds FIGURE 3- 3. KVAL 979-2 Operation Manual... -
Page 50: About View Ports
If the hopper is stacked the product will feed through automatically.(Or the quantity set on the main screen) Start Sequence • Press the left pedal to stop the machine. This acts like an E-Stop. KVAL 979-2 Operation Manual... -
Page 51: Operation Station
(See “About Lock-Outs (Option)” on page 2-10.) Lock-Outs Operator Interface FIGURE 3- 5. The Starts Saws Button Press the Start Saws Button to begin the cutting process. Start Saws Button Start Saws Button Location FIGURE 3- 6. KVAL 979-2 Operation Manual... -
Page 52: About The Back Section
The figure below shows the key parts of the out-feed of the machine. The finished product is fed out through the fence slot. Out Feed Area: Fin- ished Product is fed out of the machine Out-Feed Key Parts FIGURE 3- 7. KVAL 979-2 Operation Manual... -
Page 53: About The Electrical Panels
Main Electrical Panel with VPN Main Electrical Panel 110 V / 24 V Terminals Input / Output Terminals High Voltage Section Control Trans- former VFD Section Thermal (Brake) Servo Drive Resistor E-Box Layout FIGURE 3- 8. KVAL 979-2 Operation Manual... -
Page 54: System It Administration
Connection to the Intranet is achieved by interfacing with the control- 979-2 ler. The location of the Intranet connection is identified in the figure below (RJ45 to Intranet.) About the 979-2 Computer ® uses a Beckhoff CPU module as a PLC (Programmable Logic Controller.) In addition 979-2 to the CPU and the chipset, the module also contains internal main memory. -
Page 55: About The Thermal (Brake) Resistor
When ready, push the VPN button until the but- ton lights up. The technician can connect to the machine and view the operation of the pro- gram. Call Customer Support at (800) 553-5825. Outside the U.S, call (707) 762- Kval 7367. KVAL 979-2 Operation Manual... -
Page 56: Description Of The Six Light Panel
Description of the Six Light Panel The six lights on this panel indicate the status of the system. Commander III The Sequence that the lights activate is as follows: Control Power Overload Relay E-Stop Stop Start 24VDC 3-10 KVAL 979-2 Operation Manual... -
Page 57: About Sensors
The Limit Switch is activated by an assembly moving a switch arm. • Depending on the model of limit switch, the amount of pre-travel (amount of movement from the arms resting position) is either 5 or 20 degrees before the limit switch actuates (Clicks). Switch Arm 3-11 KVAL 979-2 Operation Manual... - Page 58 About Sensors 3-12 KVAL 979-2 Operation Manual...
- Page 59 2-12 reset machine button description user interface 2-12 internet access location of connection 3-8 remote connection 3-8 safety guidelines 1-4 RJ45 to intranet 3-8 Safety Sign Off Sheet intranet Safety Concerns 1-17 979-2 Operation Manual...
- Page 60 3-10 start machine button power up 2-4 tagout procedure 1-9 TwinCAT 2® software automation software 3-8 USB module 3-8 user interface screens menu map 2-9 Windows CE® operating system,about 3-8 zero-energy start-up clean up 1-11 inspect 1-11 979-2 Operation Manual...
- Page 62 Customer Service Contacting KVAL Phone and Fax: Mailing address: In the U.S and Canada, call (800) 553-5825 or fax Customer Support Department (707) 762-0485 Kval Incorporated Outside the U.S. and Canada, call (707) 762-7367 825 Petaluma Boulevard South or fax (707) 762-0485 Petaluma, CA 94952 Email: service@kvalinc.com...
Need help?
Do you have a question about the 979-2 and is the answer not in the manual?
Questions and answers