Table of Contents
Advertisement
Advertisement
Table of Contents

Related Manuals for Interphase Sea Scout


Summary of Contents for Interphase Sea Scout
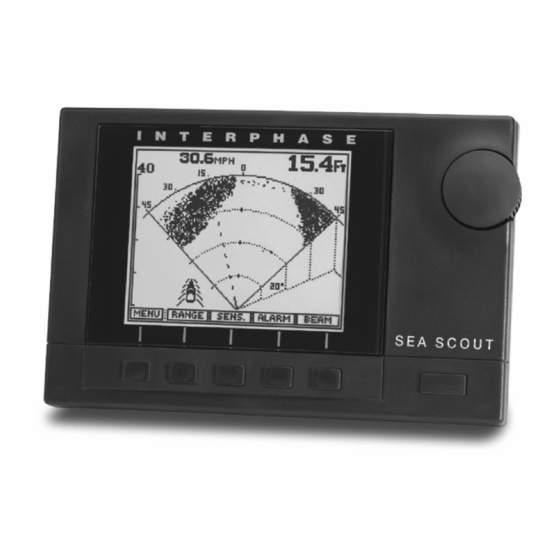
- Page 1 PERATION ANUAL...
- Page 2 We feel proud of the Sea Scout Forward Scanning Sonar and your satisfaction is very important to us. To this end, we welcome any comments or suggestions that you might have in regard to this equipment.
-
Page 3: Table Of Contents
Chart/Scan View Range Adjustment Sensitivity Adjustment Alarm Adjustment Beam Width & Direction Adjustment NMEA 0183 Interface Interpreting Your Sea Scout Display Distance Forward Noise and Sensitivity Adjustments Time Variable Gain (TVG) Reference Information Maintenance and Factory Reset Troubleshooting Guide and Speed Calibration... -
Page 4: General Information
The Sea Scout is available with either a transom or thru-hull scanning sonar depth transducer. In addition, an optional speed/temperature transducer (either transom or thru- hull) is available which will enable your Sea Scout to display boat speed, elapsed distance and surface water temperature. -
Page 5: Warranty Information
Forward Scanning Sonar. We strongly urge you to read this warranty (reprinted at the back of this manual) and closely follow its terms and conditions should your Sea Scout require repair. It is highly recommended that you save all packing materials so that if you should need to send in the unit for repair, it can be fully protected. -
Page 6: Principle Of Operation
(depth) and to indicate the presence of any intervening submerged objects - such as fish. The Sea Scout’s transducer does not contain just one piezoelectric ceramic element like most fishfinders. The Sea Scout’s transducer contains an array of 7... -
Page 7: Display Unit Installation
Installation Overhead Display Unit The compact size of the Sea Scout display unit allows for easy installation in almost any vessel. To get maximum performance and life from your unit, the following guidelines should be considered when selecting a mounting location: 1) Select a location where the unit is protected from excessive temperatures. - Page 8 12 Volt Battery DANGER: Removal of any connector, disassembly of transducer, shortening of any cable or use of any cable other than that supplied by Interphase will void your warranty. NO EXCEPTIONS. Cable Connectors (view from front of female plug)
-
Page 9: Selecting The Transducer Configuration For Your Boat
Selecting the Transducer Configuration for your Boat Keep in mind the primary rule for transducer operation. This is: the transducer can function as long as it has an unobstructed forward view and has smooth flowing non-aerated water surrounding it. The first line of inquiry should be about the boat. Transom mounted transducers are intended for low speed boats with external props. -
Page 10: Transducer Installation
Forward Direction Top View Transducer Installation The Sea Scout comes standard with either a thru-hull or transom mounted forward scanning transducer. It is important to position the transducer so that it has as clear a view as possible of the water directly below and ahead of your boat, as indicated at left. - Page 11 Tighten the nut to 50 inch pounds of torque before operating the boat. 30’ Extension Cable 9-pin Interphase Part # Male 04-0014-008 Transom Mount Bracket in Released Position Suggested materials required for installation: ♦...
- Page 12 Bracket Axle Nylok Nut Kick-up Bracket Replacement Parts If during installation parts are somehow lost are damaged, they can be replaced as follows: Part# 17-0088-008 - Spray Shield Kit - Includes: Spray Shield, four Mounting Bolts and Nuts, Rubber Grommet and four Large Mounting Screws.
- Page 13 After mounting the transducer and actually using the Sea Scout on the water, you may need to readjust the transducer’s mounting for optimum performance.
-
Page 14: Selecting The Best Location
The Sea Scout must have a clear view of the water ahead as it can not magically see through obstructions such as the vessel’s hull. - Page 15 Because of the skill required, we suggest that your professional boatyard provide the fairing block. Molded plastic fairing blocks are also available to fit the Sea Scout’s transducer. Contact us at (831) 477-4944 for additional information and where to purchase.
- Page 16 MOLDED FAIRING BLOCK If your installation requires a fairing block, you may either have one made locally, or purchase a molded plactic unit from Interphase or your Interphase distributor. For this transducer, the molded Fairing Block Part Number is: 42-2004-000...
-
Page 18: Basic Operation
Center simply by turning the control knob. Basic Operation The Sea Scout has been designed to be as easy to learn and operate as possible. The raised push-button keys provide a tactile feel to each operation and the Sea Scout responds with an audible beep each time a key is pressed. - Page 19 Pre-Programmed Screen Displays Interphase Sea Scout Rather than ask you to “build” different screen displays while operating the unit, the Sea Scout has seven of the most valuable LCD screen displays pre-programmed into its operating system memory. Thanks to the Multi-Tasking...
- Page 20 Pressing this key again turns the backlight on and off, each time accompanied by a beep. To turn the Sea Scout off, press this key and hold it down for Typical Sub-Menu several seconds until the unit goes off.
- Page 21 Although 50% of the acoustic radiation is concentrated within this cone, 50% is also outside the cone which permits the Sea Scout to detect targets typically up to twice the 1/2 power cone angle, (i.e. 24 degrees).
-
Page 22: Getting Started
Thru-Hull Transducer Getting Started Check to see that all the components shown at left were included with your Sea Scout. If a part is missing, contact the Interphase Customer Service Department (831) 477-4944 immediately. WARNING: DO NOT operate the Sea Scout with parts missing or with parts other than those obtained through Interphase;... - Page 23 PLOT View (Track Plot) DATA View (Large Digits) CHART/PLOT View FWD View (Forward Scan) SET-UP View (Languages, etc.) CHART/SCAN View CHART View (Conventional)
-
Page 24: Set-Up View
(see Interpreting The Sea Scout’s Forward Display, page 44). To exit the DEMO program either turn the Sea Scout off and back on again, or press the “DEMO” soft key again. Select Units of Measure The Sea Scout starts with the last units of measure selected. -
Page 25: Language Selection
A zero number in the softkey indicates that the Sea Scout is not using any offset. If you feel you need to adjust the transducer alignment left or... -
Page 26: Forward View (Full Scan)
Sensitivity Adjustment Press the soft key labeled "SENS" (for sensitivity) to bring up the choices available for adjusting the Sea Scout s receiver sensitivity. Press the button labeled "AUTO" so that the word AUTO is shown in reverse video (white... -
Page 27: Alarm Adjustment
When you choose to manually adjust the sensitivity, the Sea Scout turns off the AUTO sensitivity mode and it will remain off until the AUTO soft key is again selected. To exit the sensitivity menu and save your adjustments simply press the soft key labeled “LAST”... -
Page 28: Beam Width & Direction Adjustment
The RESET button can be used to quickly select three popular scanning sectors. If the RESET button is pressed once, the Sea Scout will return to the full 90 degree horizontal sector scan , pressing RESET again will put the Sea Scout into one of two preprogrammed forward sector scans. -
Page 29: Plot (Track Plot) View
Interphase Star Pilot GPS, Pilot GPS or Interphase Pilot Loran, you can easily interface the unit to the Sea Scout to show both digital and graphic navigation information. Possible information obtained from a navigation receiver can include track plotting and digital Lat/Lon readings. -
Page 30: Center
Note: The Sea Scout has both a full screen and a split screen track plotter. Both of these Views are updated automatically, regardless of what display screen is in use. -
Page 31: Chart View
Sea Scout LCD display will show a picture exactly like conventional fixed beam down-looking fish finders. When in this mode, the Sea Scout offers a full range of sophisticated features which are found on advanced conventional depth sounders, such as split screen zoom, bottom lock, fish and depth alarms, bottom hardness (white- line), plus several other features. -
Page 32: Bottom Hardness
Hardness (White-Line) If the softkey labeled “HARD” is pressed, the display will show the bottom as a thin line separated by a shaded area. This mode can be used to find detail close to the bottom or to indicate the bottom composition. The thinner the shaded area the softer the bottom. -
Page 33: Zoom & Bottom Track
(Split Screen displays) When using the Chart display (conventional down looking view), the Sea Scout can also display a split screen high resolution zoom of any 25% of the depth range, or can show a split screen Bottom Track or Bottom Lock display. -
Page 34: Fish Symbol Id & Scrolling Speed
Pressing the soft key labeled "FISH" turns the fish symbol on or off. When turned on, the "FISH" soft key will be shown in reverse video and the Sea Scout’s microprocessor will scan the output of the receiver and looks for specific patterns which it has been programmed to recognize as fish. -
Page 35: Data View
"LAST". Log Res. (Distance log reset). If your Sea Scout is equipped with the optional speed/ temperature transducer, the Sea Scout will automatically keep a distance traveled log. You can reset this log to zero by pressing the "Log Res."... -
Page 36: Alarm Adjustment
When you choose to manually adjust the sensitivity, the Sea Scout turns off the AUTO sensitivity mode and it will remain off until the “AUTO” soft key is again selected. Note: when AUTO mode is turned on the word AUTO will be displayed in reverse video (white letters on a black background). -
Page 37: Beam Width & Direction Adjustment
The RESET button can be used to quickly select three popular scanning sectors. If the RESET button is pressed once, the Sea Scout will return to the full 90 degree horizontal sector scan , pressing RESET again will put the Sea Scout into one of two preprogrammed forward sector scans as shown at right. -
Page 38: Chart/Plot View
Chart/Plot View (split screen) In this view, the Sea Scout shows a split screen display with a conventional down looking depth sounder picture on the left and a track plot display on the right. Pressing the "GO" soft key will bring up a sub-menu to allow adjustments to the track plotter display. -
Page 39: Center
Reset the Track Plot. Note: The Sea Scout has both a full screen and a split screen track plotter. Both of these Views are updated automatically regardless of what display screen is in use. -
Page 40: Chart/Scan View
Chart/Scan View (split screen) In this split screen view, the Sea Scout shows a forward looking view on the right and a conventional down looking chart view on the left. In this view, adjustments can be made to the right side of the display (forward looking view) but not to the left side (conventional down looking display). -
Page 41: Alarm Adjustment
Alarm Adjustment In the forward looking display or view, a forward alarm may be set for targets which are closer than a present distance. To adjust or clear the alarm settings, press the soft key labeled “ALARM” to bring up the forward looking alarm menu choices. -
Page 42: Beam Width & Direction Adjustment
The RESET button can be used to quickly select three popular scanning sectors. If the RESET button is pressed once, the Sea Scout will return to the full 90 degree horizontal sector scan , pressing RESET again will put the Sea Scout into one of two preprogrammed forward sector scans as shown at left. -
Page 43: Nmea 0183 Interface
RMB, RMC. Consult your operation manuals or contact the manufacturer for further information on interfacing. The Sea Scout needs to be interfaced via the three pin jack on the rear panel of the display unit. The pin connections are shown at right. -
Page 44: Interpreting Your Sea Scout Display
Transducer steers an acoustic beam over a forward arc whose scan width can be adjusted from approximately 12 to 90 degrees. As the Sea Scout steers the beam to different positions, it transmits a pulse of energy and then waits a defined period of time (depending on the range selected) to receive any return echoes. -
Page 45: Distance Forward
Bait The top picture and resulting screen display shows a boat in 12 feet of water. The Sea Scout’s forward range is set to 40 ft. Notice on the scan picture on the right side of the display, the bottom is just starting to show at about 35 to 40 ft in front. - Page 46 - even if both targets are of identical size. The Sea Scout’s receiver circuit includes a Time Variable Gain (TVG) feature where the receiver’s gain is controlled by the microprocessor and increases in value as the depth or forward range increases.
-
Page 47: Reference Information
Reference Information Phased Array Technology Most existing depthsounders and fishfinders in the marine market use a mature “fixed beam” technology which was originally developed during W.W. II to detect the presence and distance of submarines. Products using this technology usually have a transducer mounted on the rear of the vessel, making contact with the water. - Page 48 In the future, Interphase believes that this multiple fixed- beam approach has serious limitations, especially for use in more advanced products where maximum underwater coverage and resolution are important.
- Page 49 For example, using an 8 element phased array, the Sea Scout is capable of steering the acoustic beam in over 70 different directions. Conventional fixed-beam technology would have required the use of at least 70 transducer elements, each pointed in a different direction. Such a transducer would be much too costly and bulky to be of any practical use in the marine market.
-
Page 50: Maintenance And Factory Reset
Follow the maintenance tips below to ensure that your Sea Scout remains problem free. 1) Keep your Sea Scout clean and dry. Occasionally wipe unit off with a damp cloth, but be careful not to scratch the lens covering the LCD screen. For stubborn dirt, use a mild soap and a damp cloth. NEVER USE SOLVENTS SUCH AS PAINT THINNER, ACETONE, OR GASOLINE TO CLEAN YOUR Sea Scout. -
Page 51: Troubleshooting Guide And Speed Calibration
Troubleshooting Guide If you are experiencing trouble with your Sea Scout, please refer to the following checklist: PROBLEM Unit will not turn on. Unit beeps but no picture appears on the screen. Unit blows fuses. Loses picture at speed. LCD darkens in sunlight after prolonged use. -
Page 52: Interference Problems
Sea Scout display as each suspected source is turned back on. This type of interference can usually be eliminated by moving the Sea Scout away from the source and checking to ensure that the interfering source is properly grounded. -
Page 53: Specifications
Specifications Depth only Transom Transducer Part # T1-I200-028 Display Type: Depth Ranges: Forward Ranges: Transmit Frequency: Zoom Ranges: Pulselength and Sounding Rates: Transmitter Power: Surface Water Temperature: Power Requirements: Dimensions: Standard Equipment: Specifications subject to change without notice. Depth only Thru-Hull Transducer Part # T1-I200-029 128 x 160 pixels;... -
Page 54: How To Obtain Service
Interference Problems. This information solves the most common problems. If problems persist, please call Interphase Technical Service at (831) 477-4944 or send your unit in with the information below filled out. If you do need to return your set, send it to the following address: Service Department Interphase Technologies, Inc. -
Page 55: Warranty
From the second through the fifth year, Interphase will, at its option, repair or replace defective units for a fixed fee. This fee will be set at the beginning of each year.
Need help?
Do you have a question about the Sea Scout and is the answer not in the manual?
Questions and answers