LG AP300A Series Owner's Manual
Hide thumbs
Also See for AP300A Series:
- Owner's manual (24 pages) ,
- Owner's manual (40 pages) ,
- Owner's manual (44 pages)
Table of Contents
Advertisement
Available languages
Available languages
Quick Links
Owner's Manual
Wearable Air Purifier
Read this owner's manual thoroughly before operating the appliance and
keep it handy for reference at all times.
ENGLISH
AP300A Series
MFL71724108
Rev.03_011821
(Only for Philippines)
Imported by:
LG Electronics Philippines Inc.
15 Francisco Legaspi St. Maybunga, Pasig City 1607 Philippines
Copyright © 2020 - 2021 LG Electronics Inc. All rights reserved.
(Only for Malayisia)
DIIMPOT / DIEDAR OLEH:
LG ELECTRONICS (M)SDN BHD.
A-08-01 LEVEL 8 ,BLOCK A ,PJ8,
NO 23 ,JALAN BARAT SEKSYEN 8,
46050 PETALING JAYA,
SELANGOR DARUL EHSAN.
INFO LINE TEL : 1 800 822 822
(Customer Care Line)
www.lg.com
Advertisement
Table of Contents

Related Manuals for LG AP300A Series


Summary of Contents for LG AP300A Series
- Page 1 INFO LINE TEL : 1 800 822 822 (Customer Care Line) (Only for Philippines) Imported by: LG Electronics Philippines Inc. 15 Francisco Legaspi St. Maybunga, Pasig City 1607 Philippines www.lg.com MFL71724108 Rev.03_011821 Copyright © 2020 - 2021 LG Electronics Inc. All rights reserved.
-
Page 2: Table Of Contents
TABLE OF CONTENTS SAFETY PRECAUTIONS OPERATION 03 Using the Product 13 Turning Product On and Adjusting Fan Speed 05 Storing the Product 14 Wearing and Using the Product 05 Battery Safety MAINTENANCE UNPACKING 15 Filter Replacement 06 Components 16 Maintaining the Face Guard 07 Appliance Overview 17 Cleaning the Product 17 Cleaning the Exhaust Unit... -
Page 3: Safety Precautions
• Do not use or charge the product when it is wet. If the product has been submerged, stop using the product and contact an LG Electronics Customer Information Center. • Do not use or store firearms, combustibles or inflammables near the product. - Page 4 • Do not operate this product while driving. • If you detect a strange sound, a chemical or burning smell, or smoke coming from the appliance, discontinue use immediately, and contact an LG Electronics Customer Information Center. • Repair or immediately replace all power cords that have become frayed or otherwise damaged.
-
Page 5: Storing The Product
• Do not store the product in a place where there is a lot of salt. Battery Safety • This product uses an integrated battery. Do not separate or WARNING replace the battery. If the battery is faulty, the product and charging accessories should be replaced by an authorized LG service provider. -
Page 6: Unpacking
UNPACKING Components Main unit Face guard PuriCare Filters(2EA) Inner cover(10EA) Strap Extender Charging cable Portable pouch... -
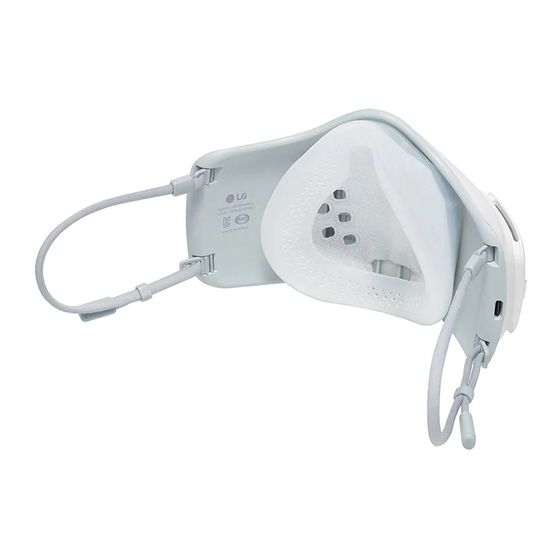
Page 7: Appliance Overview
Appliance Overview Front View Filter case Ear strap Power button/battery indicator light Suction fan Air inlet PuriCare filter Rear View Respiratory sensor Exhaust unit Air inlet Charging unit Face guard Inner Cover... -
Page 8: Assembly
Align the filter cases with the grooves at the front of the product and press the cases in until they click into place. • Make sure to align the filter cases correctly before reassembling. The LG PuriCare logo is on the right filter case. -
Page 9: Assembling The Face Guard
Assembling the Face Guard Slide the 2 hooks at the bottom of the face guard into the slots at the bottom of the product and press to secure. Hook Slot Attach the 2 metal pieces at the top of the face guard to the magnets at the top of the product. -
Page 10: Installing The Inner Cover
Installing the Inner Cover Inner cover insertion location Bottom Remove 1 inner cover from the inner cover packaging. Align the inner cover with the top and bottom as shown, and insert it into the face guard. CAUTION Do not use the Air Purifier without the inner cover installed. Without the inner cover installed, moisture from your breath could enter the Air Purifier and cause it to fail. -
Page 11: Charging
CHARGING Charging the Battery This product has a built-in battery. Charge the battery fully before using the Air Purifier by connecting the USB cable to an AC adapter. The adapter is sold separately. • The battery will begin charging when the USB cable is connected from the product to an electrical outlet. - Page 12 CAUTION • The appliance must only be supplied at safety extra low voltage corresponding to the marking on the appliance from an AC adapter (5 V, 1.8 A).The AC adapter should be purchased separately. Using an unapproved charger may cause failure or variation in the charging time.
-
Page 13: Operation
OPERATION Turning Product On and Adjusting Fan Speed Power button Press the Power button to turn the product on. Change the fan speed to suit your requirements. • Press the Power button once to turn the product on with the fan speed set to Low. -
Page 14: Wearing And Using The Product
If you find the ear straps uncomfortable, use the strap extender to reduce the tension around your ears. • Attach the strap extender so that the LG PuriCare logo and the hooks face out. • Adjust the ear straps as needed to keep the Air Purifier comfortably in place. -
Page 15: Maintenance
• Do not wash the filter with water. Doing so damages the filter. • The filter replacement period may vary depending on the operating environment. • Purchase new filters by calling an LG Electronics Customer Information Center or visiting the www.lg.com website. -
Page 16: Maintaining The Face Guard
Maintaining the Face Guard Separating the Face Guard Separate the face guard from the product by pulling on the top of the face guard. Cleaning the Face Guard After removing the face guard from the product, clean it with a swab or soft cloth moistened with alcohol or clean water. -
Page 17: Cleaning The Product
Cleaning the Product Use a soft, damp cloth to wipe the surface of the product clean. CAUTION Do not allow water to get inside the product. Doing so could cause product failure, fire, or electric shock. Cleaning the Exhaust Unit Wipe the exhaust unit with a cotton swab soaked with water or alcohol and then wipe it dry using a dry cotton swab. -
Page 18: Maintaining The Ear Straps
Maintaining the Ear Straps Replacing the Ear Straps Fold the ear straps and ear strap hooks toward the inside of the product. Lift one side of the ear strap hook up to separate the ear strap. To assemble new ear straps, fold the ear strap hooks toward the inside of the product and slide the ends of the ear straps into the grooves in the ear strap hooks. -
Page 19: Troubleshooting
TROUBLESHOOTING Before Calling for Service If a failure occurs in the product, check the following before contacting the Service Center. Symptoms Solution • The battery is discharged or needs to be replaced. See Charging the Battery. The appliance does not operate. -
Page 20: Appendix
APPENDIX Product Specifications Appearance and specifications may vary without notice in order to improve the quality of this product. Product 1.8 A (AC adapter) Power Built-in rechargeable battery Power Input 1.8 W Dimensions (W*D*H) 156 mm × 63 mm × 110 mm Recommended operating °C °C... - Page 21 PT. LG ELECTRONICS SERVICE INDONESIA (Address) Alamat : Jalan Panglima Polim Raya Nomor 69, Kel. Melawai, Kec. Kebayoran Baru, Kota Adm. Jakarta Selatan, Prov. DKI Jakarta 12160 www.lg.com Hak Cipta © 2020 - 2021 LG Electronics Inc. Semua Hak Cipta Dilindungi Undang-Undang.
- Page 22 DAFTAR ISI TINDAKAN PENCEGAHAN PENGOPERASIAN UNTUK KESELAMATAN 13 Menyalakan Produk dan Menyesuai- 03 Penggunaan Produk kan Kecepatan Kipas 05 Penyimpanan Produk 14 Mengenakan dan Menggunakan Produk 05 Keselamatan Baterai PEMELIHARAAN MEMBUKA KEMASAN 15 Penggantian Filter 06 Komponen 16 Pemeliharaan Pelindung Wajah 07 Tinjauan Alat 17 Membersihkan Produk 17 Membersihkan Unit Pembuangan...
- Page 23 • Jangan menggunakan atau mengisi daya pada produk jika ba- sah. Jika produk telah direndam, hentikan penggunaan produk dan hubungi Pusat Informasi Pelanggan LG Electronics. • Jangan menyimpan produk di dekat senjata api, bahan mudah terbakar, atau bahan mudah meledak.
- Page 24 • Jika Anda mendeteksi suara aneh, bau bahan kimia atau terbakar, atau asap yang keluar dari alat, segera hentikan penggunaan alat, dan hubungi Pusat Informasi Pelanggan LG Electronics. • Segera lakukan perbaikan atau ganti semua kabel daya yang putus atau rusak. Jangan menggunakan kabel yang terlihat rusak retak atau tergores di sepanjang kabel atau di bagian ujung manapun.
- Page 25 • Jangan menyimpan produk di tempat yang terdapat ban- yak garam. Keselamatan Baterai • Produk ini menggunakan baterai yang terintegrasi. Jangan PERINGATAN melepaskan atau mengganti baterai. Jika baterai bermasa- lah, produk dan aksesori pengisi daya harus diganti oleh Pusat Informasi Pelanggan LG Electronics.
- Page 26 MEMBUKA KEMASAN Komponen Unit utama Pelindung wajah Filter PuriCare (2EA) Penutup bagian dalam (10EA) Ekstensi Tali Kabel pengisi daya Kantong portabel...
- Page 27 Tinjauan Alat Tampak Depan Wadah filter Tali telinga Tombol daya/lampu indikator baterai Kipas isapan Inlet udara Filter PuriCare Tampak Belakang Sensor pernapasan Unit pembuangan Inlet udara Unit pengisi daya Pelindung wajah Penutup bagian dalam...
- Page 28 • Pastikan untuk menyejajarkan wadah filter dengan benar sebelum merakit ulang. Logo LG PuriCare berada di sebelah kanan wadah filter. CATATAN • Jangan menekan bagian tengah Filter PuriCare terlalu keras saat memasang filter.
- Page 29 Perakitan Pelindung Wajah Masukkan 2 kaitan di bagian dasar pelindung wajah ke dalam selot di bagian dasar produk dan pasang dengan menekan untuk mengunci di posisinya. Kait Selot Pasang 2 bagian logam di bagian atas pelindung wajah ke unit magnet pada bagian atas produk.
- Page 30 Memasang Penutup Bagian Dalam Atas Lokasi masuk Penutup bagian dalam Bawah Lepaskan 1 penutup bagian dalam dari kemasan penutup bagian dalam. Sejajarkan penutup bagian dalam dengan bagian atas dan bawah seperti ditunjukkan, dan masukkan ke dalam pelindung wajah. WASPADA Jangan menggunakan Pembersih Udara tanpa terpasang penutup bagian dalam, kelembapan dari pernapasan dapat masuk ke Pembersih Udara dan menyebabkan kegagalan.
- Page 31 PENGISIAN DAYA Mengisi Baterai Produk ini memiliki baterai tanam. Isi daya baterai secara penuh sebelum menggu- nakan Pembersih Udara dengan cara menyambungkan kabel USB ke adaptor AC. Adaptor dijual terpisah. • Baterai akan mulai terisi saat kabel USB tersambungkan dari produk ke stopkon- tak listrik.
- Page 32 WASPADA • Alat harus disuplai dengan tegangan listrik sangat rendah dari adaptor AC yang sesuai dengan yang tertulis pada alat (5 V, 1.8 A). Adaptor AC harus dibeli se- cara terpisah. Menggunakan pengisi daya yang tidak disetujui dapat menyebab- kan kegagalan atau variasi dalam waktu pengisian. • Alat ini memiliki baterai yang tidak dapat diganti.
- Page 33 PENGOPERASIAN Menyalakan Produk dan Menyesuaikan Kecepatan Kipas Tombol daya Tekan tombol Daya untuk menyalakan produk. Atur kecepatan kipas sesuai dengan kebutuhan Anda. • Tekan tombol Daya satu kali untuk menyalakan produk dengan kecepatan kipas rendah. Tekan tombol Daya berulang kali untuk mengatur kecepatan kipas dari Rendah >...
- Page 34 Jika menurut Anda tali telinga tidak nyaman dipakai, gunakan ekstensi tali untuk mengurangi tingkat ketegangan di sekeliling telinga Anda. • Pasang ekstensi telinga sehingga logo LG PuriCare dan kaitnya menghadap keluar. • Atur tali telinga seperlunya untuk menjaga Pembersih Udara tetap nyaman di kenakan.
- Page 35 Inner cover CATATAN • Jangan mencuci filter menggunakan air. Melakukannya dapat merusak filter. • Periode penggantian filter mungkin berbeda tergantung pada lingkungan pengoperasian. • Silakan membeli filter baru dengan menelepon Pusat Informasi Pelanggan LG Electronics atau kunjungi situs web www.lg.com.
- Page 36 Pemeliharaan Pelindung Wajah Memisahkan Pelindung Wajah Pisahkan pelindung wajah dari produk dengan menarik pada bagian atas pelindung wajah. Cleaning the Face Guard Setelah melepaskan pelindung wajah dari produk, bersihkan mengguna- kan kapas pembersih telinga atau kain lembut yang dibasahi dengan air atau alkohol.
- Page 37 Membersihkan Produk Gunakan kain lembut yang lembap untuk mengusap produk hingga bersih. WASPADA Jangan biarkan air berada di dalam produk. Karena dengan demikian produk dapat mengalami kegagalan, kebakaran, atau sengatan listrik. Membersihkan Unit Pembuangan Usap unit pembuangan menggunakan kapas pembersih telinga yang dibasahi den- gan air atau alkohol dan kemudian usap menggunakan kapas pembersih telinga yang kering.
- Page 38 Pemeliharaan Tali Telinga Penggantian Tali Telinga Lipat tali telinga dan kait tali telinga ke arah bagian dalam dari produk. Angkat satu sisi kait tali telinga untuk memisahkan tali telinga. Untuk merakit tali telinga yang baru, lipat kait tali telinga ke arah bagian dalam produk dan geser ujung tali telinga ke dalam alur di dalam kait tali telinga.
- Page 39 PENYELESAIAN MASALAH Sebelum Menghubungi Bagian Servis Jika kerusakan muncul pada produk, cek hal berikut sebelum menghubungi Pusat Layanan. Gejala Solusi • Baterai dalam keadaan kosong atau perlu diganti. Lihat Mengisi Baterai. Alat tidak beroperasi. • Temperatur ambien terlalu rendah atau terlalu tinggi. Periksa temperatur ambien.
- Page 40 LAMPIRAN Spesifikasi Produk Tampilan dan spesifikasi mungkin berbeda tanpa pemberitahuan terlebih dahulu untuk meningkatkan kualitas produk ini. Product 1.8 A (Adaptor AC) Daya listrik Baterai tertanam yang dapat diisi ulang Power input 1.8 W Dimensi (P*L*T) 156 mm × 63 mm × 110 mm Rentang temperatur -20 ℃...
- Page 41 เครื ่ อ งใช ้ ไ ฟฟ ้ า และเก็ บ ไว้ ใ นที ่ ท ี ่ เ ข้ า ถึ ง ง่ า ยเพื ่ อ ใช ้ ส � า หร ับอ้ า งอิ ง ได้ ท ุ ก เวลา ภาษาไทย ซ ี ร ี ส ์ AP300A www.lg.com Copyright © 2020 - 2021 LG Electronics Inc. All rights reserved ศู น ย์ บ ริ ก ารข ้อมู ล แอลจี โทร. 02-878-5757...
- Page 42 สารบั ญ การใช ้ ง าน ข้ อ ควรระว ัง เพื ่ อ ความปลอดภ ัย 03 การใช ้ ผลิ ต ภั ณ ฑ์ 13 การเปิ ด ผลิ ต ภั ณ ฑ์ แ ละการปรั บ ความเร็ ว พั ด ลม 05 การจั ด เก็ บ ผลิ ต ภั ณ ฑ์ 14 การสวมใส...
- Page 43 • ห ้ามใช ้ หรื อ ชาร์ จ ผลิ ต ภั ณ ฑ์ เ มื ่ อ เปี ย ก หากผลิ ต ภั ณ ฑ์ จ มอยู ่ ใ ต ้น� ้ า ให ้ หยุ ด ใช ้ ผลิ ต ภั ณ ฑ์ และติ ด ต่ อ ศู น ย์ ข ้อมู ล ลู ก ค ้า LG Electronics...
- Page 44 ควั น ที ่ ม าจากเครื ่ อ งใช ้ ไฟฟ้ า ให ้หยุ ด ใช ้ งานทั น ที แ ละติ ด ต่ อ ศู น ย์ ข ้อมู ล ลู ก ค ้า LG Electronics • ให ้ท� า การซ ่ อ มแซม หรื อ เปลี ่ ย นสายไฟทั ้ ง หมดที ่ ห ลุ ด ลุ ่ ย หรื อ เส ี ย...
- Page 45 แบตเตอรี ่ ม ี ป ั ญ หา ควรเปลี ่ ย นผลิ ต ภั ณ ฑ์ แ ละอุ ป กรณ์ เ สริ ม การชาร์ จ โดยผู ้ให ้บริ ก าร LG ที ่ ไ ด ้รั บ อนุ ญ าต...
- Page 46 การแกะบรรจุ ภ ัณฑ์ ส ่ ว นประกอบ ส ่ ว นประกอบหลั ก กรอบครอบจมู ก PuriCare ฟิ ล เตอร์ ฝาครอบด ้านใน (10 ช ิ ้ น ) (2 แผ่ น ) ตั ว ขยายสายคล ้อง สายชาร์ จ กระเป๋ าพกพา...
- Page 47 ภาพรวมของเครื ่ อ งใช ้ ไ ฟฟ ้ า มุ ม มองด้ า นหน้ า กล่ อ งแผ่ น กรอง สายคล ้องหู ปุ่ มเปิ ด ปิ ด /ไฟแสดงสถานะแบตเตอรี ่ พั ด ลมดู ด อากาศ ช ่ อ งอากาศเข ้า PuriCare ฟิ ล เตอร์ มุ...
- Page 48 • ตรวจสอบให ้แน่ ใ จว่ า ได ้จั ด ต� า แหน่ ง กล่ อ งแผ่ น กรองให ้ถู ก ต ้องก่ อ นที ่ จ ะประกอบกลั บ เข ้าไปใหม่ โลโก ้ LG PuriCare ควรอยู ่ ท างด ้านขวาของกล่ อ งแผ่ น กรอง...
- Page 49 การประกอบกรอบครอบจมู ก เลื ่ อ นขอยึ ด ทั ้ ง 2 ขอที ่ ด ้านล่ า งของกรอบครอบจมู ก เข ้าไปในร่ อ งยึ ด ที ่ ด ้านล่ า งของ ผลิ ต ภั ณ ฑ์ และกดให ้แน่ น ขอ ร่ อ ง ติ...
- Page 50 การติ ด ต ั ้ งฝาครอบด้ า นใน ด้ า นบน ฝาครอบ ด้ า นใน ต� า แหน่ ง สอด ด้ า นล่ า ง ถอดฝาครอบด ้านใน 1 ช ิ ้ น ออกจากบรรจุ ภ ั ณ ฑ์ จั ด แนวฝาครอบด ้านในให ้ตรงกั บ ด ้านบนและด ้านล่ า งตามที ่ แ สดง แล ้วสอดเข ้าไป ในกรอบครอบจมู...
- Page 51 การชาร์ จ การชาร์ จ แบตเตอรี ่ ผลิ ต ภั ณ ฑ์ น ี ้ ม ี แ บตเตอรี ่ ใ นตั ว ชาร์ จ แบตเตอรี ่ ใ ห ้เต็ ม ก่ อ นใช ้ งาน หน ้ากากฟอกอากาศ โดยเช ื ่ อ มต่ อ สาย USB เข ้ากั บ อะแดปเตอร์ AC ตั...
- Page 52 ข ้อควรระว ั ง • ตั ว อุ ป กรณ์ ใ ช ้ เช ื ่ อ มต่ อ กั บ แรงดั น ไฟต� ่ า และเพื ่ อ ความปลอดภั ย ควรเลื อ กใช ้ ตั ว แปลงไฟหรื อ อะแดปเตอร์ AC ที ่ ม ี ค ่ า แรงดั น ไฟตามที ่ ก � า หนดเท่ า นั ้ น (5 V , 1.8 A) ตั ว แปลงไฟ หรื อ อะ แดปเตอร์...
- Page 53 การใช ้ ง าน การเปิ ดผลิ ต ภ ัณฑ์ แ ละการปร ับความเร็ ว พ ัดลม ปุ ่ ม เปิ ด ปิ ด กดปุ่ มเปิ ด ปิ ด เพื ่ อ เปิ ด ผลิ ต ภั ณ ฑ์ เปลี ่ ย นความเร็ ว พั ด ลมให ้เหมาะกั บ ความต ้องการของคุ ณ •...
- Page 54 • กล่ อ งแผ่ น กรอง ตั ว ขยายสายคล ้อง และสายคล ้องหู ส � า หรั บ การเปลี ่ ย นนั ้ น มี พ ร ้อมจ� า หน่ า ย ได ้ได ้นโทรไปที ศ ู น ย์ ข ้อมู ล ลู ก ค ้า LG Electronics หรื อ เข ้าเยี ่ ย มชมเว็ บ ไซต์ LG Electron-...
- Page 55 • ระยะเวลาการเปลี ่ ย นแผ่ น กรองอาจแตกต่ า งกั น ไปขึ ้ น อยู ่ ก ั บ สภาพแวดล ้อมใน การใช ้ งาน • ซ ื ้ อ แผ่ น กรองใหม่ โ ดยโทรไปที ่ ศ ู น ย์ ข ้อมู ล ลู ก ค ้า LG Electronics หรื อ ไปที ่ เ ว็ บ ไซต์ lg.com...
- Page 56 การดู แ ลร ักษากรอบครอบจมู ก การแยกกรอบครอบจมู ก ถอดกรอบครอบจมู ก ออกจากผลิ ต ภั ณ ฑ์ โ ดยดึ ง ที ่ ด ้านบนของกรอบครอบจมู ก การท� า ความสะอาดกรอบครอบจมู ก หลั ง จากถอดกรอบครอบจมู ก ออกจากผลิ ต ภั ณ ฑ์ แ ล้ ว ให้ ท � า ความสะอาดด้ ว ยก้ า น ส�...
- Page 57 การท� า ความสะอาดผลิ ต ภ ัณฑ์ ใช ้ ผ ้านุ ่ ม หมาดเช ็ ด พื ้ น ผิ ว ของผลิ ต ภั ณ ฑ์ ใ ห ้สะอาด ข ้อควรระว ั ง อย่ า ให ้น� ้ า เข ้าไปในผลิ ต ภั ณ ฑ์ การท� า เช ่ น นั ้ น อาจท� า ให ้ผลิ ต ภั ณ ฑ์ ข ั ด ข ้อง ไฟไหม ้ หรื อ ไฟฟ้ า ช...
- Page 58 การดู แ ลร ักษาสายคล้ อ งหู การเปลี ่ ย นสายคล้ อ งหู พั บ สายคล ้องหู แ ละขอเกี ่ ย วสายคล ้องหู เ ข ้าหาด ้านในของผลิ ต ภั ณ ฑ์ ยกด ้านหนึ ่ ง ของขอเกี ่ ย วสายคล ้องหู ข ึ ้ น เพื ่ อ ถอดสายคล ้องหู ในการประกอบสายคล...
- Page 59 การแก้ ป ั ญ หา ก่ อ นที ่ จ ะติ ด ต่ อ ขอร ับบริ ก าร หากเกิ ด ข ้อผิ ด พลาดขึ ้ น กั บ ผลิ ต ภั ณ ฑ์ ให ้ท� า การตรวจสอบต่ อ ไปนี ้ ก่ อ นที ่ จ ะติ ด ต่ อ กั บ ศู น ย์ บริ...
- Page 60 ภาคผนวก ข้ อ มู ล จ� า เพาะของผลิ ต ภ ัณฑ์ ลั ก ษณะภายนอกและข ้อมู ล จ� า เพาะอาจมี ก ารเปลี ่ ย นแปลงโดยไม่ ม ี ก ารแจ ้งให ้ทราบล่ ว งหน ้า เพื ่ อ การปรั บ ปรุ ง คุ ณ ภาพของผลิ ต ภั ณ ฑ์ น ี ้ ผลิ...
- Page 61 บ ันทึ ก...
- Page 62 บ ันทึ ก...
- Page 63 บ ันทึ ก...
Need help?
Do you have a question about the AP300A Series and is the answer not in the manual?
Questions and answers