Advertisement
Quick Links
Imported by Amart Furniture Pty Ltd, Qld, Brisbane Australia.
For any assistance with assembly or for missing parts please phone
Amart Furniture, Customer Service Free call 1800 351 084
ASSEMBLY INSTRUCTION
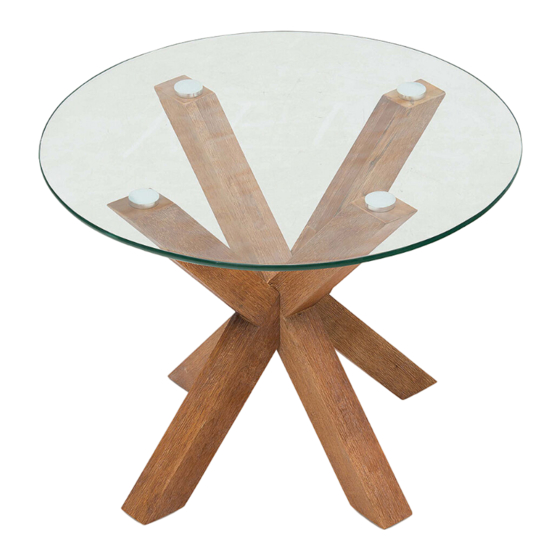
PROMENADE LAMP TABLE
ITEM CODE 62056
Imported by Amart Furniture Pty Ltd, Qld, Brisbane Australia.
For any assistance with assembly or for missing parts please
phone Amart Furniture, Customer Service Free call 1800 351
084
1
ITEM CODE 62056
Advertisement

Subscribe to Our Youtube Channel
Related Manuals for Amart Furniture 62056


Summary of Contents for Amart Furniture 62056
- Page 1 ASSEMBLY INSTRUCTION PROMENADE LAMP TABLE ITEM CODE 62056 Imported by Amart Furniture Pty Ltd, Qld, Brisbane Australia. For any assistance with assembly or for missing parts please phone Amart Furniture, Customer Service Free call 1800 351 Imported by Amart Furniture Pty Ltd, Qld, Brisbane Australia.
-
Page 2: Before You Start
4.Always read the assembly instructions carefully before beginning assembly. 5.Keep all hardware parts and packaging out of reach of small children. 6.Do not over tighten the screws and bolts as this may damage the threads ALLOW 20 MINITES 2 PEOPLE REQUIRED TOOLS REQUIRED ITEM CODE 62056... -
Page 3: Parts List
PARTS LIST GLASS TABLE TOP X-LEG WITH ADJUSTABLE FEET V-LEG WITH ADJUSTABLE FEET ITEM CODE 62056... - Page 4 • Insert the dowel on the V-leg(3) into the X-leg(2). • Attache the X-leg (2)&V-leg(3) using bolt(D)、lock washer(F) and flat washer (E). • Tighten with allen key(G). ITEM CODE 62056...
- Page 5 • Attach the two V-leg with the connection(H) using screw (I). • Use Screwdriver or Power Drill on Low Speed. ITEM CODE 62056...
- Page 6 • Put the bolt (C)into the aluminium plate(B). • Then attach the aluminium plate(B) and the X-leg(2) &V- leg (3)with the bolt(C) NOTE: Peel and adhere the sticky side of the silicone plate (A) to the flat side of the aluminium plate (B) ITEM CODE 62056...
- Page 7 • Put the glass top on the legs. • Rotate the bottom adjustable feet to make the table level. ITEM CODE 62056...
- Page 8 As wall materials vary greatly, the fastener required to fix this product to a wall is not included. If unsure, consult your local hardware store for advise on wall fixings which would be suitable for your situation. ITEM CODE 62056...
- Page 9 STEP 2: Put plastic string into bracket . ITEM CODE 62056...
- Page 10 STEP 3: Fix bracket onto the ground using screws M4*30MM. Join ground and the lamp table leg with plastic sting . ITEM CODE 62056...
- Page 11 3.Move the furniture into its final position. Thread a strap through the bracket as shown in the illustration, tighten strap until snug. Do not over tighten. 4.Make sure the bracket is firmly attached to the ground and furniture, and the strap is snug. ITEM CODE 62056...
- Page 12 ASSEMBLY IS COMPLETE ITEM CODE 62056...
-
Page 13: Product Care
• Do not allow plastic to come in direct contact with your furniture. Chemicals in the plastic of placemats etc. may soften and mark the finish if left in contact with the furniture for a period of time ITEM CODE 62056...
Need help?
Do you have a question about the 62056 and is the answer not in the manual?
Questions and answers