
Subscribe to Our Youtube Channel
Related Manuals for FS TA1910-4GVC-W


Summary of Contents for FS TA1910-4GVC-W
- Page 1 TA1910-4GVC-W GPON/EPON ONU GPON/EPON ONU GPON/EPON ONU Quick Start Guide V1.0 Quick Start Anleitung Guide de Démarrage Rapide...
- Page 2 Introduction Thank you for choosing TA1910-4GVC-W integrated broadband access device. This guide is designed to familiarize you with the layout of the device and describes how to deploy the device in your network. PWR PON LOS FXS1 FXS2 LAN1 LAN2 LAN3 LAN4 2.4G...
-
Page 3: Hardware Overview
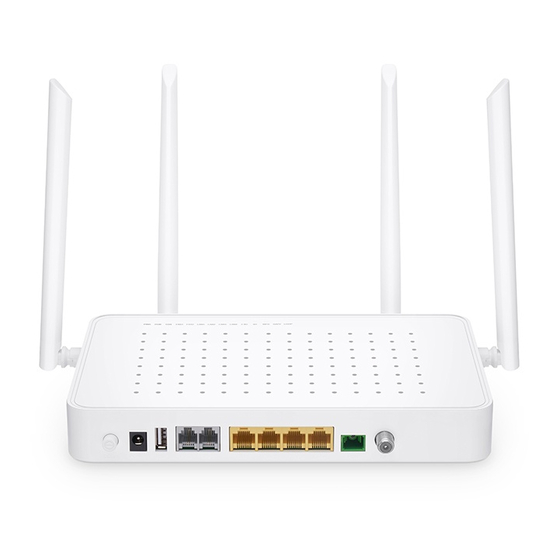
Hardware Overview Front Panel Ports PWR PON LOS FXS1 FXS2 LAN1 LAN2 LAN3 LAN4 2.4G WPS CATV LOOP 2x TEL 4x LAN PON RF Port Description A USB management port for software, configuration backup and offline software upgrade Connect the telephone Connect the computer or network television Realize the access of GPON ONU Radio-frequency signal transmission... -
Page 4: State Description
LEDs State Description On: The system is powered on normally. Power Green Off: The system is not powered on. Off: The ONU is not activated. PON state Green On: The ONU has been activated. Flicker: The ONU is being activated. Off: The optical power is received normally. -
Page 5: Installation Requirements
Installation Requirements Make sure the device is put on a horizontal and flat surface. To avoid thunder-strike, disconnect all power cords from the power supply and all cables in thunder and rainy days. Make sure that the installation site is well-ventilated, the heat of electrical devices is well-discharged and sufficient air circulation is provided for device cooling. -
Page 6: Connecting The Usb Port
Connecting the USB port 1. Insert the Universal Serial Bus(USB) flash disk to the USB port for software and configuration backup and offline software upgrade. Connecting the TEL Port PWR PON LOS FXS1 FXS2 LAN1 LAN2 LAN3 LAN4 2.4G WPS CATV LOOP Connecting the TEL port to a telephone with a cable. -
Page 7: Connecting The Lan Port
Connecting the LAN Port Connecting the LAN port to a computer or a network television with a network cable. Connecting the PON port GPON 1. Insert a Stick ONU module into the PON port of the GPON. 2. Connect the Stick ONU module to an optical splitter with a single-mode SC optical fiber cable. 3. -
Page 8: Computer Setting
Connecting the RF Port PWR PON LOS FXS1 FXS2 LAN1 LAN2 LAN3 LAN4 2.4G WPS CATV LOOP Connecting the RF port to a cable television with a network cable. Configuring the GPON Computer Setting Step 1: Click “Start-Control Panel-Network and Internet-Network and Sharing Center-Local Area Connection”, select “Local Area Connection”, and click “Properties”... - Page 9 Step 2: Double click “Internet Protocol 4 (TCP/IPV4)” as shown in the following figure: Ethernet Properties Networking Sharing Connect using: Realtek PCle GBE Family Controller Configure... This connection uses the following items: QoS Packet Scheduler Microsoft Network Adapter Multiplexor Protocol Microsoft LLDP Protocol Driver Link-Layer Topology Discovery Mapper I/O Driver Link-Layer Topology Discovery Responder...
-
Page 10: Wizard Setting
Wizard Setting Step 1: Open the web browser, for instance: Google Chrome or Microsoft Edge. Step 2: Enter 192.168.123.1 in the address bar and click “Enter” to the web interface. Then enter the UserName (user by default) and Password (123456 by default) respectively in the interface UserLogin. -
Page 11: System Setting
Step 4: Click “WLAN” in “Network” to select whether to enable wireless. And you can also modify the wireless name, authentication mode and password. Admin Status WLAN Service WLAN Basic Settings wlan0 (2.4GHz) This page is used to configure the parameters for WLAN clients which may connect to your Access Point. Here you may change wireless encryption settings as well as wireless network parameters. -
Page 12: Network And Sharing Center
Step 2: Click “Wireless Network Connection”. Network and Sharing Center Net... Network and Sharing Cen... Search Control Panel << View your basic network information and set up connections Control Panel Home View your active networks Change adapter settings Access type: Internet HGU-6E78 Change advanced sharing... -
Page 13: Troubleshooting
Step 4: Enter the password and click “OK”. Connect to a Network Type the network security key ········ Security key: Hide Characters Cancel Troubleshooting WiFi Has signal on the PC but it cannot connect to the Internet. 1. Check whether the WiFi name is the same with SSID of the wireless router; 2. -
Page 14: Online Resources
5. Check whether there is wireless signal if keeping the PC closer to the wireless router. 6. Retry to connect other wireless adapter card if the above solutions are unsatisfactory. If not, reset the wireless router. Online Resources Download https://www.fs.com/products_support.html Help Center https://www.fs.com/service/fs_support.html Contact Us https://www.fs.com/contact_us.html... - Page 15 Einführung Vielen Dank, dass Sie sich für das integrierte Breitbandzugangsgerät TA1910-4GVC-W entschieden haben. Diese Anleitung soll Sie mit dem Aufbau des Geräts vertraut machen und erklärt, wie Sie es in Ihrem Netzwerk einsetzen. PWR PON LOS FXS1 FXS2 LAN1 LAN2 LAN3 LAN4 2.4G...
- Page 16 Hardware-Übersicht Ports an der Vorderseite PWR PON LOS FXS1 FXS2 LAN1 LAN2 LAN3 LAN4 2.4G WPS CATV LOOP 2x TEL 4x LAN PON RF Port Beschreibung Ein USB-Verwaltungsport für Software, Konfigurationsbackups und Offline-Software-Upgrades Verbindet das Telefon Verbindet den Computer oder den Netzwerkfernseher Ermöglicht den Zugang von GPON ONU Übertragung von Hochfrequenzsignalen LEDs an der Oberseite...
- Page 17 Status Beschreibung Ein: Das System ist normal eingeschaltet. Strom Grün Aus: Das System ist nicht eingeschaltet. Aus: Die ONU ist nicht aktiviert. PON Zustand Grün Ein: Die ONU ist aktiviert. Blinken: Die ONU wird aktiviert. Aus: Die optische Leistung wird normal empfangen. Optisches Blinken: Die empfangene optische Leistung ist niedriger als der Signal...
-
Page 18: Installation
Installationsanforderungen Achten Sie darauf, dass das Gerät auf einer horizontalen und ebenen Fläche aufgestellt wird. Ziehen Sie bei Gewitter und Regen alle Netzkabel aus der Steckdose, um einen Blitzschlag zu vermeiden. Stellen Sie sicher, dass der Aufstellungsort gut belüftet ist, die Wärme der elektrischen Geräte gut abgeleitet wird und eine ausreichende Luftzirkulation zur Kühlung des Geräts gewährleistet ist. - Page 19 Anschließen des USB-Ports 1. Stecken Sie die Universal Serial Bus (USB)-Flash-Disk in den USB-Port ein, um die Software und die Konfiguration zu sichern und die Software offline zu aktualisieren. Anschließen des TEL-Ports PWR PON LOS FXS1 FXS2 LAN1 LAN2 LAN3 LAN4 2.4G WPS CATV LOOP Anschließen des TEL-Anschlusses an ein Telefon mit einem Kabel.
- Page 20 Anschließen des LAN-Ports Anschließen des LAN-Ports an einen Computer oder ein Netzwerkfernsehgerät mit einem Netzwerkkabel. Anschließen des PON-Ports GPON 1. Stecken Sie ein ONU-Stick-Modul in den PON-Port des GPONs. 2. Verbinden Sie das ONU-Stick-Modul mit einem optischen Splitter über ein Singlemode-SC- Glasfaserkabel.
- Page 21 Anschließen des RF-Ports PWR PON LOS FXS1 FXS2 LAN1 LAN2 LAN3 LAN4 2.4G WPS CATV LOOP Anschließen des RF-Ports an ein Kabelfernsehgerät mit einem Netzwerkkabel. Konfigurieren des GPONs Computer-Einstellungen Schritt 1: Klicken Sie auf "Start - Control Panel - Network and Internet - Network and Sharing Center - Local Area Connection", wählen Sie "Local Area Connection", und klicken Sie auf "Properties".
- Page 22 Schritt 2: Doppelklicken Sie auf "Internet Protocol 4 (TCP/IPV4)", wie in der folgenden Abbildung gezeigt: Ethernet Properties Networking Sharing Connect using: Realtek PCle GBE Family Controller Configure... This connection uses the following items: QoS Packet Scheduler Microsoft Network Adapter Multiplexor Protocol Microsoft LLDP Protocol Driver Link-Layer Topology Discovery Mapper I/O Driver Link-Layer Topology Discovery Responder...
- Page 23 Einstellung des Assistenten Schritt 1: Öffnen Sie den Webbrowser, zum Beispiel: Google Chrome oder Microsoft Edge. Schritt 2: Geben Sie 192.168.123.1 in die Adressleiste ein und klicken Sie auf "Enter", um das Webinterface zu öffnen. Geben Sie dann den Benutzernamen (standardmäßig user) und das Passwort (standardmäßig 123456) in der Interface UserLogin ein.
-
Page 24: Passwort Ändern
Schritt 4: Klicken Sie unter "Network" auf "WLAN", um auszuwählen, ob Sie das WLAN aktivieren möchten. Sie können auch den WLAN-Namen, den Authentifizierungsmodus und das Passwort ändern. Admin Status WLAN Service WLAN Basic Settings wlan0 (2.4GHz) This page is used to configure the parameters for WLAN clients which may connect to your Access Point. Here you may change wireless encryption settings as well as wireless network parameters. -
Page 25: Network And Sharing Center
Schritt 2: Klicken Sie auf "Wireless Network Connection". Network and Sharing Center Net... Network and Sharing Cen... Search Control Panel << View your basic network information and set up connections Control Panel Home View your active networks Change adapter settings Access type: Internet HGU-6E78... -
Page 26: Fehlersuche
Schritt 4: Geben Sie das Passwort ein und klicken Sie auf "OK". Connect to a Network Type the network security key ········ Security key: Hide Characters Cancel Fehlersuche Der PC hat ein WiFi-Signal, kann sich aber nicht mit dem Internet verbinden. - Page 27 5. Prüfen Sie, ob ein WLAN-Signal vorhanden ist, wenn Sie den PC näher an den WLAN-Router halten. 6. Versuchen Sie erneut, eine andere drahtlose Adapterkarte anzuschließen, wenn die oben genannten Lösungen nicht zufriedenstellend sind. Falls nicht, setzen Sie den WLAN-Router zurück. Online Resourcen Download https://www.fs.com/de/products_support.html Hilfecenter https://www.fs.com/de/service/fs_support.html https://www.fs.com/de/contact_us.html Kontakt Produktgarantie Garantie: Für die GPON ONU gilt eine beschränkte Garantie von 1 Jahr auf Material- und...
- Page 28 Introduction Nous vous remercions d'avoir choisi le dispositif d'accès à large bande intégré TA1910-4GVC-W. Ce guide est conçu pour que vous puissez vous familiariser avec la configuration de l'appareil et décrit comment procéder à son déploiement. PWR PON LOS FXS1 FXS2 LAN1 LAN2 LAN3 LAN4 2.4G...
-
Page 29: Aperçu Du Matériel
Aperçu du Matériel Ports du Panneau Frontal PWR PON LOS FXS1 FXS2 LAN1 LAN2 LAN3 LAN4 2.4G WPS CATV LOOP 2x TEL 4x LAN PON RF Port Description Un port de gestion USB pour le logiciel, la sauvegarde de la configuration et la mise à... - Page 30 Statut Description Allumé : Le système est alimenté normalement. Power Vert Éteint : Le système n'est pas sous tension. Éteint : ONU desactivée. Statut PON Vert Allumé : ONU activée. Clignotement : ONU en cours d'activation. Éteint : Le signal optique est reçu normalement. Signal Rouge Clignotement : Le signal optique reçu est inférieur au seuil du...
-
Page 31: Exigences D'installation
Exigences d'Installation Assurez-vous que l'appareil est posé sur une surface horizontale et plate. Pour éviter tout dommage en cas de coup de tonnerre, débranchez tous les câbles de l'alimentation électrique durant les orages. Assurez-vous que le site d'installation est bien ventilé, que la chaleur des appareils électriques est bien évacuée et qu'une circulation d'air suffisante est prévue pour le refroidissement des appareils. - Page 32 Connexion du Port USB 1. Insérez le Dispositif USB (Universal Serial Bus) dans le port USB pour la sauvegarde du logiciel, la configuration et la mise à jour du logiciel hors ligne. Connexion du Port TEL PWR PON LOS FXS1 FXS2 LAN1 LAN2 LAN3 LAN4 2.4G WPS CATV LOOP Connecter un téléphone au port TEL avec un câble.
- Page 33 Connexion du Port LAN Connecter avec un cable réseau le port LAN à un ordinateur ou à un téléviseur réseau. Connexion du Port PON GPON 1. Insérez un module Stick ONU dans le port PON du GPON. 2. Connectez le module Stick ONU à un répartiteur optique avec un câble à fibre optique SC monomode.
- Page 34 Connexion du Port RF PWR PON LOS FXS1 FXS2 LAN1 LAN2 LAN3 LAN4 2.4G WPS CATV LOOP Connexion du port RF à une télévision câblée avec un câble réseau. Configuration du GPON Paramétrage de l'Ordinateur Étape 1 : Cliquez sur « Start-Control Panel-Network and Internet-Network and Sharing Center-Local Area Connection »...
- Page 35 Étape 2 : Double-clique sur « Internet Protocol 4 (TCP/IPV4) » comme indiqué dans la figure suivante : Ethernet Properties Networking Sharing Connect using: Realtek PCle GBE Family Controller Configure... This connection uses the following items: QoS Packet Scheduler Microsoft Network Adapter Multiplexor Protocol Microsoft LLDP Protocol Driver Link-Layer Topology Discovery Mapper I/O Driver Link-Layer Topology Discovery Responder...
- Page 36 Réglage de l'Assistant Étape 1 : Ouvrez le navigateur web, par exemple : Google Chrome ou Microsoft Edge. Étape 2 : Saisissez 192.168.123.1 dans la barre d'adresse et cliquez sur « Enter » pour accéder à l'interface Web. Saisissez ensuite le nom d'utilisateur (user par défaut) et le mot de passe (123456 par défaut) respectivement dans l'interface UserLogin.
-
Page 37: Réglage Du Système
Étape 4 : Cliquez sur « WLAN » dans « Network » pour activer ou désactiver le Wi-Fi. Vous pouvez également modifier le nom du réseau sans fil, le mode d'authentification et le mot de passe. Admin Status WLAN Service WLAN Basic Settings wlan0 (2.4GHz) This page is used to configure the parameters for WLAN clients which may connect to your Access Point. - Page 38 Étape 2 : Cliquez sur « Wireless Network Connection » . Network and Sharing Center Net... Network and Sharing Cen... Search Control Panel << View your basic network information and set up connections Control Panel Home View your active networks Change adapter settings Access type: Internet...
-
Page 39: Dépannage
Étape 4 : Entrez le mot de passe et cliquez sur « OK » . Connect to a Network Type the network security key ········ Security key: Hide Characters Cancel Dépannage Le WiFi est détecté sur le PC mais il ne peut pas se connecter à Internet. 1. -
Page 40: Garantie Du Produit
Pour plus de détails sur la garantie, veuillez consulter la page : https://www.fs.com/fr/policies/warranty.html Retour : Si vous souhaitez retourner un ou plusieurs articles, vous trouverez des informations sur les modalités de retour à la page suivante : https://www.fs.com/fr/policies/day_return_policy.html Q.C. PASSED Copyright © 2022 FS.COM All Rights Reserved.
Need help?
Do you have a question about the TA1910-4GVC-W and is the answer not in the manual?
Questions and answers