Table of Contents
Advertisement
Quick Links
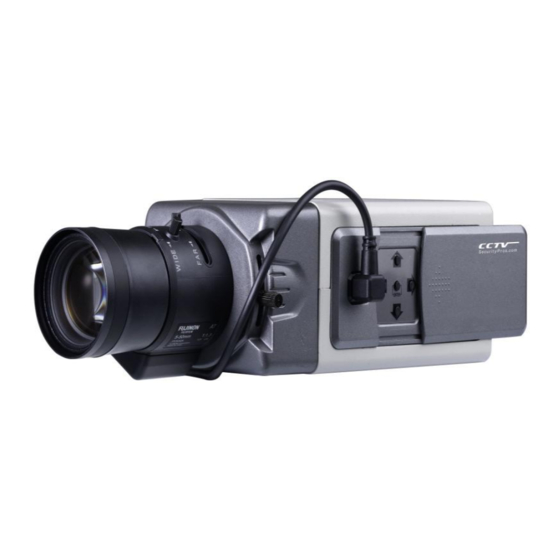
SONY EFFIO-V Security Camera
FEATURES:
1/3 Sony Ex-View HAD II CCD
Sony EFFIO-V DSP
750TVL High Resolution
Wide Dynamic Range (WDR)
Scene Detection Function
3D Noise Reduction (3DNR)
On-Screen Display (OSD)
ATR-EX2
1AMP
12V DC
The CSP-PB750 is a "New Generation" 960H Professional Box Camera with SONY EFFIO-V DSP. This
camera was designed to provide the user with stunningly clear hi-resolution images in both daytime and
low light environments. With built-in Wide Dynamic Range (WDR) technology, this camera is capable of
providing clear images even under backlight circumstances where intensity of illumination can be vary
excessively. The camera is also equipped with many advanced features including a digital on-screen
display (OSD) menu which enables the user to adjust camera settings in order to achieve the highest
quality image.
With On-Screen Display
Model CSP-PB750
Advertisement
Table of Contents

Subscribe to Our Youtube Channel
Related Manuals for CCTV CSP-PB750


Summary of Contents for CCTV CSP-PB750
- Page 1 1AMP 12V DC The CSP-PB750 is a “New Generation” 960H Professional Box Camera with SONY EFFIO-V DSP. This camera was designed to provide the user with stunningly clear hi-resolution images in both daytime and low light environments. With built-in Wide Dynamic Range (WDR) technology, this camera is capable of providing clear images even under backlight circumstances where intensity of illumination can be vary excessively.
- Page 2 CAUTION: Do not attempt to service this video product by yourself as taking apart camera may expose you to dangerous voltage or other hazards. Please comply with all electrical safety standards during installation and operation. In order to prevent damage caused by fire or electric shock, please do not submerse camera in water or expose any open parts to liquid.
- Page 3 Frequently Asked Questions: No Image? Check the power cable to the power box or wall outlet. Make sure video and power connections are secure. Do not switch on power until camera connection is complete. If using a multiple output power box, make sure the power switch is in the “ON”...
- Page 4 Interface Use this button to display the Main Menu and to Enter the ENTER Submenus when they are available. Select the desired feature by using Joystick with Up / Down UP/DOWN direction Change the status of the selected feature by using Joystick with LEFT/RIGHT Left / Right direction...
- Page 5 III OSD Press “Enter” button for 2 seconds, the Camera screen will display the OSD Main menu. Users can select different options according to the camera environment, including Automatic, Indoor, Outdoor, Backlight, Traffic Monitoring, user-defined.
- Page 6 3.1.1 Shutter/AGC Move the cursor to the main menu function "Scene Select", press the " Enter " button to display the " Advanced Settings" sub-menu, move the cursor to " Shutter / AGC " item , this function can be divided into "Automatic" control, "Manual"...
-
Page 7: White Bal
In “Sens Up”, there is “On” and “Off ” as an option. Manual Setup, user can adjust the Shutter Mode Shutter Speed and AGC 3.1.2 WHITE BAL White Balance can restore the authenticity of the color when it is affected by the change of temperature. - Page 8 Normally, only when you choose “user defined” setting you can adjust the mood, otherwise the white balance is fixed. 3.1.3 WDR The WDR feature improves the dynamic range and the visibility of the image by providing the optimal gradation compensation of the image in one field. This is achieved by two ways of image processing, luminance compression and contrast enhancement, so that the tone can be enhanced at highlighted and dark areas...
- Page 9 For WDR, there are two sets. One is contrast , the other is clear face. “Contrast” has three options----“ Low; Mid ; High” “Clear Face” has four options----“Off ; Low; Mid ; High” 3.1.4 HLI/BLC In the main menu, press the cursor to “Scene Selection”, press “Enter” button to enter “advanced settings”...
-
Page 10: Adaptive Tone Reproduction
3.1.5 Adaptive Tone Reproduction The ATR (Adaptive Tone Reproduction) function provides gradation compensation to improve the contrast of subjects whose gradation has been lost in cases where, for instance, both low-luminance areas and high-luminance areas exist in the same picture. "Clear Face"... - Page 11 3.1.6 DNR In the main menu, press the cursor to “Scene Selection”, press “Enter” button to enter “advanced settings” sub-menu. In the "noise reduction" menu press "enter" button to enter the "noise reduction" sub-menu. You can adjust the level of noise reduction, the bigger the value, the higher the noise reduction level .
- Page 12 A. Auto mode In the “Day/Night” menu, press “left” “right” key to select “Auto mode” and press “ENTER” button to “Auto mode” sub-menu, this function controls the camera output color or black and white image according to the strength of the light. User can set the parameter according to the environment.
-
Page 13: Pict Adjust
3.2 PICT ADJUST Select to bring up the PICT ADJUST sub-menu for further settings. Function Option BRIGHTNESS 000-255 CONTRAST 000-255 SHARPNESS 000-255 000-255 COLOR GAIN 000-255... - Page 14 3.3 EZOOM In the OSD main menu to choose " EZOOM", Press “ENTER” button to bring up the setup sub-menu, in the EZOOM SETUP, users can setup according to the needs of area size and position. 3.4 DIS (Digital image stabilization) Digital image stabilization (DIS) is a family of techniques used to reduce blurring associated with the motion of a camera during exposure.
- Page 15 3.5 Privacy 15 areas optional, user can adjust the size, position, color, transparency of the chosen area. Privacy shield can be setup for 1-15 areas, when mode is set to open, users can press the “up” “down” "left" "right" “ENTER” to select the parameter of areas’ DISPLAY, POSITION, COLOR, TRANSP.
-
Page 16: Motion Detection
3.6 Motion detection In the OSD main menu to choose “MOTION DETECTION "press the "left" "right" to select "On", and press “ENTER” button to bring up the MOTION DETECTION sub- menu. In the motion detection sub-menu, users can do setup according to the needs of detection sense, interval, mask area, monitor area The detect sense: 0-127. - Page 17 3.7 SYS Setting Move the cursor to “system setting” press “enter” to set the submenu. 3.7.1 Sync Camera The system default is "Internal synchronization" mode 3.7.2 Lens Lens Type can be set to "Auto” lens, "manual" Lens 2 types, the user can select the type of lens by the menu "left and right”.
- Page 18 3.7.3 Image Flip Function Move the cursor to "flip" item, press left and right to select "off" to "flip" turn "vertical" "horizontal vertical flip" option. 3.7.4 Communication In the System Settings sub-menu, move the cursor to the "Communication", press "ENTER" to enter the communication settings sub-menu, the user can set up "address", "baud rate"...
- Page 19 3.7.5 Camera ID In system settings submenu, move the cursor to "CAMERA ID SETUP" option, press the "ENTER" key to enter into the camera set up submenu. You can now set the camera name. You can set the camera code as numbers, uppercase letters, and related symbols.. “←↑↓→”...
-
Page 20: Maintenance
3.9 MAINTENANCE Maintenance is for WHITE PIXEL MASK and CAMERA RESET 3.9.1 White Pixel Mask When used in high-temperature environment, there might be dead pixel on CCD sensor. With this function on, the dead pixel is to be masked so as to improve the picture quality. -
Page 21: Exit / Save All
3.10 EXIT / SAVE ALL Press to restore all the settings to the default values. SAVE ALL Press to save all the settings made. NOTE: There will be no prompt windows while the settings are being saved. EXIT Press to exit the OSD menu. NOTE: Before exiting the OSD menu, please press SAVE ALL<┘... -
Page 22: Technical Specifications
Technical Specifications 1/3" SONY EXVIEW CCD II Sony Effio-V DSP Imaging Sensor PAL:976(H)×582(V); Pixel NTSC:976(H)×494(V) Signal System PAL/ NTSC Syn. System Internal Synchronization PAL:1/50~1/100000s; Shutter speed NTSC:1/60~1/100000s S/N Ratio More than 50dB(AGC OFF) Video Output 1.0Vp-p, 75 ohms Horizontal resolution 750TV Lines Of Resolution Color 0.1Lux(F1.2,50IRE,AGC ON) B/W:0.001Lux(F1.2,50IRE,AGC ON)
Need help?
Do you have a question about the CSP-PB750 and is the answer not in the manual?
Questions and answers