
Related Manuals for Shure BLX288/B58


Summary of Contents for Shure BLX288/B58
- Page 1 Wireless System Online user guide for Shure BLX wireless system. Version: 5.0 (2021-G)
-
Page 2: Table Of Contents
Shure Incorporated Table of Contents Getting Good Sound BLX Wireless System Correct Microphone Placement Wearing the Headworn Microphone System Components Adjusting Gain Quick Start Guide BLX1 Features BLX2 Front Panel Batteries Back Panel BLX1 Wearing the Bodypack Transmitter BLX2 Power Off... -
Page 3: Blx Wireless System
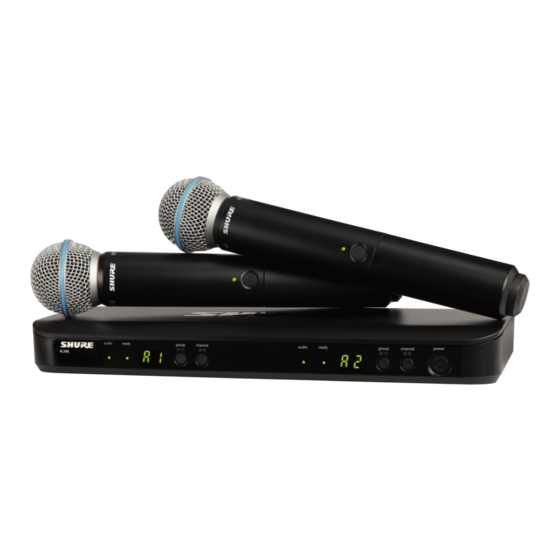
Shure Incorporated BLX Wireless System System Components Note: Your system comes with a combination of the following components. • BLX1 Bodypack Transmitter • BLX2 Handheld Transmitter (choice of SM58, BETA58A, or PG58) • BLX4 Wireless Receiver • BLX88 Dual Wireless Receiver •... - Page 4 Shure Incorporated a. Install batteries and turn on transmitter. b. On the transmitter, set the group and channel to match the receiver. The audio LED on the receiver should illumi nate. If setting up additional systems, leave the first transmitter and receiver on. For each additional receiver, manually set the group to match the first receiver. Note: The receiver will automatically perform a channel scan to find an available frequency after the group has been selected. Set the transmitter fre...
-
Page 5: Features
Shure Incorporated Features Front Panel BLX4 BLX88 ① audio LED Indicates strength of incoming audio signal: green for normal and red for overload. ② ready LED Green light indicates system is ready for use and receiving transmitter signal. ③ LED Display... -
Page 6: Back Panel
Shure Incorporated Displays group and channel setting. ④ group and channel Buttons Scan: Push and release group button to scan for an open group and channel. Manual: Push and hold group button to select a group. Push channel button to select a channel in the current group. -
Page 7: Blx2
Shure Incorporated ⑤ group Button Changes group setting. ⑥ LED Display Displays group and channel setting. ⑦ channel Button Changes channel setting. ⑧ Battery Compartment ⑨ Audio Gain Adjustment Rotate to increase or decrease transmitter gain. BLX2 ① LED Indicator Displays power and battery status (see Transmitter LED Indicators). -
Page 8: Single System Set Up
Shure Incorporated ⑥ Identification Cap ⑦ Battery Compartment Transmitter LED Indicators LED Indicator Status Green Ready Rapidly Flashing Red Controls locked Solid Red Battery power low (less than 1 hour remaining*) Flashing Red and shuts off Batteries dead (change batteries to power on transmitter) *For alkaline batteries only. -
Page 9: Setting Transmitter Group And Channel
Shure Incorporated Before you begin, turn off all transmitters and turn on any equipment (other microphones or personal monitoring systems) that could cause interference during the performance. Press and release the group button on the receiver. The receiver scans for the clearest group and channel. -
Page 10: Multiple System Setup
Shure Incorporated Multiple System Setup Up to 12 systems can operate simultaneously (band and RF environment dependent). Important: Set up each system one-at-a-time. Once a receiver and transmitter are tuned to the same group and channel, leave the transmitter powered on. -
Page 11: Locking And Unlocking Controls
Shure Incorporated Locking and Unlocking Controls Lock system controls to prevent accidental setting changes or power off. Transmitter (lock/unlock) Turn the transmitter on. Hold the group button, then press the channel button for approximately 2 seconds. The LED indicator rapidly flashes red when locked. -
Page 12: Getting Good Sound
Shure Incorporated Getting Good Sound Correct Microphone Placement • Hold the microphone within 12 inches from the sound source. For a warmer sound with increased bass presence, move the microphone closer. • Do not cover grille with hand. Wearing the Headworn Microphone • Position the headworn microphone 13 mm (1/2 in.) from the corner of your mouth. • Position lavalier and headworn microphones so that clothing, jewelry, or other items do not bump or rub against the micro phone. 12/23... -
Page 13: Adjusting Gain
Shure Incorporated Adjusting Gain Monitor the audio LED indicator on the receiver front panel when setting the transmitter gain. • Green: normal levels • Red: excessive sound levels (overload). The red LED should only illuminate infrequently when you speak loudly or play your instrument loudly. -
Page 14: Batteries
Shure Incorporated Batteries Expected life for AA batteries is up to 14 hours (total battery life varies depending upon battery type and manufacturer). When the LED indicator turns red, it signifies "low battery" with approximately 60 minutes of remaining battery life. -
Page 15: Power Off
Shure Incorporated Power Off Hold down the power button to power off the BLX2 or BLX4/88. To power off the BLX1, slide the power toggle switch to OFF. Removing and Installing Identification Caps The BLX2 is equipped with a black identification cap from the factory (dual vocal systems ship with additional gray cap). -
Page 16: Frequency Range And Transmitter Output Level
Shure Incorporated Issue Indicator Status Solution Transmitter indicator LED Replace transmitter batteries (see Changing Batteries). flashing red Change receiver and transmitter to a different group and/ or channel. Identify nearby sources of RF interference, and shut down or remove source. Replace transmitter batteries. Audio artifacts or dropouts Ready LED flickering or off Ensure that receiver and transmitter are positioned with... -
Page 17: Specifications
Shure Incorporated Band Range Output Power 614 to 638 MHz 10 mW 614 to 638 MHz 10 mW 674 to 698 MHz 10 mW 662 to 686 MHz 10 mW 662 to 686 MHz 10 mW 694 to 703 MHz... - Page 18 Shure Incorporated Operating Temperature -18°C (0°F) to 57°C (135°F) Polarity Positive pressure on microphone diaphragm (or positive voltage applied to tip of WA302 phone plug) pro duces positive voltage on pin 2 (with respect to pin 3 of lowimpedance output) and the tip of the high im pedance 1/4-inch output. BLX1 Audio Input Level 16 dBVmaximum min (0 dB) +10 dBVmaximum Gain Adjustment Range 26 dB Input Impedance 1 MΩ RF Transmitter Output 10 mW, typical Dimensions 4.33 in. X 2.52 in. X 0.83 in. (110 mm X 64 mm X 21 mm) H x W x D Weight 2.6 oz. (75 g), without batteries Housing...
- Page 19 Shure Incorporated RF Transmitter Output 10 mW, typical Dimensions 8.82 in. X 2.09 in. (224 mm X 53 mm) L x Dia. Weight 7.7 oz. (218 g) without batteries Housing Molded ABS Power Requirements 2 LR6 AA batteries, 1.5 V, alkaline Battery Life up to 14 hours (alkaline) BLX4 Output Impedance XLR connector 200 Ω 6.35 mm (1/4") connector 50 Ω Audio Output Level Ref. ±33 kHz deviation with 1 kHz tone XLR connector –27 dBV (into 100 kΩ load)
-
Page 20: Important Safety Instructions
Shure Incorporated Power Requirements 12–15 V DC @ 235 mA (BLX88, 320 mA), supplied by external power supply (tip positive) BLX88 Output Impedance XLR connector 200 Ω 6.35 mm (1/4") connector 50 Ω Audio Output Level Ref. ±33 kHz deviation with 1 kHz tone XLR connector –27 dBV (into 100 kΩ load) 6.35 mm (1/4") connector –13 dBV (into 100 kΩ load) RF Sensitivity 105 dBm for 12 dB SINAD, typical Image Rejection >50 dB, typical... -
Page 21: Certifications
This product meets the Essential Requirements of all relevant European directives and is eligible for CE marking. Hereby, Shure Incorporated declares that the radio equipment is in compliance with Directive 2014/53/EU. The full text of the EU declaration of conformity is available at the following internet address: http://www.shure.com/europe/compliance... -
Page 22: Important Product Information
Important Product Information LICENSING INFORMATION Licensing: A ministerial license to operate this equipment may be required in certain areas. Consult your national authority for possible requirements. Changes or modifications not expressly approved by Shure Incorporated could void your authority to operate the equipment. Licensing of Shure wireless microphone equipment is the user’s responsibility, and licensability de pends on the user’s classification and application, and on the selected frequency. Shure strongly urges the user to contact the ... -
Page 23: Australia Warning For Wireless
Shure Incorporated Canada Warning for Wireless This device operates on a noprotection, nointerference basis. Should the user seek to obtain protection from other radio ser vices operating in the same TV bands, a radio licence is required. For further details, consult Innovation, Science and Econom ic Development Canada’s document Client Procedures Circular CPC2128, Voluntary Licensing of LicenceExempt LowPow er Radio Apparatus in the TV Bands. Ce dispositif fonctionne selon un régime de non‑brouillage et de non‑protection. Si l’utilisateur devait chercher à obtenir une certaine protection contre d’autres services radio fonctionnant dans les mêmes bandes de télévision, une licence radio serait requise. Pour en savoir plus, veuillez consulter la Circulaire des procédures concernant les clients CPC‑2‑1‑28, Délivrance de licences sur une base volontaire pour les appareils radio de faible puissance exempts de licence et exploités dans les bandes...
Need help?
Do you have a question about the BLX288/B58 and is the answer not in the manual?
Questions and answers