Advertisement
Quick Links
BASIC INSTALLATION, CALIBRATION and OPERATING INSTRUCTIONS
for the COMPULOAD CL2000MKII Series LOAD WEIGHING SYSTEM
For forklift or small loader application
Instant Weight Pty. Ltd.
P.O. Box 2340
MIDLAND WA 6936
Tel:
(08) 9274 8600
Email: sales@instantweighing.com.au
1
Advertisement

Related Manuals for COMPULOAD CL2000MKII Series


Summary of Contents for COMPULOAD CL2000MKII Series
- Page 1 BASIC INSTALLATION, CALIBRATION and OPERATING INSTRUCTIONS for the COMPULOAD CL2000MKII Series LOAD WEIGHING SYSTEM For forklift or small loader application Instant Weight Pty. Ltd. P.O. Box 2340 MIDLAND WA 6936 Tel: (08) 9274 8600 Email: sales@instantweighing.com.au...
- Page 2 INDEX Introduction Installation Instructions Basic Calibration Basic Weighing WARRANTY...
- Page 3 Introduction The CL2000MKII Weighing Indicator IP65 rated digital indicator designed for use on forklifts and small wheel loaders. Operating Voltage is 12-24Volts DC The CL2000MKII will generally be installed with a Hydraulic pressure transducer mounted in the Lift Circuit of the machine hydraulics. The hydraulic transducer should be mounted in an area that is not affected by high pressure cleaning.
- Page 4 Inexperienced personnel should not undertake this task if they are unsure of the safety precautions necessary. FITTING THE COMPULOAD TO THE OPERATORS CABIN Select a suitable location and using the mounting bracket as a template, drill two holes and mount the bracket into position.
- Page 5 FITTING THE PRESSURE TRANSDUCER PRECAUTIONS Lower load carriage completely to the ground and stop the engine. Operate the tilt and lift levers to ensure no residual pressure is present in the hydraulic system. Remove the hydraulic tank filler cap to remove any pressure from the oil reservoir tank.
- Page 6 Transducer connector instructional video. Transducer Connector Diagram Green Transducer...
- Page 7 BROWN = Power either battery or ignition WHITE = Earth Wiring the Compuload CL4070 Printer (if fitted) – The Compuload CL4070 Printer can be wired to the CL2000MKII by the 3-core wire coming from the rear of the CL2000MKII plug. This wire should be marked “printer”.
- Page 8 position 2. When lowering to position 2, this must be done smoothly and slowly to allow the hydraulic pressure to be consistent. Lowering abruptly will cause a pressure spike within the lift circuit and readings will be erratic.
- Page 9 BASIC CALIBRATION INSTRUCTIONS The calibration instructions below are given, based on the instrument being set up prior to being shipped to you. The instrument will have been set up based on the information supplied regarding the model, capacity and application the forklift is being used.
- Page 10 Step7- It is now time to pick up the test weight and raise to the weighing height , (Raise to 1 , Lower to 2) . Allow approx 2-3 seconds for the weight to settle, and then press the “Set Laden Calibration” key once. Step8- Check the “Calculated Current Weight”...
-
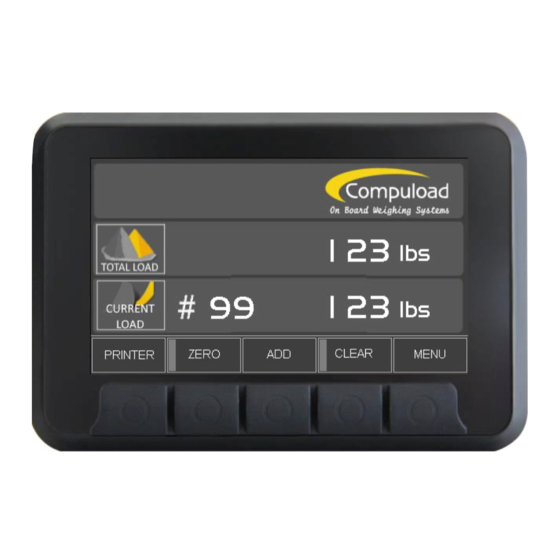
Page 11: Basic Weighing
BASIC WEIGHING NOTE 1: All reference to weighing position refers to raising the forks or bucket up to a pre- determined position and lowering slightly and slowly. The pre-determined position is determined by the installer and is generally indicated by stickers on the mast for a forklift (Raise to 1, Lower to 2) and on the carriage (Arrow) or other markings on a loader. - Page 12 Accumulated weight will be displayed in the “Total Load” screen. Repeat Step 2. To accumulate further buckets. To CLEAR the TOTAL, press the “CLEAR” button and HOLD for 3 seconds. The TOTAL will return to zero to allow the next Load to be completed.
- Page 13 PRINTING A DOCKET If a printer is fitted in conjunction with the Compuload CL2000 MKII weighing system, a docket can be produced whilst loading. To get the printer to print, before loading press the “PRINTER” button once. There will be 3 x buttons available –...
- Page 14 Compuload CL4070 Printer- The paper required for this printer is THERMAL Paper. Size = 57mm x 45mm. Most normal EFTPOS paper will fit. If you change the paper and it does not print, most likely you have the paper upside down.
- Page 15 ATTEMPT TO DISMANTLE THE UNIT AS THIS WILL CAUSE YOUR WARRANTY TO BECOME NULL AND VOID. ATLAS WEIGHING Pty. Ltd. warrants the COMPULOAD Series load weighing gauge and any optional equipment to be free of defects in workmanship and material for a period of twelve (12) months from date of dispatch or installation, (whichever is applicable).