Table of Contents
Advertisement
Quick Links
Advertisement
Table of Contents

Summary of Contents for XGuard IntelliSwitch
- Page 1 XGuard IntelliSwitch User’ s Guide Copyright 2021 XGuard RC. All rights reserved...
- Page 2 Do not operate an RC models within the vicinity of homes, trees, electrical lines during inclement weather or rain or near crowds of people. www.XGuardRC.com Page: 2 Copyright 2020 XGuard RC. All rights reserved...
-
Page 3: Table Of Contents
LOCATOR ALARM SWITCHED ON BY RADIO SWITCH ....8 SWITCH OPERATION ................9 PROGRAMMING THE UNIT ..............10 ENTERING PROGRAMMING MODE ........... 11 QUICK PROGRAMMING SEQUENCE GUIDE ........11 MUSICAL TONES MEANING ..............12 DIMENSIONS ....................13 INSTALLATION HOLE PATTERN ............13 Page: 3 Copyright 2020 XGuard RC. All rights reserved... -
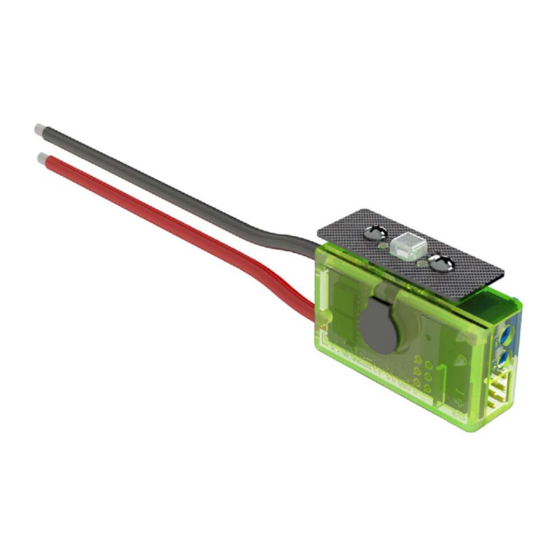
Page 4: Ports Diagram
LiPo batteries. Overvoltage or Reverse voltage damage is not covered by warranty ← Output 1 & Locator Switch (TOP) ON/OFF ← Output 2 (BOTTOM) Pushbutton High-Current Output Port Buzzer/Alarm Page: 4 Page: 4 Copyright 2020 XGuard RC. All rights reserved... -
Page 5: Correct Battery Connector Polarity
(Not Included) Solder the wires and add heat shrink tubbing Positive wire (Red) Positive side of EC3 Warning: Overvoltage connector (Flat Side) or Reverse voltage damage is not covered by warranty Page: 5 Copyright 2020 XGuard RC. All rights reserved... -
Page 6: Connection For Higher Currents
*WARNING* Do not use solder on the cable ends that connect into the terminal block. Connect AWG 14 wires to the screw terminal block as shown. Page: 6 Copyright 2020 XGuard RC. All rights reserved... -
Page 7: Mounting The Switch
Add two pieces of thin double- sided tape 13mm x 6.25mm (not included) WARNING: Do not over- tighten the screws or you will break the plastic thread. Page: 7 Copyright 2020 XGuard RC. All rights reserved... -
Page 8: Locator Alarm Switched On By Radio Switch
Turn locator buzzer Three Position Position on by using the Switch Switch radio switch Note: If the positions are reversed go to the radio’s setting screen and reverse the switch channel. Page: 8 Copyright 2020 XGuard RC. All rights reserved... -
Page 9: Switch Operation
1 to 6 depending on what is programmed as the mode of operation. If not clicked ON withing 3 seconds it will go to standby. Page: 9 Copyright 2020 XGuard RC. All rights reserved... -
Page 10: Programming The Unit
Lipo Warning voltage: 6.7V (3.35V per cell) Lipo Emergency voltage: 6.1V (3.05V per cell) NiMh Warning voltage: 5.2V (1.04V per cell) NiMh Emergency voltage: 4.8V (0.96V per cell) LiFe Emergency voltage: 6.2V (3.1V per cell) Page: 10 Copyright 2020 XGuard RC. All rights reserved... -
Page 11: Entering Programming Mode
• If pressed after 7 beeps then wait for 7 confirmation beeps • Wait for musical tones indicating programming mode exit IMPORTANT NOTE: Programming can only be started by plugging a battery not from Standby. Page: 11 Copyright 2020 XGuard RC. All rights reserved... -
Page 12: Musical Tones Meaning
PLAY SOUND operate aircraft. DURING PROGRAMMING: • 1) Enter Programming Section PLAY SOUND • 2) Programing steps: Mode tone for selecting: Select confirmation tone: • 3) Exit Programming Section PLAY SOUND Page: 12 Copyright 2020 XGuard RC. All rights reserved... -
Page 13: Dimensions
Switch itself without wires:.......12.2 grams (0.43 oz) Pair of 8 inch 14 AWG wires:....10.9 grams (0.38 oz) Unit with wires:.........23.1 grams (0.81 oz) (Note: Wires can be shortened to match your specific need) INSTALLATION HOLE PATTERN Page: 13 Copyright 2020 XGuard RC. All rights reserved...