Advertisement
Quick Links
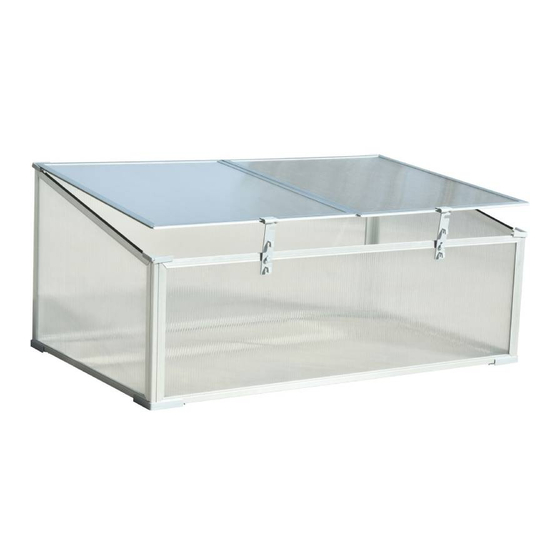
Cold Frame
Assembly Instruction
Overall Size/CM: L99 x W59.5 x H31/43.5
Overall Size/inch: L39"x W23.5"x H12/17"
IMPORTANT
You must read these instructions carefully before you start to assemble it.
Please ensure that you find all parts in the correct type and
Please carry out the steps according to the instructions.
Do not tighten the steps until completing on
Keep the instruction manuals in a safe place for future reference.
quantity as mentioned in the list.
the assembly of the whole product.
9820110
Advertisement

Related Manuals for Hanover HANGHMN-1NAT


Summary of Contents for Hanover HANGHMN-1NAT
- Page 1 Cold Frame Assembly Instruction Overall Size/CM: L99 x W59.5 x H31/43.5 Overall Size/inch: L39"x W23.5"x H12/17" 9820110 IMPORTANT You must read these instructions carefully before you start to assemble it. Please ensure that you find all parts in the correct type and quantity as mentioned in the list.
- Page 2 IMPORTANT If you have any problems with this product, please DO NOT RETURN THIS ITEM To the Retailer/Store from where you purchased the product. Please email us anytime with the nature of the problem at: ContactUs@Hanover‐Products.com Please include: Pictures of the issue(s) and receipt (if available) Name and address of the Purchaser Name of retailer Or call our Customer Service team between 9:00 AM and 5:00 PM Eastern Time, Monday through Friday at: 1‐877‐397‐5144 or visit our website at: www.Hanover‐Products.com To expedite any future warranty claims, please retain your receipt for future use. For additional on‐line support on assembly, troubleshooting and care & maintenance of your outdoor product, please visit our website at: www.Hanover‐Products.com. 8/1/2019 ...
-
Page 3: Before You Start
BEFORE YOU START Owner's Manual Assembly instructions Instructions are supplied in this manual and contain all appropriate information for your building model. Review all instructions before you begin. During assembly, follow the step sequence carefully for correct results Parts Check to be sure that you have all the necessary parts for the building. Separate contents of the carton by the part number while reviewing parts list. - Page 4 Parts List No Qty A1 2 A2 2 A3 1 A4 1 Line Line No Qty No Qty Drawing Drawing Line No Qty Inch Drawing B1 1 35" 20"...
- Page 5 SUMMARY STATEMENT FOR INSTALLATION Insert the wall panels into anchors. Wall panels are pre-installed. Insert the four corner profiles 14,15 into anchors. Rubber Strip B1 Rubber Strip B2 Front Corner Caps Installation...
- Page 6 Covers Installation rubber strip B1 via inserting the Sliding the two covers along with of cover. rubber strip B1 into the profile Cover Brackets & Bracket Seats Installation / Rear corner caps Installation Fix the product with 8 pieces F2 screws at 8 corners. Anchors and corner caps screwing...
- Page 7 Maintenance: 1.Please prevent adding any increased weight to the product. PC Panel Maintenance: 1. Be careful not to have a sharp object touch the film as it may scratch. 2.Clean films regularly to keep the light transmittance as clear as possible. 3.The boards/panels have flame retardant polycarbonate material applied to them and is recommended to keep away from fire to avoid softening or deformation.
- Page 8 Outdoor Products 1‐877‐397‐5144 ContactUs.Hanover‐Products.com www.Hanover‐Products.com...