Advertisement
Quick Links
Assembly Instructions
& User's Manual
Style #166826
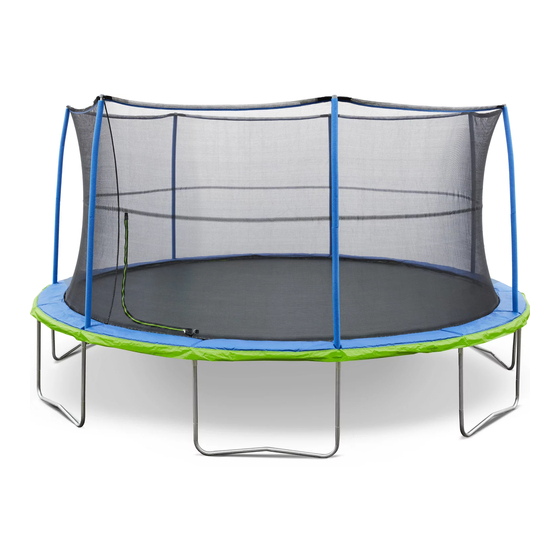
16 Ft Mega Trampoline and Enclosure
Please keep this instruction manual for future reference
Customer Service: (888) 922-2336
7:00 am to 12:00 am CST (daily)
Live Chat at: www.academy.com
Email: customerservice@academy.com
(Made in China)
Advertisement

Related Manuals for AGame 166826


Summary of Contents for AGame 166826
- Page 1 Assembly Instructions & User’s Manual Style #166826 16 Ft Mega Trampoline and Enclosure Please keep this instruction manual for future reference Customer Service: (888) 922-2336 7:00 am to 12:00 am CST (daily) Live Chat at: www.academy.com Email: customerservice@academy.com (Made in China)
- Page 2 Table of Contents Warnings Tools and Parts Assembly Instructions Care and Maintenance Warranty Information Note: Before beginning assembly of product, make sure all parts are present. Compare parts with package content list and hardware contents. If any part is missing or damaged, do not attempt to assemble the unit.
- Page 3 Page 3 of 27...
- Page 4 Page 4 of 27...
- Page 5 Page 5 of 27...
- Page 6 Page 6 of 27...
- Page 7 Page 7 of 27...
- Page 8 Page 8 of 27...
- Page 9 Page 9 of 27...
- Page 10 Page 10 of 27...
- Page 11 Page 11 of 27...
- Page 12 Page 12 of 27...
- Page 13 Assembly Instructions Step 1: You will need the following parts 7 x Top Tubes with T-Connector A – Part A 7 x Top Tubes with T-Connector B – Part B 14 x Leg Extensions – Part C 7 x Leg Centers – Part D Step 2: First we will complete one of the six sections of the trampoline frame.
- Page 14 Assembly Instructions Step 3: Insert the leg extensions into the leg center. Step 4: Insert one of the leg extensions from the complete leg into the T-Connector. Page 14 of 27...
- Page 15 Assembly Instructions Step 5: Important: The frame is held together under tension so you will have to use some force to insert certain parts. Place one foot on the top tube and grip the leg extension with both hands. Pull the extension until it can be slotted into the T-connector (1).
- Page 16 Assembly Instructions Step 7: This step will require 2 people who must be wearing gloves and protective eyewear. Slot two of the frame section together as shown in the diagram. Whilst one person holds the assembled sections upright, the other person can slot a third section onto the end of the assembled sections.
- Page 17 Assembly Instructions This step will require two people who Step 9: must be wearing gloves and protective eyewear. Lay the stitched bed (with the V-Rings) part E out inside the frame of the trampoline with the warning labels facing upwards. Locate the 4 V-Rings with the yellow stitching.
- Page 18 Assembly Instructions Step 11: Attach a spring to the opposite-colored webbing V-Ring. Important: You will now need to use the spring tool part G to attach the spring to the frame. Hook the spring tool onto the end of the spring and pull until the spring can be slotted into the spring slot on the top of the frame.
- Page 19 Assembly Instructions Step 13: Attach four more springs to the V-Rings in the middle of the four attached points and then attach them to the frame. The stitched bed should now be as shown in the diagram. Continue to attach springs in the Step 14: same sequence as above in the middle of each section, making sure...
- Page 20 Assembly Instructions Step 15: This step will require two people. Lay the frame pad, Part H, out over the edge of the frame with the ties facing downwards. Align the openings in the frame pad with the T-Connector B’s on the frame. Step 16: Tie the outer elastic straps on the underside of the frame pad around the...
- Page 21 Assembly Instructions Step 17: You will need the following parts to complete 7 x Top enclosure tube - Part I 7 x Bottom enclosure tube - Part J You will also need a cross-head screwdriver (not supplied ) Slot, Part J, the bottom enclosure tubes into, Part I, the top enclosure tubes.
- Page 22 Assembly Instructions Step 19: Place the round cap, Part N, onto the top enclosure pole, Part I. Slot the bottom of the enclosure pole into the open T- connector B tube, Part B. Slot should be visible through the opening in the frame pad.
- Page 23 Assembly Instructions Step 21: Slot the remaining enclosure tubes with hemisphere caps into the remaining T-connector B’s on the frame. Step 22: The enclosure tubes are now fitted and you have completed step 22. Page 23 of 27...
- Page 24 Assembly Instructions Step 23: Find the ROD on top of enclosure netting. Stand on the trampoline and insert one of the exposed sections of the rod into a plastic grip on top of one of the enclosure tubes. Step 24: Tie the end of the cord around one of the V-Ring attachments located on the mat.
- Page 25 Assembly Instructions Step 25: From the underside of the trampoline, tie the remaining elastic straps around the springs of through the V-Rings. The trampoline is fully assembled. Page 25 of 27...
- Page 26 Page 26 of 27...
- Page 27 Page 27 of 27...
Need help?
Do you have a question about the 166826 and is the answer not in the manual?
Questions and answers