Table of Contents
Advertisement
Quick Links
Instruction manual SMART
models:
ST 1, ST 2, ST 3, ST 4, ST 5, ST 6,
ST 500, ST 700, ST 1200, ST 1450,
ST 500 M, ST 700 M, ST 1200 M, ST 1450 M,
ST 2 BD, ST 4 BD, ST 5 BD
Laboratory refrigerators
models:
CHL 1, CHL 2, CHL 3, CHL 4, CHL 5, CHL 6,
CHL 500, CHL 700, CHL 1200, CHL 1450
CHL 500 M, CHL 700 M, CHL 1200 M, CHL 1450 M
models:
ST 1/1, ST 1/1/1, ST 2/2, ST 2/3
CHL 1/1, CHL 1/1/1, CHL 2/2, CHL 2/3
ST1/CHL1, ST2/CHL2, ST2/CHL3
models:
ILW 53, ILW 115, ILW 240, ILW 400, ILW 750
Before using the equipment, please read carefully this instruction manual!
Thermostatic cabinets
Multichamber devices
Laboratory incubators
Version 1.26
Issued 06.05.2021
Advertisement
Table of Contents

Subscribe to Our Youtube Channel
Related Manuals for POL-EKO SMART ST 1


Summary of Contents for POL-EKO SMART ST 1
- Page 1 Instruction manual SMART Thermostatic cabinets models: ST 1, ST 2, ST 3, ST 4, ST 5, ST 6, ST 500, ST 700, ST 1200, ST 1450, ST 500 M, ST 700 M, ST 1200 M, ST 1450 M, ST 2 BD, ST 4 BD, ST 5 BD Laboratory refrigerators models: CHL 1, CHL 2, CHL 3, CHL 4, CHL 5, CHL 6,...
- Page 2 Instruction manual ST, ST BD, CHL, ILW SMART Manufacturer's address: POL-EKO-APARATURA sp. j. ul. Kokoszycka 172 C 44-300 Wodzisław Śląski Country of origin: Polska As a manufacturer, we inform you that we took the necessary measures to ensure that this device fully meets your expectations and is reliable for a long period of use.
-
Page 3: Table Of Contents
Instruction manual ST, ST BD, CHL, ILW SMART Contents: INTENDED USE AND IMPORTANT INFORMATION FOR THE USER ............6 PACKAGE CONTENTS ..........................7 BEFORE THE FIRST USE ..........................8 3.1. Installation of shelves ........................... 10 3.2. Condensation in the chamber ....................... 13 3.3. - Page 4 Instruction manual ST, ST BD, CHL, ILW SMART 6.5.8. Defrosting program (only for CHL 1-6, CHL 500, CHL 700, CHL 1200, CHL 1450) ...... 40 6.5.9. Photoperiod FOT programming (optionally for ST and ILW) ............41 6.6. Starting the program ..........................42 6.6.1.
- Page 5 Instruction manual ST, ST BD, CHL, ILW SMART 13. TROUBLESHOOTING ..........................66 13.1. Possible defects ............................ 67 14. WARRANTY CONDITIONS .......................... 68 15. RATING PLATE ............................69 16. TECHNICAL DATA ............................70 16.1. ST, ST BD, CHL devices ........................70 16.2.
-
Page 6: Intended Use And Important Information For The User
Instruction manual ST, ST BD, CHL, ILW SMART 1. INTENDED USE AND IMPORTANT INFORMATION FOR THE USER ST thermostatic cabinets, CHL refrigerators and ILW cooled incubators are laboratory devices designed for incubation and storage of samples at following temperature ranges: •... -
Page 7: Package Contents
Instruction manual ST, ST BD, CHL, ILW SMART • climb on the unit, • overload the shelves (the maximum load is described in technical data). You should: • place samples in such a way to provide proper air circulation in the chamber, •... -
Page 8: Before The First Use
Instruction manual ST, ST BD, CHL, ILW SMART 3. BEFORE THE FIRST USE The manufacturer sends the device protected by cardboard profiles and foil. The device should be transported in an upright position and the package should be secured against sliding during transport. After receiving the device, visually assess its condition and equipment in the presence of the person delivering the goods. - Page 9 Instruction manual ST, ST BD, CHL, ILW SMART Wheels / leveling feet The device has been equipped with wheels or leveling feet. After placing the unit at its destination, secure the device against movement by locking the wheels. In the case of feet, after placing the device in the destination, they should be leveled.
-
Page 10: Installation Of Shelves
Instruction manual ST, ST BD, CHL, ILW SMART 3.1. Installation of shelves In the ST 1-6, CHL 1-6 models To install the shelf or to change its position, follow these steps: Install the shelf slide at the selected height by inserting it into proper slots on the wall of the device. Do the same with the slide on the opposite wall. - Page 11 Instruction manual ST, ST BD, CHL, ILW SMART In the ST 500 - 1450, ST 500 M - 1450 M, CHL 500 - 1450, CHL 500 M - 1450 M models To install the shelf or to change its position, follow these steps: Install the shelf slide at the selected height by inserting it into proper slots on the wall of the device.
- Page 12 Instruction manual ST, ST BD, CHL, ILW SMART In the ILW models To install the shelf or to change its position, follow these steps: Install the shelf slide at the selected height by inserting it into perforations on the wall of the device. Do the same with the slide on the opposite wall.
-
Page 13: Condensation In The Chamber
Instruction manual ST, ST BD, CHL, ILW SMART 3.2. Condensation in the chamber If the set temperature is much lower than the ambient temperature, condensation may occur, which will cause accumulation of the water at the bottom of the chamber. The amount of accumulated water depends on the following factors: •... -
Page 14: Anchoring Of The Equipment
Instruction manual ST, ST BD, CHL, ILW SMART 3.5. Anchoring of the equipment In the case of high equipment ((ST 6, CHL 6, ST 500, ST 500 M, CHL 500, CHL 500 M, ST 700, ST 700 M, CHL 700, CHL 700 M, ST 1200, ST 1200 M, CHL 1200, CHL 1200 M, ST 1450, ST 1450 M, CHL 1450, CHL 1450 M) and multi-chamber units they must be anchored to the wall with suitable fixings (the anchoring kit is supplied with the device). -
Page 15: Description Of The Device
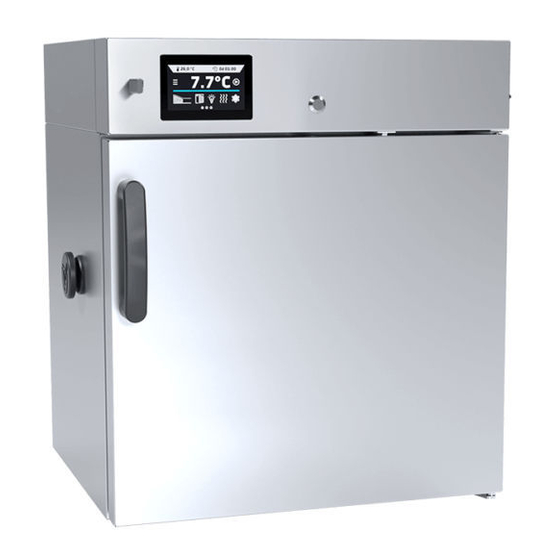
Instruction manual ST, ST BD, CHL, ILW SMART 4. DESCRIPTION OF THE DEVICE SMART models are equipped with a PID microprocessor temperature controller and a 4.3 inch colour touch screen with a resolution of 800x480. 4.1. Design of ST / CHL devices Below there’s a picture of ST model (exemplary photo) with a description of the important components of the device. - Page 16 Instruction manual ST, ST BD, CHL, ILW SMART Rear view (ST/CHL 1-6 models) main switch condenser cooling system fuse main power socket c14 LAN port...
- Page 17 Instruction manual ST, ST BD, CHL, ILW SMART Rear view (ST/CHL 500 M - 1450 M models) anchoring handle integrated power cable fuse main switch LAN port...
-
Page 18: Design Of Ilw Devices
Instruction manual ST, ST BD, CHL, ILW SMART 4.2. Design of ILW devices Below there’s a picture of ILW 115 model (exemplary photo) with a description of the important components of the device. Front view rating plate access port ø30mm for external sensor internal glass door shelf... - Page 19 Instruction manual ST, ST BD, CHL, ILW SMART Rear view main switch adjustable feet LAN port fuse main power socket c20...
-
Page 20: Device Equipment (Standard And Optional)
Instruction manual ST, ST BD, CHL, ILW SMART 5. DEVICE EQUIPMENT (STANDARD AND OPTIONAL) 5.1. Internal glass door (optionally for ST / CHL, standard for ILW) Internal glass door is an optional equipment in ST thermostatic cabinets and CHL laboratory refrigerators. For ILW cooled incubators it’s a standard equipment. To open and close the door use the plastic handle attached to the glass. -
Page 21: Internal Socket (Optionally For All Units, Standard For St Bd)
Instruction manual ST, ST BD, CHL, ILW SMART During operation, when the temperature inside the chamber is high, do not touch the internal components and glass door, as there is a risk of burns. Use protective gloves to protect yourself against the effects of burns from hot components. -
Page 22: Open Door Alarm (Standard For St, St Bd, Chl, Ilw)
Instruction manual ST, ST BD, CHL, ILW SMART 5.7. Open door alarm (standard for ST, ST BD, CHL, ILW) All units have been equipped with an open door sensor. If you open the door, the icon: will appear (the number above the icon presents open door counter. -
Page 23: Photoperiod Fot (Optionally For St And Ilw)
Instruction manual ST, ST BD, CHL, ILW SMART Figure 1 Unmounting USB flash drive Data saved in the * .csv file can be opened in a spreadsheet. Data saved as * .plkx can be opened in the Lab Desk program (additionally paid option). This program allows, among others, for data preview in the form of a table or a graph. -
Page 24: Display Battery Backup (Optionally For St, St Bd, Chl, Ilw)
Instruction manual ST, ST BD, CHL, ILW SMART Figure 2 Main screen for devices with photoperiod If a photoperiod is not switched on, the icon is inactive. To program a photoperiod, see the Section 6.5.9. 5.11. Display battery backup (optionally for ST, ST BD, CHL, ILW) Units in the SMART version can be optionally equipped with a battery backup of the display. -
Page 25: First Boot
Instruction manual ST, ST BD, CHL, ILW SMART 6.2. First boot During the first boot, the screen will display information about saving the "Download" folder (with instruction manual) on the USB flash drive in pdf format (Figure 3). In order to do it, insert the USB flash drive and wait a second for hardware detection, then press If you press you quit downloading the folder. - Page 26 Instruction manual ST, ST BD, CHL, ILW SMART Figure 5 Main screen – running program in ST, ST BD, CHL main segment turning off alarm start/stop menu temperature duration time sound program current temperature in the chamber (main sensor) alarm bar side-scrolling information panel...
-
Page 27: Information Panel
Instruction manual ST, ST BD, CHL, ILW SMART 6.3.1. Information panel There are two different windows in the information panel. Switching between them is done by swiping the finger left or right. The icon indicates information about which window is active. 6.3.1.1. - Page 28 Instruction manual ST, ST BD, CHL, ILW SMART Figure 9 Alarm details 6.3.1.2. Status panel The icon which is on the second page of the information panel, allows you to go to the status panel. Figure 10 Icon: Status panel The status of the device is indicated also by description.
-
Page 29: The Meaning Of Icons And Symbols
Instruction manual ST, ST BD, CHL, ILW SMART program name the name of running program current segment currently running segment / total number of segments in the program priority of time or parameters time set set time of running segment time elapsed elapsed time since the segment has started time remaining... - Page 30 Instruction manual ST, ST BD, CHL, ILW SMART Icon is visible only when the chamber is cooling down. Icon is visible only when the chamber is heating up. Icon is visible only when the automatic defrosting function or defrosting program is running.
-
Page 31: Upper Expandable And Configurable Menu
Instruction manual ST, ST BD, CHL, ILW SMART Going to the SMART program (Quick Program function). Turning off of the alarm sound (open door alarm, exceeding temperature range). Critical alarms (i.e. damage to the temperature sensor, temperature protection, etc.) continue emitting a sound. When the program is running, click the icon to quickly change the fan speed in ILW (Quick Change function). - Page 32 Instruction manual ST, ST BD, CHL, ILW SMART Figure 13 Upper expandable menu for ILW Figure 14 Upper menu when the program is stopped Positions available on the upper bar can be personalized. Just drag the selected icon to a new location (Figure 15).
-
Page 33: Alarm Bar
Instruction manual ST, ST BD, CHL, ILW SMART 6.3.4. Alarm bar The Alarm bar is a quick visual information about the device status. The colour of the bar indicates the status of the device: – blue - the device is working properly –... - Page 34 Instruction manual ST, ST BD, CHL, ILW SMART Clicking the icon starts the program in continuous mode (time set to infinity). Figure 17 Starting the Quick Program Press Set fan efficiency (ILW) Start Stopping a Quick program has been made difficult on purpose (this prevents the program from being stopped accidentally) –...
-
Page 35: Programs
Instruction manual ST, ST BD, CHL, ILW SMART In Quick Program editing mode, you can change: • settings of the data recording interval, • settings of the protection class. When the program is running you can change the parameters (temperature, fan) by pressing the icon (for ILW). -
Page 36: Segments Edition
Instruction manual ST, ST BD, CHL, ILW SMART • Interval – frequency of saving the data in the data record (1 min, 2 min, 5 min, 10 min, 15 min, 30 min, 1 h), • Protection class – more information Section 6.5.4. - Page 37 Instruction manual ST, ST BD, CHL, ILW SMART • ramp time – the time of reaching the set temperature ([d hh:mm]) in days, hours, minutes. The following parameters are available in selected models or as additional paid options: • fan - fan efficiency in percent (ILW), •...
-
Page 38: Summary Of Segments
Instruction manual ST, ST BD, CHL, ILW SMART Figure 22 6.5.3. Summary of segments In the segments summary (Figure 23) all segments can be seen along with introduced parameters: • number of segments, • temperature, duration time, target time of reaching temperature of a given segment (ramp), •... -
Page 39: Protection Class
Instruction manual ST, ST BD, CHL, ILW SMART 6.5.4. Protection class The device is equipped with sample protection – temperature protection which is carried out on the basis of the temperature value measured by an independent temperature sensor, the so-called security sensor. The main aim of sample protection is the protection against uncontrolled rise or fall of temperature. -
Page 40: Loop
Instruction manual ST, ST BD, CHL, ILW SMART Time: In the program without ramp – the device starts counting down the segment time when the program is started. Regar- dless of whether the temperature has been reached. In the program with ramp – first, the device counts down the ramp time and after its expiry it proceeds to the countdown of the segment time. -
Page 41: Photoperiod Fot Programming (Optionally For St And Ilw)
Instruction manual ST, ST BD, CHL, ILW SMART Figure 25 Defrosting program 6.5.9. Photoperiod FOT programming (optionally for ST and ILW) * does not apply to refrigerators with monoblock: (ST 500 M, ST 700 M, ST 1200 M, ST 1450 M). To program photoperiod you must be in a segment edit mode (Section 6.5.2) and set the desired temperature, time for... -
Page 42: Starting The Program
Instruction manual ST, ST BD, CHL, ILW SMART Figure 26 Turning on / off the photoperiod 6.6. Starting the program The created program can be started in two ways: 6.6.1. The first way • and press the icon „programs” Go to the main menu (Figure 27). -
Page 43: The Second Way
Instruction manual ST, ST BD, CHL, ILW SMART Figure 28 Program management menu If the program is running, the symbol appears next to the program name on the list. The symbol means that the program has been edited, but the changes have not been confirmed (Figure 29). -
Page 44: Quick Change Of Parameters
Instruction manual ST, ST BD, CHL, ILW SMART Figure 30 Main screen Figure 31 List of programs A delayed start of backdated program is possible (up to 7 days back). This is possible for the programs with time priority. Program segments that would last from the back date to the current date will be skipped. If the program is running, the symbol appears next to the program name on the list. -
Page 45: Quick Change Of Set Time
Instruction manual ST, ST BD, CHL, ILW SMART confirm the change. The temperature can’t be higher than the over temperature protection -2°C and lower than the under temperature protection +2°C. Figure 32 Quick change of set temperature Figure 33 Quick change of set temperature 6.7.2. -
Page 46: Quick Change Of Fan Efficiency (Only For Ilw)
Instruction manual ST, ST BD, CHL, ILW SMART Figure 34 Quick change of set time Figure 35 Quick change of set time 6.7.3. Quick change of fan efficiency (only for ILW) In order to quickly change the fan efficiency, press the icon in the main screen (Figure 36). -
Page 47: Statistics
Instruction manual ST, ST BD, CHL, ILW SMART Figure 36 Quick change of fan efficiency Figure 37 Quick change of fan efficiency 6.8. Statistics Go to the main menu and press the icon . This panel (Figure 38) displays statistics of the currently running program or program that has ended. -
Page 48: Data Record
Instruction manual ST, ST BD, CHL, ILW SMART You cannot overview the segment / cycle data that has not started yet. Figure 38 Statistics 6.9. Data record Go to the main menu and press the icon . Data record window (Figure 39) contains the following information: •... -
Page 49: Event Log
Instruction manual ST, ST BD, CHL, ILW SMART Press to display the rest of the data. Recording data onto the USB flash drive. .csv files are available - separated by semicolon when opening e.g. with a spreadsheet, .plkx - opening with the Lab Desk application (option) Before removing the USB flash drive from the USB port, it must be unmounted, see Section 5.8. - Page 50 Instruction manual ST, ST BD, CHL, ILW SMART Recording data onto the USB flash drive. .csv files are available - separated by semicolon when opening e.g. with a spreadsheet, .plkx - opening with the LabDesk application (option) Before removing the USB flash drive from the USB port, it must be unmounted, see Section 5.8.
-
Page 51: Info
Instruction manual ST, ST BD, CHL, ILW SMART Open door alarm start open door alarm has been activated Door closed the door is closed Open door alarm stop open door alarm has been deactivated Program Restarted program has been reasumed after power failure Under Protection Start under-temperature protection has been activated Under Protection Stop... -
Page 52: User Settings Panel
Instruction manual ST, ST BD, CHL, ILW SMART Figure 44 Info window (example) to save the “Download” folder (with instruction manual) on the USB flash drive. After inserting the flash Press icon drive into USB port wait few seconds until the information “Flashdrive connected” will appear on the display - for more to write the service data on the USB flash drive –... -
Page 53: Unlocking The Touch Screen
Instruction manual ST, ST BD, CHL, ILW SMART Figure 45 User settings panel Confirms changes Cancels the entered changes 6.12.1. Unlocking the touch screen When the automatic touch screen lock is enabled (Section 6.16), slide the blue circle into the white circle to unlock the screen. -
Page 54: Alarms
Instruction manual ST, ST BD, CHL, ILW SMART To change the date / system time it is necessary to press in the window (Figure 47). The window will appear and you will be able to make changes (Figure 48). Figure 47 Time zone change Figure 48 Date / time change Confirms changes and restarts the device Cancels the entered changes... -
Page 55: Mute Option
Instruction manual ST, ST BD, CHL, ILW SMART the alarm will be activated with a delay (1 min, 2 min, 5 min, 10 min, 15 min) after exceeding the permitted temperature. • delay door alarm: the door alarm will be activated when the door is opened for the time selected by the user (30 s, 1 min, 2 min, 5 min, 10 min). -
Page 56: Network
Instruction manual ST, ST BD, CHL, ILW SMART Figure 50 Setting the time of mute function 6.15. Network Go to the main menu and press the icon . In this panel (Figure 51) you can change LAN settings: • IP – the device’s IP address •... -
Page 57: Automatic Defrosting Function (Optionally For St 1-6, St 500-1450, Chl 1-6, Chl 500-1450, Ilw, Standard For St 500 M-1450 M I Chl 500 M-1450 M)
Instruction manual ST, ST BD, CHL, ILW SMART Figure 51 – LAN settings Confirms changes Cancels the entered changes 6.16. Automatic defrosting function (optionally for ST 1-6, ST 500-1450, CHL 1-6, CHL 500-1450, ILW, standard for ST 500 M-1450 M i CHL 500 M- 1450 M) * –... -
Page 58: Corrections
Instruction manual ST, ST BD, CHL, ILW SMART Figure 52 Defrosting function Confirms changes Cancels the entered changes 6.17. Corrections Go to the main menu and press the icon . In this window (Figure 53) you can correct temperature value indicated on the display by adding the correction value. -
Page 59: Archives
Instruction manual ST, ST BD, CHL, ILW SMART Confirms changes Cancels the entered changes 6.18. Archives Go to the main menu and press the icon . The archive folder contains data and events transferred there while changing the date / time to an earlier one than the date / time with which they have been stored in the device memory. -
Page 60: Temperature Protection
Instruction manual ST, ST BD, CHL, ILW SMART register INPUT REGISTERS function READ_INPUT_REGISTERS (0x30001) Address Type Multiplier Description temperature from the main sensor bool Open door b0 – door alarm b1 – upper temperature alarm b2 – lower temperature alarm b3 –... -
Page 61: Connecting The Device To A Computer
Instruction manual ST, ST BD, CHL, ILW SMART 9. CONNECTING THE DEVICE TO A COMPUTER Each device in the SMART version can be connected to an Ethernet network or directly to a computer with a LAN cable (optional equipment). To read data (stored data and event log), you need the Lab Desk software (optional equipment). If you purchase the software, a LAN cable is included together with a hardware key, which should be inserted into the USB port of the computer. -
Page 62: Exterior Cleaning
Instruction manual ST, ST BD, CHL, ILW SMART INOX products are manufactured with stainless steel. When used in standard laboratory conditions they do not rust. However it is possible that stains (which may look like rust) form on the steel surface (e.g. due to the kind of samples that are incubated in the chamber). - Page 63 Instruction manual ST, ST BD, CHL, ILW SMART for: ST 500, 700, 1200, 1450 for: ST 1, 2, 3, 4, 5, 6, CHL 500, 700, 1200, 1450 CHL 1, 2, 3, 4, 5, 6, view from the top (the aggregate is located in the upper part of the rear view equipment)
- Page 64 Instruction manual ST, ST BD, CHL, ILW SMART for ILW To loosen (one rotation) Failure to clean regularly may result in damage to the compressor and loss of the rights for repair under warranty.
-
Page 65: Cleaning The Touch Screen
Instruction manual ST, ST BD, CHL, ILW SMART 11.3. Cleaning the touch screen The touch screen is exposed to dirt, so it must be cleaned regularly. To clean the touch screen, use a clean and dry microfiber cloth. It is a very delicate material and collects dirt well. Before using the cloth, make sure that on the surface there are no crumbs or particles. -
Page 66: Consumables
• get full contact details of technical service • access to POL-EKO-APARATURA online catalogue, and information about accessories and related products • receive additional product information and special offers To receive information or technical assistance, contact the Service Department or visit the website: www.pol-... -
Page 67: Possible Defects
Instruction manual ST, ST BD, CHL, ILW SMART 13.1. Possible defects Malfunction What to check? What to do? The unit is not working Check if the unit is plugged in correctly Plug in the unit correctly Check if the circuit-breaker has tripped Press the circuit breaker on the back of the device Check the voltage in the socket... -
Page 68: Warranty Conditions
POL-EKO-APARATURA warrants that this product will be free from defects in material and workmanship for a period of two (2) years from date of the invoice. If a defect is present, POL-EKO-APARATURA will, at its option and cost, repair, replace, or refund the purchase price of this product to the customer, provided it is returned during the warranty period. -
Page 69: Rating Plate
Instruction manual ST, ST BD, CHL, ILW SMART 15. RATING PLATE The rating plate is located on the left side wall in the upper left corner. Below there is an example of a rating plate: 55 l Manufacturer’s data Type of device Serial number (the two marked digits indicate the year of manufacture of the device) Temperature protection class according to DIN 12880 Degree of protection against electric shock (class I: protection against indirect contact) and IP enclosure protection... -
Page 70: Technical Data
Door number Warranty 24 months Manufacturer POL-EKO-APARATURA additional internal glass door depth does not include 50mm of power cable internal dimensions of the units with double door are always smaller on uniformly loaded surface... -
Page 71: St M, Chl M Devices With Monoblock
Door number Warranty 24 months Manufacturer POL-EKO-APARATURA additional internal glass door depth does not include 50mm of power cable internal dimensions of the units with double door are always smaller on uniformly loaded surface... -
Page 72: St, Chl Multi-Chamber Devices
Refrigerant consult rating plate of the device Warranty 24 months Manufacturer POL-EKO-APARATURA additional internal glass door depth does not include 50mm of power cable internal dimensions of the units with double door are always smaller on uniformly loaded surface reinforced shelf... - Page 73 Instruction manual ST, ST BD, CHL, ILW SMART ST 1, CHL 1 ST / CHL: 2,3,4,5,6, ST BD: 2, 4, 5 ST / CHL 500, 700, 1200, 1450...
- Page 74 Instruction manual ST, ST BD, CHL, ILW SMART ST / CHL 500 M, 700 M, 1200 M, 1450 M...
-
Page 75: Ilw Devices
3/14 5/16 Warranty 24 months Manufacturer POL-EKO-APARATURA depth does not include 50mm of power cable reinforced shelf reinforced version on uniformly loaded surface the rating plate is located on the left side of the device in the upper left corner... -
Page 76: Declarations Of Conformity
Instruction manual ST, ST BD, CHL, ILW SMART 17. DECLARATIONS OF CONFORMITY... - Page 77 Instruction manual ST, ST BD, CHL, ILW SMART...
- Page 78 Instruction manual ST, ST BD, CHL, ILW SMART...
- Page 79 ❑ warranty and post-warranty service ❑ consultancy in the selection, maintenance and operation of laboratory equipment POL-EKO LAB is Accredited by the Polish Centre for Accreditation (a member of ILAC) and provides accredited calibration of: ❑ thermostatic and climatic chambers (incubators, drying ovens, thermostatic cabinets, climatic chambers, freezers) ❑...
- Page 80 Instruction manual ST, ST BD, CHL, ILW SMART...
Need help?
Do you have a question about the SMART ST 1 and is the answer not in the manual?
Questions and answers