Assured Wireless AW12 Installation And Quick Start Manual
Usb lte modemhigh power user equipment
Hide thumbs
Also See for AW12:
- Installation and quick start manual (22 pages) ,
- Manual (21 pages) ,
- Troubleshooting manual (10 pages)

Related Manuals for Assured Wireless AW12


Summary of Contents for Assured Wireless AW12
- Page 1 Installation and Quick Start Guide AW12 USB LTE MODEM HIGH POWER USER EQUIPMENT...
- Page 2 Paddle Antennas (3) FIRSTNET SIM Not Included The AW12 operates on the FirstNet® network. SIMs must be properly provisioned on AT&T FirstNet to camp on Band 14 and enable HPUE mode. Please contact AT&T, or an AT&T Authorized Reseller for plan details, and the process for provisioning SIMs.
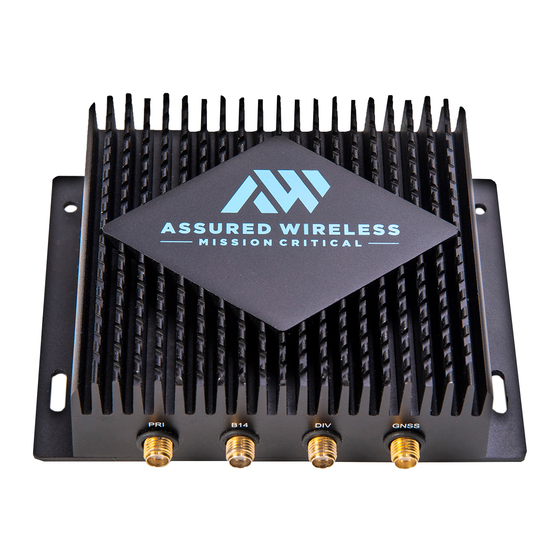
- Page 3 Page 3 Hardware FRONT PANEL: Antenna Ports REAR PANEL: Power and Data Ports A Port Primary LTE Antenna A Power Connection B Port Band 14 Antenna B USB-C Connection C Port Diversity Antenna C SIM Tray Slot D Port GNSS Antenna...
- Page 4 FIRSTNET SIMs from your AT&T Sales Provider. Notch-end Insert activated SIM into AW12 using SIM tray. Insert the card with the notch-end aligned to tray notch, and the gold contacts facing down – it will click into place.
-
Page 5: Connection Overview
USB port to the FirstNet Connection network. Overview • For Windows 10, a driver is available for the AW12 if the driver is not already installed on the PC. • For the download driver or support, visit: https://www.assured-wireless.com/support... -
Page 6: Installation
Installation Page 6 Choose Your Installation Configuration Fixed Installation Vehicle Installation See Pages 7 through 9 See Pages 10 through 11... - Page 7 Page 7 Fixed Location Connect Install the USB cable as shown, tightening the thumbscrews on the USB Type C connector to the AW12 using a small flathead screwdriver. Connect the USB Type A connector to your laptop as shown. Shown with the optional...
- Page 8 Page 8 Connecting Paddle Antennas Connect the Paddle antennas following the shown numerical sequence, your location may require different orientation for maximum performance. 45° 45° 45° 54.7° GNSS port GPS antenna NOTE: Once the PRI and the DIV antennas are assembled, rotate them away from each other to ensure you have enough clearance to install the B14 antenna.
-
Page 9: Connecting Gps Antenna
GPS signal however, some enhanced features may not be enabled. GPS antenna Provide 1 meter of separation between the AW12 and other wireless antennas for best performance. Moving the unit to an alternate location within your environment may enhance connectivity and throughput. -
Page 10: Vehicle Connection
Page 10 Vehicle Connection AW12 Standalone In-Vehicle with PC or USB Device Connect the DC power cable with the barrel connector to the AW12 and then connect Vehicular Roof the cable to your automotive power source. Mount Antenna Chassis Ground... - Page 11 Page 11 Mount Antenna on Vehicle Warning – provide 1 meter of separation from other antennas for best performance and maintain 20 cm (approximately 8 inches) distance from antenna to humans when antenna is transmitting...
-
Page 12: Connecting To Internet
Page 12 Connecting to Internet You are now connected! If you have any questions or need further information, please contact your AW 12 sales or solution representative or Assured Wireless Corporation at www.assured-wireless.com... - Page 13 This equipment should be installed and operated with minimum distance 20cm between the antenna and your body. Under no circumstances should the AW12 modem be used in any areas (a) where blasting is in progress, (b) where explosive atmospheres may be present, or (c) that are near (i) medical or life support equipment, or (ii) any equipment which may be susceptible to any form of radio interference.
- Page 14 PUNITIVE OR EXEMPLARY DAMAGES, INCLUDING WITHOUT LIMITATION FOR LOSS OF PROFITS OR REVENUE OR OF ANTICIPATED PROFITS OR REVENUE ARISING OUT OF THE USE OR INABILITY TO USE THE DEVICE, EVEN IF Assured Wireless Corporation AND/OR ITS AFFILIATES HAVE BEEN ADVISED OF THE POSSIBILITY OF SUCH DAMAGES, AND EVEN IF SUCH DAMAGES ARE FORESEEABLE; OR (B) CLAIMS BY ANY THIRD PARTY.
Need help?
Do you have a question about the AW12 and is the answer not in the manual?
Questions and answers