
Related Manuals for ECOWAY KOMFY200


Summary of Contents for ECOWAY KOMFY200
- Page 1 KOMFY200 USER'S MANUAL Ecoway Trading (Canada) Inc. 174 Torbay Rd. L3R 1G6 Markham, Ontario www.eco-way.ca service@eco-way.ca 1 833 3ECOWAY (1 833 332 6929)
-
Page 2: Table Of Contents
Table of Contents PART 1: BEFORE PUTTING INTO OPERATION .................... 1 Important safety instructions ....................... 1 General safety instructions ........................1 Recommendations ..........................1 Important safety measures ........................2 Part – 2: INSTALLATION ..........................5 Installation space ..........................5 Installing base-plate ..........................6 Installation and Removal of Device ...................... -
Page 3: Part 1: Before Putting Into Operation
PART 1: BEFORE PUTTING INTO OPERATION Important safety instructions • Read thoroughly and retain for future use. • The power source required by the appliance must be installed by an authorized electrician. Otherwise, there exists a risk of an accident, injury or damage to the appliance. •... -
Page 4: Important Safety Measures
responsible for their safety. Children should be supervised so as not to play or tamper with the appliance. • Only connect the bidet to cold tap water. Do not use seawater. Doing so may cause irritation to the skin and malfunction. •... - Page 5 Risk of death/injury by electrical shock This is an electrical product. Do not install it where water is likely to get on the product or where with humidity high enough that water is likely to form on the surface of this product. •...
- Page 6 Health concerns • Preliminary studies in females suggest that overuse of continuous spraying can increase the possibility of vaginal mucosa drying and potential reduction in desirable microbial organisms. • Although these studies have not been validated, please consult your healthcare provider for concerns regarding whether these circumstances may apply to you.
-
Page 7: Part - 2: Installation
Part – 2: INSTALLATION Carefully read the entire user's manual before putting your bidet seat into operation and store it in a safe place for future reference. The power source must be installed by an authorized electrician. Installation space Before proceeding with the installation, carefully measure and make sure that the unit measurements match the user’s toilet. -
Page 8: Installing Base-Plate
Installing base-plate The black pin frontward Screws and groove upwards 1. Install the Expansion Screws Gasket into the installation holes in the Pressing plate Base plate toilet. 2. Then install the Base Plate, Expansion Screws Pressing Plate, Gasket and Screw as per the drawing and tighten the Screws. -
Page 9: Installation Of Water Supply Pipe
Installation of water supply pipe Step-2: Bottom side connecter Step-1: Left side connecter If the toilet has two holes; for power line and Install the 3-way connecter onto the angle valve, and water supply, let two supplies across the hole to then connect the large hole of water supply pipe and plug in device’s connector which is under the water pipe of toilet pipe to the 3-way connecter. - Page 10 Power plug verification • Insert the power plug into power socket, and press protection button. When indicator light is on, the device is powered on. • Press the leakage test button if first time use the device. Protection switch bumps to show that protection function works normally Self-inspection •...
-
Page 11: Part - 3: Description Of The Appliance & Control Panel
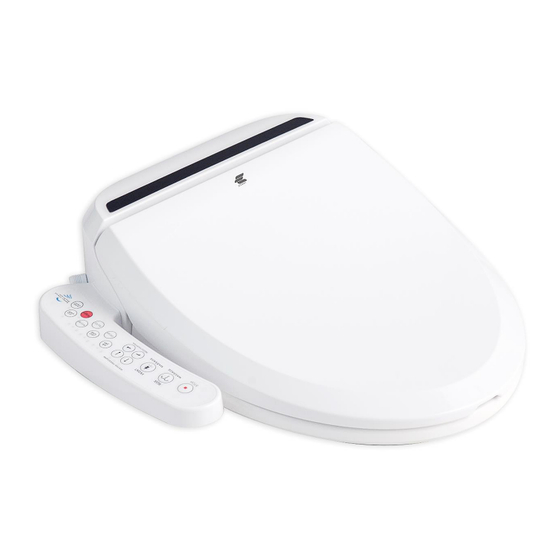
Part – 3: DESCRIPTION OF THE APPLIANCE & CONTROL PANEL Description of the appliance WARNING LABEL FRONT WASH SPRAY REAR WASH SPRAY SEAT SENSOR WARM AIR DRYER POWER PLUG CONTROL PANEL SEAT P a g e... -
Page 12: Buttons And Functions
Buttons and Functions Press once to stop function which is running 1. When user is seated on the unit, press “Front cleaning button” and start front cleaning; press twice to turn on the massage function. 2. When front cleansing is finished, and the use is still seated on the unit, the device will turn on the drying function. - Page 13 1. Press switch between seat temperature settings. ○○○: No light on – room temperature ●○○: 1 light on – approx. 28°C or 82°F ●●○: 2 light on – approx. 30°C or 86°F ●●●: 3 light on – approx. 33°C or 91°F Press once to turn on turbo wash function.
-
Page 14: Part - 4: Maintenance & Cleaning
Part – 4: MAINTENANCE & CLEANING Cleaning the unit 1. Turn off the power before cleaning the unit. 2. Gently wipe dirt and stains with a dry soft cloth or sponge. 3. Do not apply any chemical solutions to the unit. 4. -
Page 15: Part - 5: Packing List
Part – 5: PACKING LIST 1.Base Plate 2.Screw (2 pcs) 3.Gasket (2 pcs) 4.Pressing plate (2 pcs) 5.Expansion Screw (2 pcs) Water Pipe (1 pcs) 3-way Connector (1 pcs) User Manual USER MANUAL WARRANTY CARD Warranty Card KOMFY-200 13 | P a g e... -
Page 16: Part - 6: Technical Specifications
Part – 6: TECHNICAL SPECIFICATIONS Item Komfy-200 5102 Rated power supply AC110-220V ~ 50/60Hz Maximum power consumption 1600 W Power cord length 1.8 m (5.9ft) Water Pressure Minimum Water Pressure is 0.07 MPa (20L/min flush), Maximum Water Pressure is 0.8 MPa (Static). Water Tank capacity 600ml Heater capacity...
Need help?
Do you have a question about the KOMFY200 and is the answer not in the manual?
Questions and answers