Table of Contents
Advertisement
Quick Links
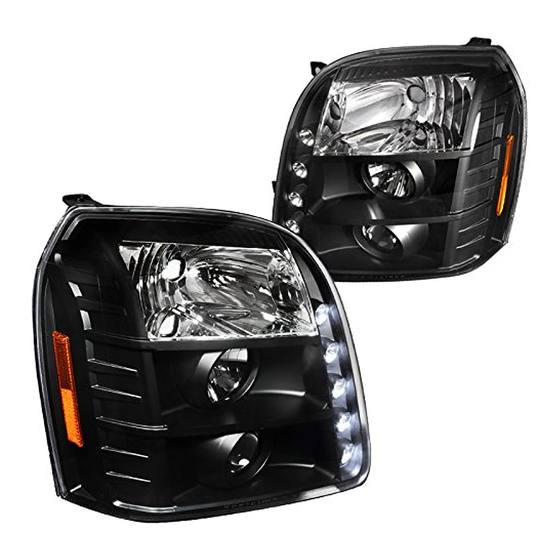
2007-2010 GMC YUKON DENALI PROJECTOR HEADLIGHTS
If you experience any difficulties that the instruction did not cover, Please seek local auto shop for advise.
Please wear protection before you work on your vehicle.
An assistant is helpful when removing the front bumper.
Please be careful while working with the bumper or body part to avoid scratching.
Do not make direct contact with the halogen bulb or the wire assembly until the unit has cooled down after use .
TOOLS AND SUPPLIES REQUIRED
Handy Remover
¼" Drive Ratchet
¼" Drive Extensions (3 to 6 inches)
10mm Socket
2LHP-DEN07-TM
2LHP-DEN07JM-TM
If your Headlight is Halo type, you also need:
Wire Stripper
Wire Crimper
4 Blue Quick Splice Wire Connectors
W W W . S P E C D T U N I N G . C O M
2 Red Wires (8 inch)
2 Black Wires (8 inch)
Advertisement
Table of Contents

Related Manuals for SPEC-D Tuning 2LHP-DEN07-TM


Summary of Contents for SPEC-D Tuning 2LHP-DEN07-TM
- Page 1 ¼” Drive Ratchet Wire Crimper ¼” Drive Extensions (3 to 6 inches) 4 Blue Quick Splice Wire Connectors 10mm Socket 2LHP-DEN07-TM 2LHP-DEN07JM-TM W W W . S P E C D T U N I N G . C O M...
- Page 2 2007-2010 GMC YUKON DENALI PROJECTOR HEADLIGHTS INSTALLATION INSTRUCTIONS W W W . S P E C D T U N I N G . C O M If you experience any difficulties that the instruction did not cover, Please seek local auto shop for advise. Please wear protection before you work on your vehicle.
- Page 3 5. Pull out the headlight a little bit, just enough to see the 6. Disconnect the connectors from the headlight wire harness in the back 7. Remove the harness from the OEM headlight 8. Pull out the driving light bulb 9.
- Page 4 11. Connect the connectors with the vehicle 12. Put the new headlight into the original spot 13. Install two bolts to fasten the headlight 14. Install one hidden bolt between the bumper and fender 15. Install two bolts under wheel well 16.
- Page 5 17. The installation is now complete please repeat the picture order from 1 to 17 for the opposite side W W W . S P E C D T U N I N G . C O M...
Need help?
Do you have a question about the 2LHP-DEN07-TM and is the answer not in the manual?
Questions and answers