
Related Manuals for ZZ2 IC-NBT


Summary of Contents for ZZ2 IC-NBT
- Page 1 User Manual IC-NBT OEM RADIO:Camera Interface for BMW NBT system with 6.5”/8.8”/10.25” screen...
-
Page 2: Table Of Contents
Camera Interface for BMW NBT system with 6.5”/8.8”/10.25” screen Contents 1.Car Compatibility Chart................................3 2.Features....................................4 3.Specifications..................................5 4.Packing Lists................................... 6 5.Wiring Diagram..................................7 6.DIP Switch Settings................................8 7.Operation Instructions................................11 8.Safety Considerations................................ 17 www.zz-2.com... -
Page 3: Car Compatibility Chart
Camera Interface for BMW NBT system with 6.5”/8.8”/10.25” screen 1. Car Compatibility Chart www.zz-2.com... -
Page 4: Features
Camera Interface for BMW NBT system with 6.5”/8.8”/10.25” screen Features: A. Support Intelligent Parking Assist System including PDC (Parking Distance Control) and FPG (Flexible Parking Guidelines) B. Support further software update via TF Card C. Support adjust FPG position for 8.8" 10.25" screen D. -
Page 5: Specifications
Camera Interface for BMW NBT system with 6.5”/8.8”/10.25” screen 3. Specifications A. Interface I/O Spec: Input: CVBS *3 (Front/Rear View Camera, 360, Video), VGA *1 (Specific 360 Panoramic System) Output: LVDS Output B. Power Spec: Input Power: 9V-16V Consumption: 6W C. -
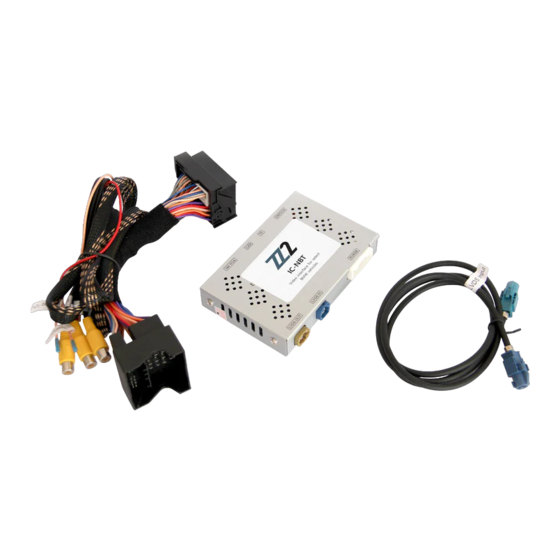
Page 6: Packing Lists
Camera Interface for BMW NBT system with 6.5”/8.8”/10.25” screen 4. Packing Lists Camera Interface LVDS Cables Power Harness Optional Parts(Sold separately at the Cartizan) 3.5mm AUX cable www.zz-2.com... -
Page 7: Wiring Diagram
Camera Interface for BMW NBT system with 6.5”/8.8”/10.25” screen 5. Wiring Diagram www.zz-2.com... -
Page 8: Dip Switch Settings
Camera Interface for BMW NBT system with 6.5”/8.8”/10.25” screen 6. DIP Switch Settings ON ( OFF( ▼ ▲ Car Model No.1 No.2 No.3 2015-2016 6.5 inch OFF(▲) OFF(▲) OFF(▲) 2013-2014 6.5 inch ON (▼) OFF(▲) OFF(▲) 2017 1 series OFF(▲) ON(▼) ON(▼) 2013-2016... - Page 9 Camera Interface for BMW NBT system with 6.5”/8.8”/10.25” screen ON ( OFF( ▼ ▲ Turn off PDC Turn on PDC Turn off dynamic guideline Turn on dynamic guideline Turn on front view Turn off front view *Please note that DIP Switch 5 and DIP Switch 8 put ON ( with OEM rear view.
- Page 10 Camera Interface for BMW NBT system with 6.5”/8.8”/10.25” screen * Dip Switcher SettingsⅡ(Quick Setting): www.zz-2.com...
-
Page 11: Operation Instructions
Camera Interface for BMW NBT system with 6.5”/8.8”/10.25” screen 7. Operation Instructions 7.1 Installation Process * Please note that there need to power off and take protection measures to avoid damaging in the installation process. 1. Please prize up the air conditioner panel according to the designated position. *Please note that there are screws on the side panel of copilot, and remove the screws of side panel first if there is any, then prize up the air conditioner panel. - Page 12 Camera Interface for BMW NBT system with 6.5”/8.8”/10.25” screen 2. After prize up the air conditioner panel, pull out the panel cables, then prize up the up plastic panel, remove the six screws in the red circle, and take down the CD panel. www.zz-2.com...
- Page 13 Camera Interface for BMW NBT system with 6.5”/8.8”/10.25” screen 3. Remove the screw in the red circle, take out the head unit. Please note that original car plug has optical fibers, and switch the optical fibers of the original car to the plug according to the pictures. www.zz-2.com...
- Page 14 Camera Interface for BMW NBT system with 6.5”/8.8”/10.25” screen 4. Pull out the LVDS cables of the OEM screen and connect to the LVDS-IN interface. Another cable connect to the LVDS-OUT interface, plug connect to the OEM screen on the other side. Then connect to the rear view cables and all of cables, check it and confirm the dip switcher, power on at the end.
- Page 15 Camera Interface for BMW NBT system with 6.5”/8.8”/10.25” screen 7.2 DVR Switching Long time press MENU for 2 seconds to enter DVR if DVR available and don’t use dip switcher. www.zz-2.com...
- Page 16 Camera Interface for BMW NBT system with 6.5”/8.8”/10.25” screen 7.3 Switch Position FPG (Flexible Parking Guidelines) Please long press MENU button on reversing interface about 10 seconds to enter mode of adjust dynamic guidelines. Then switch up, down, right, left four directions to adjust dynamic guidelines by turn multimedia buttons. www.zz-2.com...
-
Page 17: Safety Considerations
Camera Interface for BMW NBT system with 6.5”/8.8”/10.25” screen 8. Safety Considerations 1. In order to protect driving safety and avoid breaking the traffic law, please do not watch the program or use this product when you’re driving. 2. Please do not put the product in the damp environment or water, in order to avoid electric shock, damaged and fire accident caused by short circuit. - Page 18 Camera Interface for BMW NBT system with 6.5”/8.8”/10.25” screen 7. The cables should be connected in a good way, the vehicle installation space is small, so reduce space usage as far as possible, and it will easy installation for monitor. There should be a good plan about connect cables, avoid affecting the active component of connecting, such as control components of turning steering wheel, throttle and brake pedal.
- Page 19 info@zz-2.com 929-220-1212 Toll free: 877-241-2526 www.zz-2.com...
Need help?
Do you have a question about the IC-NBT and is the answer not in the manual?
Questions and answers