
Related Manuals for SCULPFUN S10


Summary of Contents for SCULPFUN S10
- Page 1 English Deutsche Français For Italian/Spanish/Polish user manual please scan...
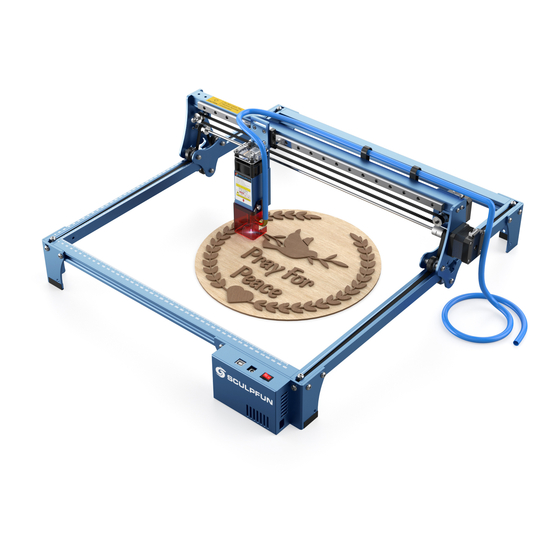
- Page 2 Preview the main parts Main Unit: 1、Back Beam 2、Front Beam 7、X Beam set 3、Left Beam 4、Right Beam 1、Back Beam 5、Foot support 6、Mainboard support 7、X Beam set 8、Laser module 3、Left Beam 9、Air tube Note! This picture is the total picture after the assembly is completed.
- Page 3 Step 1 Assemble the back, left and right beams Back Beam(Notice label on bags !) Back Beam Left Beam Right Beam M5*30 Note: 1、Find the required tool and screw model before starting assembly: T- M5*18 M5*18 Back Beam shaped hexagon wrench,Step1 Screw bag, left/right/back frame beams, tripod*2.
- Page 4 Step 2 Assemble X beam set and front beam Tripod Motherboard tripod Assembly steps: M5*30 1、Push the X beam assembly into the U-shaped frame, paying attention to the direction of white logo 2、Required components: tripod*1, motherboard tripod, front frame M5*18 M5*18 beam, Step3 screw pack, T-shaped hexagonal wrench.
-
Page 5: Step 3 Install The Belt
Step 3 Install the belt Pass the belt through the flat hole Installation steps: Install the belt to the position shown in the figure,note: 1. The belt should be installed in the direction of the arrow in the figure above. 2. -
Page 6: Installation Steps
Step 4 Install T nut Do not screw through the nut Put the T nut into the groove, the long side is Tighten the screws and keep parallel to the groove, Strongly press the T nut the long side of the T-nut while rotating the wrench clockwise to make the perpendicular to the groove. - Page 7 Step 5 Install laser module and Laser shield 1 . M4 hand screw 2. M3 hand screw Install laser module and Laser shield by hand screws...
- Page 8 Step 6 Install air pipes and cables 1. Connect the motor and cable, note: the X and Y motor are marked on the terminals. Install the laser cable. 2. Fix the cable on the machine hole with black cable tie. Install the blue air tube on the machine, fix it on Keep cables slack.
- Page 9 1. For the X-axis, just loosen the screw, of X and Y belts tighten it to one side, and then fix the 1、The focal length of the SCULPFUN laser module is fixed and cannot be changed . screw. 2、The specific position of the laser focus is 2.
- Page 10 Ø For detailed warranty policy,please visit QR Code Reader our official website at: www.sculpfun3d.com /Barcode Scanner or any APP with scanner Ø For Laser Engraver technical support and service,please email: support@sculpfun3d.com Ø Official Group for Sculpfun Users: https://www.facebook.com/groups/538557 960530958 ØOFFICIAL YOUTUBE: https://www.youtube.com/c/SCULPFUNReal /videos...
- Page 11 English Deutsche Français For Italian/Spanish/Polish user manual please scan...
- Page 12 Vorschau der Hauptteile Haupteinheit: 1、Back Beam 2、Front Beam 7、X Beam set 3、Left Beam 4、Right Beam 5、Foot support 1、Back Beam 6、Mainboard support 7、X Beam set 8、Laser module 3、Left Beam 9、Air tube Notiz! Dieses Bild ist das Gesamtbild nach Abschluss der Montage. Wenn Sie sich in den 8、Laser module folgenden Schritten über...
- Page 13 Schritt 1 Montieren Sie den hinteren, linken und rechten Balken Back Beam(Notice label on bags !) Back Beam Left Beam Right Beam M5*30 Hinweis: 1 、 Suchen Sie das gewünschte Werkzeug- und Schraubenmodell, bevor Sie mit M5*18 M5*18 Back Beam der Montage beginnen: T-förmiger Sechskantschlüssel, Schritt 1 Schraubbeutel, Rahmenbalken links / rechts / hinten, Stativ * 2.
- Page 14 Schritt 2 Montieren Sie den X-Balkensatz und den vorderen Balken Tripod Motherboard tripod Montageschritte: 1 、 Schieben Sie die X-Trägerbaugruppe in den U-förmigen Rahmen und achten Sie dabei auf die Richtung des weißen Logos! M5*30 2 、 Erforderliche Komponenten: Stativ * 1, Motherboard-Stativ, Frontrahmenbalken, Step3-Schraubensatz, T-förmiger M5*18 M5*18...
- Page 15 Schritt 3 Installieren Sie den Riemen Bitte führen Sie den Riemen durch das flache Loch Installationsschritte: Installieren Sie den Riemen in der in der Abbildung gezeigten Position. Hinweis: 1. Der Riemen sollte in Pfeilrichtung in der obigen Abbildung installiert werden. 2. Das Zahnmuster des Riemens zeigt nach unten und greift in die Zahnräder ein.
- Page 16 Schritt 4 Installieren Sie die T-Mutter Nicht durch die Mutter schrauben Put the T nut into the groove, the long side is Tighten the screws and keep parallel to the groove, Strongly press the T nut the long side of the T-nut while rotating the wrench clockwise to make the perpendicular to the groove.
- Page 17 Schritt 5 Installieren Sie das Lasermodul und die Laserabschirmung 1 . M4 hand screw 2. M3 hand screw Lasermodul einbauen und Laserschutz durch Handschrauben...
- Page 18 Schritt 6 Installieren Sie Luftschläuche und Kabel 1. Schließen Sie Motor und Kabel an, beachten Sie: Der X- und Y-Motor sind an den Klemmen gekennzeichnet. Installieren Sie das Laserkabel. Installieren Sie den blauen Luftschlauch an der Maschine, 2. Befestigen Sie das Kabel mit einem schwarzen Kabelbinder am befestigen Sie ihn mit Schrauben und Klammern am X- Maschinenloch.
- Page 19 Schraube, ziehen Sie sie an einer Seite fest und Fokussierungsprinzip: befestigen Sie dann die Schraube. 1 、 Die Brennweite des SCULPFUN-Lasermoduls 2. Für die Y-Achse müssen Sie die sechseckige ist fest und kann nicht geändert werden. 2 、 Die spezifische Position des Laserfokus liegt...
- Page 20 Sie auf unserer offiziellen Website unter: /Barcode Scanner www.sculpfun3d.com or any APP mit Scanner Ø Für technischen Support und Service von Laser Engraver senden Sie bitte eine E-Mail support@sculpfun3d.com Ø Official Group for Sculpfun Users: https://www.facebook.com/groups/538557 960530958 ØOFFICIAL YOUTUBE: https://www.youtube.com/c/SCULPFUNReal /videos...
- Page 21 English Deutsche Français For Italian/Spanish/Polish user manual please scan...
- Page 22 Aperçu des pièces principales Main Unit: 1、Back Beam 2、Front Beam 7、X Beam set 3、Left Beam 4、Right Beam 1、Back Beam 5、Foot support 6、Mainboard support 7、X Beam set 8、Laser module 3、Left Beam 9、Air tube Noter! Cette image est l'image totale une fois l'assemblage terminé.
- Page 23 Étape 1 Assemblez les poutres arrière, gauche et droite Back Beam(Notice label on bags !) Back Beam Left Beam Right Beam M5*30 Noter: 1, trouvez l'outil requis et le modèle de vis avant de commencer M5*18 M5*18 Back Beam l'assemblage: clé hexagonale en forme de T, sac de vis Step1, poutres de cadre gauche / droite / arrière, trépied * 2.
- Page 24 Étape 2 Assemblez l'ensemble de poutre X et la poutre avant Tripod Motherboard tripod Étapes d'assemblage : M5*30 1, poussez l'ensemble de poutre X dans le cadre en forme de U, faisant attention à la direction du logo blanc! 2, composants requis: trépied * 1, trépied de carte mère, poutre de M5*18 M5*18 cadre avant, jeu de vis Step3, clé...
- Page 25 Étape 3 Installez la courroie Veuillez passer la ceinture à travers le trou plat Etapes d'installation: Installez la courroie dans la position indiquée sur la figure, notez: 1. La courroie doit être installée dans le sens de la flèche sur la figure ci- dessus 2.
-
Page 26: Etapes D'installation
Étape 4 Installez l'écrou en T Nicht durch die Mutter schrauben Mettez l'écrou en T dans la rainure, le côté long Serrez les vis et maintenez le est parallèle à la rainure, appuyez fortement sur côté long de l'écrou en T l'écrou en T tout en tournant la clé... - Page 27 Étape 5 Installez le module laser et le bouclier laser 1 . M4 hand screw 2. M3 hand screw Installez le module laser et Bouclier laser à vis à main...
- Page 28 Étape 6 Installer les conduites d'air et les câbles 1. Connectez le moteur et le câble, notez : le moteur X et Y sont marqués sur les bornes. Installez le câble laser. Installez le tube à air bleu sur la machine, fixez-le 2.
- Page 29 50mm 50mm la surface de l'objet gravé Comment régler la tension 1, la distance focale du module laser SCULPFUN Principe de mise au point : 1. Pour l'axe X, desserrez simplement la vis, des courroies X et Y est fixe et ne peut pas être modifiée.
- Page 30 Web officiel à /Barcode Scanner l'adresse: www.sculpfun3d.com or any APP with scanner Ø Pour le support technique et le service de Laser Engraver, veuillez envoyer un e-mail à: support@sculpfun3d.com Ø Official Group for Sculpfun Users: https://www.facebook.com/groups/538557 960530958 ØOFFICIAL YOUTUBE: https://www.youtube.com/c/SCULPFUNReal /videos...
Need help?
Do you have a question about the S10 and is the answer not in the manual?
Questions and answers