Table of Contents
Advertisement
Quick Links
Advertisement
Table of Contents

Related Manuals for Electrolux FEH60G2102


Summary of Contents for Electrolux FEH60G2102
- Page 1 FEH60G2102 Cooker User Manual...
-
Page 2: Table Of Contents
14. GUARANTEE ....................29 WE’RE THINKING OF YOU Thank you for purchasing an Electrolux appliance. You’ve chosen a product that brings with it decades of professional experience and innovation. Ingenious and stylish, it has been designed with you in mind. So whenever you use it, you can be safe in the knowledge that you’ll get great results every time. -
Page 3: Safety Information
ENGLISH SAFETY INFORMATION Before the installation and use of the appliance, carefully read the supplied instructions. The manufacturer is not responsible for any injuries or damages that are the result of incorrect installation or usage. Always keep the instructions in a safe and accessible location for future reference. - Page 4 This appliance is not intended to be used on a ships, • boats or vessels. Do not install the appliance behind a decorative door • in order to avoid overheating. Do not install the appliance on a platform. •...
-
Page 5: Safety Instructions
ENGLISH Ensure that the appliance is switched off before • replacing the lamp to avoid the possibility of electric shock. If the mains power supply cable is damaged, it must • be replaced by the manufacturer, its Authorised Service Centre or similarly qualified persons to avoid an electrical hazard. - Page 6 2.2 Electrical Connection • Do not change the specification of this appliance. WARNING! • Make sure that the ventilation Risk of fire and electrical openings are not blocked. shock. • Do not let the appliance stay unattended during operation.
- Page 7 ENGLISH • Discoloration of the enamel or • Make sure the cavity and the door are stainless steel has no effect on the wiped dry after each use. Steam performance of the appliance. produced during the operation of the • Use a deep pan for moist cakes. Fruit appliance condensates on cavity walls juices cause stains that can be and can cause corrosion.
-
Page 8: Product Description
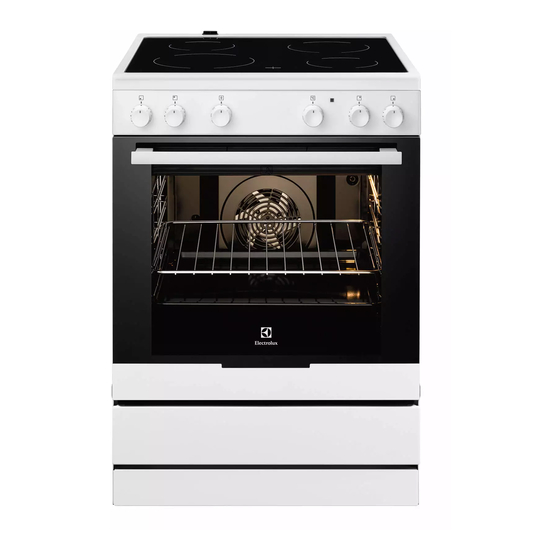
3. PRODUCT DESCRIPTION 3.1 General overview Knob for the oven functions Knob for the temperature Temperature indicator / symbol Knobs for the hob Heating element Lamp Shelf support, removable Shelf positions 3.2 Cooking surface layout Cooking zone 1200 W... -
Page 9: Hob - Daily Use
ENGLISH 1. Set the function and the maximum Refer to "Care and cleaning" temperature. chapter. 2. Let the appliance operate for 1 hour. Clean the appliance and the accessories 3. Set the function and set the before first use. maximum temperature. Put the accessories and the removable 4. -
Page 10: Hob - Care And Cleaning
Heat setting Use to: Time Hints (min) Keep cooked food warm. as nec‐ Put a lid on the cookware. essary 1 - 2 Hollandaise sauce, melt: but‐ 5 - 25 Mix from time to time. ter, chocolate, gelatine. 1 - 2... -
Page 11: Oven - Daily Use
ENGLISH 8. OVEN - DAILY USE WARNING! Refer to Safety chapters. 8.1 Oven functions Symbol Oven function Application Off position The appliance is off. Oven Lamp To activate the lamp without a cooking function. Circulated cooking To roast or roast and bake food with the same cooking temperature on more than one shelf po‐... -
Page 12: Oven - Hints And Tips
8.2 Activating and deactivating the oven It depends on the model if your appliance has knob symbols, indicators or lamps: • The indicator comes on when the oven heats up. • The lamp comes on when the oven operates. - Page 13 ENGLISH 9.1 Baking • You can extend baking times by 10 – 15 minutes if you bake cakes on more • Your oven may bake or roast than one shelf position. differently to the appliance you had • Cakes and pastries at different before.
- Page 14 Food Temperature (°C) Time (min) Biscuits 180 - 190 10 - 20 Pastry: Choux 180 - 190 30 - 40 Pastry: Shortcrust 180 - 190 25 - 35 Meringues 80 - 100 120 - 150 1) Preheat the oven.
- Page 15 ENGLISH Food Temperature Time (min) Shelf position (°C) Biscuits made with sponge mixture 150 - 160 15 - 20 Pastries made with egg white, mer‐ 80 - 100 120 - 150 ingues Macaroons 100 - 120 30 - 50 Biscuits made with yeast dough 150 - 160 20 - 40 Puff pastries...
- Page 16 Food Temperature Time (min) Shelf position (°C) 2 positions Biscuits made with yeast dough 160 - 170 30 - 60 2 / 4 Puff pastries 170 - 180 30 - 50 2 / 4 1) Preheat the oven. 9.5 Conventional Baking on one level...
- Page 17 ENGLISH Food Temperature Time (min) Shelf posi‐ (°C) tion Fruit flans made with short pastry 170 - 190 40 - 60 Yeast cakes with delicate toppings 40 - 80 160 - 180 (e.g. quark,cream, custard) Pizza (with a lot of topping) 30 - 50 1 - 2 190 - 210...
- Page 18 Food Temperature Time (min) Shelf posi‐ (°C) tion Sweet bakes 180 - 200 40 - 60 Fish bakes 180 - 200 40 - 60 Stuffed vegetables 180 - 200 40 - 60 1) Preheat the oven. 9.6 Roasting • If necessary, turn the roast after 1/2 to 2/3 of the cooking time.
- Page 19 ENGLISH Food Quantity Temperature Time (min) Shelf po‐ (°C) sition Pork knuckle (pre- 750 g - 1 kg 200 - 220 90 - 120 cooked) Veal Food Quantity Temperature Time (min) Shelf po‐ (°C) sition 1 kg 210 - 220 90 - 120 Roast veal Knuckle of veal...
- Page 20 Food Quantity Tempera‐ Time (min) Shelf po‐ ture (°C) sition Turkey 4 - 6 kg 180 - 200 180 - 240 Fish Food Quantity Tempera‐ Time (min) Shelf po‐ ture (°C) sition Whole fish 1 - 1.5 kg 210 - 220 40 - 70 9.8 Roasting with Turbo Grilling...
- Page 21 ENGLISH Poultry Food Quantity Tempera‐ Time Shelf po‐ ture (°C) (min) sition Poultry portions 200 - 250 g 200 - 220 30 - 50 each Half chicken 400 - 500 g 190 - 210 35 - 50 each Chicken, poulard 1 - 1.5 kg 190 - 210 50 - 70...
- Page 22 • Put approximately 1/2 litre of water with one-litre jars), stop the oven or into the baking tray to give sufficient decrease the temperature to 100 °C moisture in the oven. (see the table). • When the liquid in the jars starts to simmer (after approx.
-
Page 23: Oven - Care And Cleaning
ENGLISH Food Quantity Defrosting Further Comments time (min) defrosting time (min) Trout 150 g 25 - 35 10 - 15 Strawberries 300 g 30 - 40 10 - 20 Butter 250 g 30 - 40 10 - 15 Cream 2 x 200 g 80 - 100 10 - 15 Whip the cream when still... - Page 24 CAUTION! Make sure that the longer fixing wire is in the front. The ends of the two wires must point to the rear. Incorrect installation can cause damage to the enamel. 10.4 Removing the oven door 2. Pull the door trim to the front to remove it.
-
Page 25: Troubleshooting
ENGLISH Use the same oven lamp type. 2. Lift the drawer at a small angle and 4. Install the glass cover. remove it from the drawer support rails. 10.7 Removing the drawer Inserting the drawer: 1. To insert the drawer set the drawer WARNING! on the support rails. -
Page 26: Installation
Problem Possible cause Remedy Residual heat indicator The zone is not hot be‐ If the zone operated suffi‐ does not come on. cause it operated only for a ciently long to be hot, short time. speak to an Authorised Service Centre. - Page 27 ENGLISH Minimum distances Dimension 12.3 Levelling of the appliance CAUTION! Make sure you install the anti-tilt protection at the correct height. Make sure that the surface behind the appliance is smooth. 1. Set the correct height and area for Use small feet on the bottom of the appliance before you attach the appliance to set the appliance top anti-tilt protection.
-
Page 28: Energy Efficiency
13.2 Product Fiche and information for ovens according to EU 65-66/2014 Supplier's name Electrolux Model identification FEH60G2102 Energy Efficiency Index 100.0 Energy efficiency class Energy consumption with a standard load, con‐ 0.95 kWh/cycle ventional mode... -
Page 29: Guarantee
ENGLISH Energy consumption with a standard load, fan- 0.85 kWh/cycle forced mode Number of cavities Heat source Electricity Volume 72 l Type of oven Oven inside Freestanding Cook‐ Mass 46.5 kg EN 60350-1 - Household electric cooking When the cooking duration is longer than appliances - Part 1: Ranges, ovens, 30 minutes, reduce the oven temperature steam ovens and grills - Methods for... - Page 30 Point of Service Morgenstrasse 131 3018 Bern Zürcherstrasse 204E 9000 St. Gallen Seetalstrasse 11 6020 Emmenbrücke Schlossstrasse 1 4133 Pratteln Comercialstrasse 19 7000 Chur Spare parts service Industriestrasse 10, guarantee covers the costs of materials, 5506 Mägenwil, Tel. 0848 848 111 labour and travel.
- Page 31 ENGLISH...
- Page 32 www.electrolux.com/shop...
Need help?
Do you have a question about the FEH60G2102 and is the answer not in the manual?
Questions and answers