Table of Contents
Advertisement
Go to www.vtechphones.com (US)
to register your product for enhanced warranty
support and latest VTech product news.
Go to phones.vtechcanada.com (Canada) for
latest VTech product news.
Scan the QR code for
support information
US
CA
SN1127
Amplified Corded
Answering System with
Big Buttons and Display
User's manual
Advertisement
Table of Contents

Related Manuals for VTech SN1127


Summary of Contents for VTech SN1127
- Page 1 SN1127 Go to www.vtechphones.com (US) to register your product for enhanced warranty Amplified Corded support and latest VTech product news. Go to phones.vtechcanada.com (Canada) for Answering System with latest VTech product news. Big Buttons and Display Scan the QR code for support information User’s manual...
- Page 2 Congratulations on purchasing your new VTech product. Before using this telephone, please read Important safety instructions. This quick start guide provides you with basic installation and use instructions. A limited set of features are described in abbreviated form. Please refer to the online user’s manual for a full set of installation and operation instructions at www.vtechphones.com or phones.
- Page 3 Important safety water such as near a bath never be placed near or over tub, wash bowl, kitchen sink, a radiator or heat register. instructions laundry tub or a swimming This product should not be pool, or in a wet basement placed in any area where When using your telephone or shower.
- Page 4 spill liquid of any kind on the or frayed. • If the product exhibits product. • If liquid has been spilled a distinct change in 12. To reduce the risk of electric onto the product. performance. shock, do not disassemble •...
- Page 5 concentrations of flammable 19. For pluggable equipment, 2. Observez toutes les or flame-supporting gases, the socket-outlet shall be instructions et mises en unless there is adequate installed near the equipment garde inscrites sur l’appareil. ventilation. A spark in such and shall be easily accessible. 3.
- Page 6 et être sérieusement d’un élément de chauffage ouvertures de cet appareil, endommagé. ni d’une plinthe électrique. car ils pourraient toucher Évitez d’installer le système De plus, ne l’installez pas à des points de tension téléphonique dans les dans une unité murale ou dangereux ou court- endroits soumis à...
- Page 7 à la fermeture d’un département de service à la rétablir le fonctionnement circuit électrique. L’utilisateur clientèle de VTech dans les normal de l’appareil. ne devrait pas brancher le cas suivants : • Si le produit a été échappé et téléphone à...
- Page 8 où l’on utilise de l’oxygène 20. N’utilisez que les adaptateurs requirements are intended to médical sans ventilation inclus avec ce produit. provide reasonable protection adéquate; des gaz industriels L’utilisation d’un adaptateur against harmful interference in a (dissolvants de nettoyage, dont la polarité ou la residential installation.
- Page 9 between the equipment and not be ensured when using this comply with applicable Part 68 receiver. telephone. rules and technical requirements • Connect the equipment into adopted by ACTA. an outlet on a circuit different A compliant telephone cord and This Class B digital apparatus from that to which the modular plug is provided with...
- Page 10 your telephone service provider. telephone service provider may locations, you may choose to store temporarily discontinue your emergency telephone numbers This equipment must not be used telephone service. The telephone (e.g., police, fire, medical) in these with Party Lines. If you have specially service provider is required to locations.
- Page 11 Privacy of communications may Disclaimer and Limitation of not be ensured when using this Liability telephone. VTech Communications, Inc. The te rm ‘ ’ IC:‘ ’ b efore the and its suppliers assume no certification/registration number responsibility for any damage...
-
Page 12: Table Of Contents
What’s in the box Temporary ringer slicencing Call waiting Connect and install Redial Photo/memory speed dial Connect the telephone base Temporary tone dialing Line power mode (no AC power) Equalizer Mount the telephone base (optional) Answering system Overview About the built-in answering system Setup New incoming message indicator Message playback... - Page 13 Product care | Need help? Limited warranty Technical Specifications 34...
- Page 14 What’s in the box User’s manual...
-
Page 15: Connect And Install
Connect and install Connect the telephone base If you subscribe to digital subscriber line (DSL) high- speed Internet service through your telephone line, make sure you connect a DSL filter (not included) to the telephone wall jack. -
Page 16: Line Power Mode (No Ac Power)
Connect and install Line power mode (no AC power) When there is a power failure, the telephone base uses power from the telephone line to let you make and answer calls using the corded handset and dialing keys. Make a call during power failure Lift the corded handset and wait for a dial tone. -
Page 17: Mount The Telephone Base (Optional)
Connect and install Mount the telephone base (optional) On the rear side of the telephone base, press the tabs of the wall-mount bracket to release it from the tabletop orientation. - Page 18 Connect and install Flip the wall-mount bracket down and push it into the telephone base until it clicks into place.
- Page 19 Connect and install Slide the handset Rotate it upside Slide the handset tab back into the tab upward. down. slot. The protruding edge of the handset tab holds the corded handset in place when the telephone is mounted on the wall.
- Page 20 Connect and install Align and mount the bracket to the telephone wall mount plate.
-
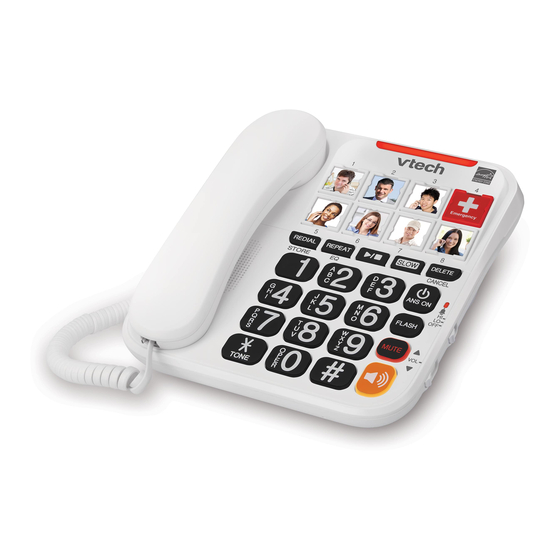
Page 21: Overview
Overview 1 Handset earpiece Slot for handset tab • For optional wall mounting. 3 Handset microphone 4 Coiled handset cord... - Page 22 Overview...
- Page 23 Overview • On when the telephone is in use, or when the answering Visual ringer system is answering an incoming call. indicator • Flashes to indicate an incoming call. • Photo speed dial memory key 4 is tailored for emergency Emergency calls.
- Page 24 Overview • Press to slow down the message playback. • Delete/cancel/quit the storing photo speed dial process. • Delete the playing message. • Press twice to delete all old messages. • Adjust the base ringer volume while in idle. • Adjust the listening volume during message playback or during a call.
- Page 25 Overview • Mute the microphone during a call • Silence the ringer temporarily while the phone is ringing. • Press to make or answer a call using the speakerphone. • Pound key. • Switch to tone dialing temporarily during a call. 14 Speaker •...
-
Page 26: Setup
Setup Voice guide to set answering system This feature assists you to do the setup of the answering system. You can follow the voice guide to set and change the Date/Time, record your own announcement, set the number of rings, the calls screening, the message alert tone, and the remote access code. - Page 27 Setup 1. Follow the voice guide steps to set up the date and time. 2. After the date and time is set, you can then select one of the options. Press To record your own announcement. To set up number of rings.* To set up call screening.
-
Page 28: Photo Speed Dial
Setup Photo speed dial There are eight photo speed dial memory keys 1 to 8 on the telephone base. You can store the telephone numbers you wish to quick dial to the photo speed dial keys. Photo speed memory key 4 is tailored for emergency calls. •... - Page 29 Setup 4. Press to store the number to the selected memory key location. • You will hear “[Telephone number] is stored in Speed dial [1].” and a confirmation tone. Change/ Remove a photo speed dial number 1. Press in idle mode. 2.
- Page 30 Setup Insert photos for speed dial keys You can insert photos into the photo speed dial compartments, or write the contact names on cards and insert them into the compartments. NOTE • The telephone base is shipped with protective stickers covering the photo speed dial compartments.
-
Page 31: Operate
Operate Make a call Answer a call / End a call -OR- -OR- On the telephone base, To answer a call, press on the telephone press or lift the base or lift the corded handset. corded handset. To end a call, press on the telephone base again or hang up the corded handset. -
Page 32: Volume - Speaker / Ringer
Operate Volume - Speaker / Ringer Slide the VOL control to adjust the corded Slide the Ringer control to handset or the speaker adjust the ringer volume volume level when level. in idle, on a call, and playing the message. CAUTION •... -
Page 33: Booster
Operate Temporary Booster Call waiting ringer slicencing When you subscribe to call waiting service from your telephone service provider, you hear an alert tone if there is an incoming call while you are already on a call. Press to temporarily When the telephone increase the volume is ringing, you can... -
Page 34: Redial
Operate Redial Photo/memory speed dial The last dialed telephone If you have set any speed dial numbers, you can press number is stored in the a photo speed dial key to quickly dial the preset telephone base. number. For details on setting photo/memory speed dial, see page 15. -
Page 35: Temporary Tone Dialing
Operate Temporary tone dialing This telephone is set as touch-tone by default. If you have pulse (rotary) service only, you can press to switch from pulse to touch-tone dialing temporarily during a call. This is useful if you need to send touch- tone signals to access your telephone banking or long distance services. -
Page 36: Equalizer
Operate Equalizer The equalizer enables you to change the quality of the audio for the telephone to best suit your hearing. The default setting is Natural. Change the equalizer setting During a call to toggle among Natural, Treble 1, Treble 2, and Press Bass. -
Page 37: Answering System
Answering system About the built-in answering system For message recording, your telephone has a built-in answering system. Built-in answering system Supported by Telephone system Subscription Fees • After 4 rings by default. Answer incoming calls • It can be changed via voice guide. Storage Telephone base •... -
Page 38: New Incoming Message Indicator
Answering system Turn the built in answering system on or off Press ANS ON to turn on, and the answering system light is Press ANS ON again to turn off. New incoming message indicator The answering system light flashes when there is a new message. -
Page 39: Message Playback
Answering system Repeat the playing Play the previous Message playback message message Press REPEAT twice. Delete a message Delete all messages Press DELETE twice. TIPS • While playing back a message on the telephone base, you can press reduce the playback speed •... -
Page 40: Remote Access
Answering system Remote access You can reach your answering system remotely by dialing your home telephone number from any touch-tone telephone. A two-digit security code is required. The preset code is 19. You can set the code from 00 to 99. 1. -
Page 41: Set Number Of Rings
Answering system COMMAND DESCRIPTION Stop. Hear a list of remote commands. Skip to the next message (during playback). Record a new announcement. End the call. Turn the answering system on or off. Set number of rings You can set your answering system to answer calls at least two rings earlier than your voicemail service. - Page 42 Product care | Need help? Taking care of your telephone Your cordless telephone contains sophisticated electronic parts, so it must be treated with care. Avoid rough treatment Place the handset down gently. Save the original packing materials to protect your telephone if you ever need to ship it.
- Page 43 For operations and guides to help you using your telephone, and for the latest information and supports, go and check the online help topics and online FAQs. Use your smartphone or mobile device to access our online help. • Go to https://help.vtechphones.com/sn1127 (US); OR https://phones.vtechcanada. com/en/support/general/manuals?model=sn1127 (Canada) •...
- Page 44 America and Canada. water or other liquid intrusion; What will VTech do if the Product is not free from defects in Product that has been damaged due to repair, alteration or materials and workmanship during the limited warranty period modification by anyone other than an authorized service (“Materially Defective Product”)?
- Page 45 Transportation, delivery or handling charges are prepaid. to make modifications to this limited warranty and you should VTech assumes no risk for damage or loss of the Product in not rely on any such modification. transit. If the Product failure is not covered by this limited...
- Page 46 Limited warranty above limitation may not apply to you. In no event shall VTech be liable for any indirect, special, incidental, consequential, or similar damages (including, but not limited to lost profits or revenue, inability to use the Product or other associated equipment, the cost of substitute equipment, and claims by third parties) resulting from the use of this Product.
- Page 47 Technical Specifications Power requirement Telephone base: 6V DC @ 800mA Specifications are subject to change without notice. © 2022 VTech Communications, Inc. All rights reserved. 07/22. SN1127_QSG_V1.0...
Need help?
Do you have a question about the SN1127 and is the answer not in the manual?
Questions and answers
Clearing phone messages
To clear phone messages on the VTech SN1127:
- To delete a single message at the base: While the message is playing, press DELETE.
- To delete all messages at the base: While the phone is idle, press DELETE twice.
- To delete a message using the handset: While listening to the message, press 3.
- To delete all old messages using the handset: When not in use, press MENU/SELECT, go to the ANS. SYSTEM menu, and select DEL ALL OLD.
This answer is automatically generated