Table of Contents
Advertisement
Quick Links
Advertisement
Table of Contents

Subscribe to Our Youtube Channel
Related Manuals for RWD DSC-400


Summary of Contents for RWD DSC-400
- Page 1 DSC-400 Single Cell Suspension Dissociator User Manual...
- Page 2 RWD. The trademark and related security marks are intangible properties owned by RWD. The use of trademarks or marks not owned by RWD in this user manual is only for the purpose of editing, and the rights to them belong to their respective owners.
-
Page 3: Table Of Contents
Contents 1-Introduction ...................... 1 1.1 Product Overview ..................1 1.2 Product Features ................... 1 1.3 Application Conditions ................. 2 1.4 Product Parameters ..................2 1.5 Components ....................3 2-Important information and security .............. 4 2.1 Safety Symbols ..................... 4 2.2 Safety classification ..................4 2.3 General Safety .................... -
Page 4: 1-Introduction
1-Introduction First of all, thank you for choosing DSC-400 Single cell suspension dissociator made by RWD! Please be sure to carefully read all the randomly distributed information before installing and using this product for the first time, which will help you use the product better. -
Page 5: Application Conditions
Operation safety ensures that the single cell tube is not loosened or leaked during operation, and the top components can be disassembled and cleaned. 1.3 Application Conditions Please prepare the device operating environment under the conditions listed in the table below to ensure the operation and safety of the system. -
Page 6: Components
1.5 Components Accessories Delivery Quantity Purpose 4-channel Preparation of single cell suspensions Standard dissociator and homogenates Plug-in power cords for device power Power cord Standard input, for different countries For holding sample tissue and processed Single cell tube Standard 25/pack single cell suspensions or homogenates Enzyme kit Optional... -
Page 7: 2-Important Information And Security
2-Important information and security Before using the device, please first read this chapter carefully and follow all safety instructions in this manual to prevent injury to the lab personnel or damage to the device. 2.1 Safety Symbols Identification Descriptions High temperature warning: Caution! High temperature! Protective grounding Biological risk... -
Page 8: Electrical Safety
4) The altitude should not exceed 2000 m. RWD does not guarantee the device can work normally at places above 2000 m. 5) Avoid any liquid leaking into the device. 6) Do not operate the device with damaged components. 7) Do not operate the device while the bushings, single cell tubes, shields, and cleaning tanks are removed. -
Page 9: 3-Product Structure And Interface
3-Product Structure and Interface Figure 3-1 Figure 3-2 Name Quantity Function To protect the safety of the ① Shield experimenter ② Bushing Connect channels ③ Indicator light To indicate the power-on status Interface for processing tissue ④ Channel consumables ⑤ USB-A port Copy of user data ⑥... -
Page 10: 4-Product Assembly
4-Product Assembly 1) Open the packing case and take out the device and accessories. 2) Place the device on a stable operating table and remove the foam packaging. 3) Insert the white bushing into the channel connector of the device, as shown in Figure 4-1. -
Page 11: 5-Operation Guide
5-Operation Guide 5.1 Preparation 1) Add the corresponding tissue lysate or enzyme to the single cell tube according to the kit instructions to mix it. 2) Cut the target tissue sample into small pieces and transfer to the single cell tube. Be sure to tighten the cover of the single cell tube. -
Page 12: Start
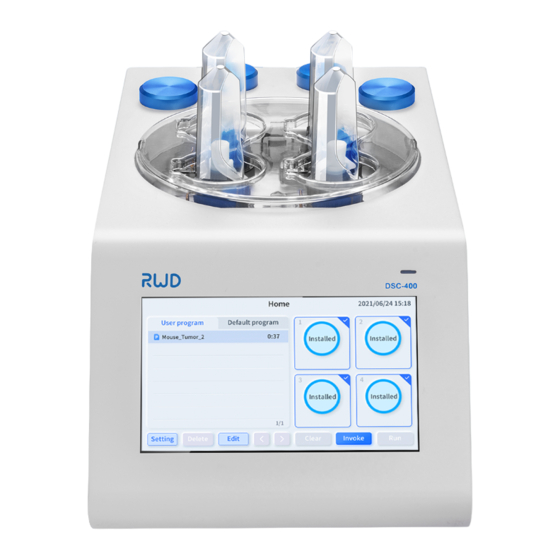
5.2 Start Turn on the power switch on the rear panel of the device and enter [Home], as shown in Figure 5-2. When the single cell tube is installed into channels 1, 2 and 3, the channel is in the state of “Installed”, as shown in Figure 5-2 for channels 1, 2 and 3. When channel 4 is not installed with a single cell tube, the channel is in the state of “Free”, as shown in Figure 5-2 for channel 4. -
Page 13: Invoke Program
Click on a channel to select/cancel it. As shown in Figure 5-3, click on the channel to cancel it when there is no need to operate on channel 3. Click on the channel to reselect it when it is necessary to invoke the program on channel 3. Figure 5-3 5.3 Invoke Program Click to select [User program] or [Default program] to be invoked on [Home], click... -
Page 14: Run Program
Figure 5-5 5.4 Run Program Select the channel and click . The channel will run the invoked program and enter the running state, such as channels 1 and 2 as shown in Figure 5-6. Figure 5-6 Click the channel in running state to pause or end the channel running, as shown in Figure 5-7. - Page 15 to pause the running channel, and Channel 1 is “Paused”, as shown in Click Figure 5-8. Click again to continue running the channel. Figure 5-8 to manually end the program, and Channel 1 is “Ended”, as shown in Click Figure 5-9. Click again to restart the channel.
-
Page 16: Edit Program
5.5 Edit Program Click a program in [User Program] or [Default Program] and click to enter the [Edit program] interface, as shown in Figure 5-10. Step Type Speed Duration Step Stage Figure 5-10 Click to save the current user program. If the current program is a default program, the button is not available and the default program cannot be modified. - Page 17 1) Step Click to select [Step], as shown in Figure 5-12. Figure 5-12 Click to add a new step to the left/right of the selected step, as shown in Figure 5-13. Edit the step type, speed, duration and direction of the new step in the [Add new step] interface.
- Page 18 2) Stage Click to select [Stage], as shown in Figure 5-14. Figure 5-14 Click to add a stage to the left/right of the selected stage, as shown in Figure 5-15. Edit the cycle time for the new stage and choose whether to heat it or not in the [Add new stage] interface.
-
Page 19: Setting
Program Import and Export Click to set date and time, see Date and time 5.6.3 Date and Time Click to view the information of the system Version version, see 5.6.4 Version Manufacturer Only available to RWD after-sales personnel maintenance... -
Page 20: History
5.6.1 History Figure 5-17 The history is shown in green to indicate that the program running is not ended. The history is shown in red to indicate that the program is ended manually or abnormally. Click one of the history records to view it and enter the [View the program history] interface, as shown in Figure 5-18. -
Page 21: Program Import And Export
5.6.2 Program Import and Export Connect a USB to the USB-A port to import and export programs. Figure 5-19 Figure 5-20... -
Page 22: Date And Time
5.6.3 Date and Time Figure 5-21 5.6.4 Version Figure 5-22... -
Page 23: 6-Alarms
Exception of driver board in Channels #. Disconnect the power cord and Recommend to restart! //vbus restart the device; Please contact technical support if this Contact RWD after-sales personnel exception persists after restart. Exception driver board communication in Channels A & B. - Page 24 Exception of driver in Channel #. Disconnect the power cord and Recommend to restart! //overcurrent restart the device Please contact technical support if this Contact RWD after-sales personnel exception persists after restart. Ensure proper installation of the The Single cell single cell tube;...
-
Page 25: 7-Maintenance
7-Maintenance 7.1 Cleaning and Maintenance 1) Remove the single cell tube when the device is not in use. 2) This device should be placed firmly and horizontally; Please avoid vibration or collision during movement. 3) Do not place heavy objects on the device. 4) Do not knock hard or scratch the device with sharp objects. - Page 26 Remove the bushing. Gently press the two buckles shown in Figure 7-2 toward the middle with both hands to remove the cleaning tank. Figure 7-2 Wipe device surfaces and other components with a wet cloth soaked in household detergent or 70% ethanol.
-
Page 27: Repair
Do not open the enclosure to repair the device by yourself, otherwise it may lead to mechanical injury and electric shock. If you need to test or repair the device, please contact RWD after-sales personnel. Please sterilize the device and all components before returning the device in its original packaging. -
Page 28: 8-Waste Disposal
8-Waste disposal Dispose of single cell tubes and waste liquids in strict accordance with local waste disposal policies and regulations, and disinfection is required before disposal. -
Page 29: 9-Warranty
9-Warranty The warranty for this system starts from the day when it leaves the factory. RWD provides after-sales support such as device maintenance and parts replacement in case of the device failure due to defects in materials or process during the warranty period. - Page 30 RWD Life Science Co., Ltd. Web: www.rwdstco.com Add: 850 New Burton Road, Suite 201, Dover, DE 19904, Kent, Delaware, USA Add: 19/20F, Building 9A, Vanke Cloud City III, Liuxin 4 Street, Nanshan District, Shenzhen518000, Guangdong, P.R. China Tel: +001-858-900-6602 +86-755-86111286 After-sales Service: +86-755-86111281 After-sales E-mail: service@rwdstco.com...
Need help?
Do you have a question about the DSC-400 and is the answer not in the manual?
Questions and answers