Hatco TQ-10 Installation & Operating Manual
Electric conveyor toasters
Hide thumbs
Also See for TQ-10:
- Installation & operating manual (80 pages) ,
- Installation and operating manual (36 pages) ,
- Operating instructions manual (15 pages)
Table of Contents
Advertisement
Electric Conveyor Toasters
TQ-10, TQ-15, TQ-400, TQ-800,
TQ-1200, TQ-1800 Series
This manual contains important safety information
concerning the maintenance, use and operation of this
product. Failure to follow the instructions contained in this
manual may result in serious injury. If you're unable to
understand the contents of this manual, please bring it to
the attention of your supervisor. Do not operate this
equipment unless you have read and understood the
contents of this manual.
Toast Qwik
Installation &
Operating Manual
I&W #07.05.124.00
®
Este manual contiene importante información sobre
seguridad concerniente al mantenimiento, uso y
operación de este producto. Cualquier falla en el
seguimiento de las instrucciones contenidas en este
manual puede resultar en un serio daño. Si usted no
puede entender el contenido de este manual por
favor pregunte a su supervisor. No opere este
equipo al menos que haya leído y comprendido el
contenido de este manual.
Advertisement
Table of Contents

Related Manuals for Hatco TQ-10


Summary of Contents for Hatco TQ-10
- Page 1 Electric Conveyor Toasters TQ-10, TQ-15, TQ-400, TQ-800, TQ-1200, TQ-1800 Series Operating Manual This manual contains important safety information concerning the maintenance, use and operation of this product. Failure to follow the instructions contained in this manual may result in serious injury. If you’re unable to understand the contents of this manual, please bring it to the attention of your supervisor.
-
Page 2: Table Of Contents
Conveyor speed and temperature determines the toasting color. Hatco toasters are built with quality to meet the demands of foodservice operations and provide years of trouble-free performance. The metal- sheathed tubular heating elements are guaranteed against breakage and burnout for two years. -
Page 3: Important Safety Information
Some aftermarket or generic replacement parts do not have the characteristics that will allow them to operate safely in Hatco equipment. It is essential to use Hatco Replacement Parts when repairing Hatco equipment. Failure to... -
Page 4: Model Descriptions
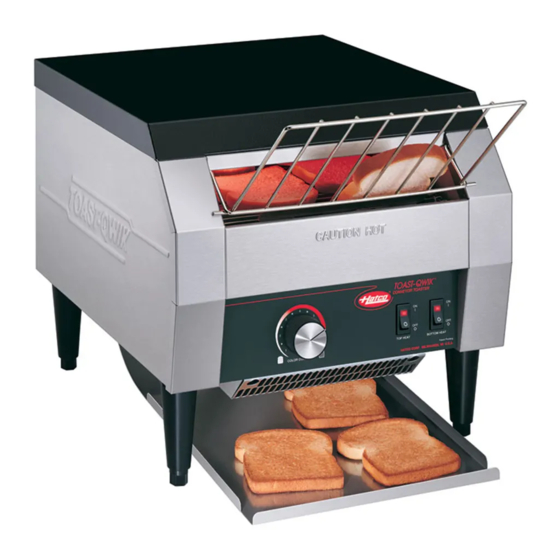
6' (1829 mm) cord and plug. TQ-10 MODEL The TQ-10 model allows for toasting of bread products up to 1-1/2" (38 mm) thick and 9-5/8" (244 mm) wide. Capacity is up to 300 slices per hour for bread or bun products. -
Page 5: Colorguard System
COLORGUARD SYSTEM All TQ-400, TQ-800, TQ-1200 and TQ-1800 series toasters use a patented ColorGuard Sensing System that monitors and automatically adjusts conveyor speed during high usage periods to assure toast color uniformity. TQ-400 MODEL The TQ-400 model allows for toasting of bread products up to 1-3/4"... -
Page 6: Specifications
NEMA 5-20P for Canada Shaded area reflects export models only. NOTE: TQ-10 220-230 Volt (CE) and 230-240 Volt (CE) available with either CEE 7/7 Schuko, BS 1363 or AS 3112 plug. See Plug Configurations for details. ELECTRICAL RATING CHART – TQ-15 MODELS... - Page 7 ELECTRICAL RATING CHART – TQ-800 SERIES Model Voltage TQ-800 220-230 (CE) 230-240 (CE) TQ-805 230-240 (CE) TQ-800H 220-230 (CE) 230-240 (CE) TQ-800BA 220-230 (CE) 230-240 (CE) TQ-800HBA 220-230 (CE) 230-240 (CE) NEMA 6-20P for Canada Shaded area reflects export models only. NOTE: TQ-800, TQ-805, TQ-800H, TQ-800BA and TQ-800HBA 200 Volt (no CE), 220-230 Volt (CE) and 230-240 Volt (CE) equipped with 6' (1829 mm) cord attached, no plug.
-
Page 8: Plug Configurations
WARNING To prevent any injury or damage do not pull unit by power cord. WARNING To prevent any injury, discontinue use if power cord is frayed or worn. DIMENSIONS – TQ-10 & TQ-15 MODELS Width Depth Model TQ-10 14-1/2" 17-3/4"... - Page 9 DIMENSIONS – TQ 400, -405, -400H, -800, -805, -1200 & -1800 SERIES Width Depth Model TQ-400 14-1/2" 17-3/4" (368 mm) (451 mm) TQ-405 14-1/2" 17-3/4" (368 mm) (451 mm) TQ-400H 14-1/2" 17-3/4" (368 mm) (451 mm) TQ-400BA 14-1/2" 17-3/4" (368 mm) (451 mm) TQ-800 14-1/2"...
-
Page 10: Installation
SHORTEN open-end wrench and turning bottom of leg accordingly. Figure 5. Adjustable Legs (TQ-10 & TQ-15 Models Only) CAUTION To avoid any injury or damage locate the unit at the proper counter height, in an area that is convenient for use. The location should be level... -
Page 11: Set-Up
SET-UP CAUTION Unit is not weatherproof. For safe and proper operation the unit must be located indoors where the ambient air temperature is a minimum of 70°F (21°C) and a maximum of 85°F (29°C). CAUTION The toasting of coated or buttered products such as garlic bread, cheese sandwiches and sweet rolls is NOT recommended. - Page 12 Allow a minimum clearance of 12" (305 mm) along the front and rear. TQ-10 & TQ-15 MODELS ONLY The TQ-10 & TQ-15 models use a one piece discharge chute/collector pan. The installation location determines discharge area. For front discharge install toaster chute from the front of the toaster with the curved end inward and the rear lip of the chute on the rear most pins.
-
Page 13: Operation
See Figure 12. 3. Turn the COLOR CONTROL to the lightest position while the unit heats up. Color Control Figure 12. Control Panel – TQ-10 & TQ-15 Models NOTE: Allow approximately 15 to 20 minutes for a warm-up period. 4. After... -
Page 14: 1800 & -1800H
OPERATION TQ-400, -405, -400H, -800, -805, -800H, -1200 & -1800 MODELS 1. Plug toaster into a properly grounded electrical outlet of the correct voltage, size and plug configuration. See SPECIFICATIONS for details. 2. Place the On/Off switch in the ON position. See Figure 13 for TQ-400, -800, and -1200 Series. - Page 15 POWER SAVE MODE WITH INDICATOR LIGHT All TQ-400, -800, -1200 and -1800 series toasters have a built-in Power Save Mode with Indicator light feature. This feature allows the toaster to go into stand-by and reduces power to the heating elements by 50%. During the Power Save Mode the indicator light on the control panel will flash.
-
Page 16: Maintenance
Some aftermarket or generic replacement characteristics that will allow them to operate safely in Hatco equipment. It is essential to use Hatco Replacement Parts when repairing Hatco equipment. Failure to use Hatco Replacement Parts may subject operators of the equipment to hazardous electrical voltage, resulting in electrical shock or burn. -
Page 17: Accessories
SECURITY COVER The security cover flips up to limit access to the control panel and flips down for access to the control panel. 1. Remove the toast crumb tray. 2. Remove screws. See Figure 15. 3. Position security cover over control panel. 4. -
Page 18: Hatco Limited Warranty
Hatco reserves the right to accept or reject any such claim in whole or in part. Hatco will not accept the return of any Product without prior written approval from Hatco, and all such approved returns shall be made at Buyer’s sole expense. - Page 19 NOTES Form No. TQ2M-1005...
-
Page 20: Authorized Parts Distributors
Cone’s Repair Service Flanders Moline 309-797-5323 P.O. Box 340500, Milwaukee, WI 53234-0500 U.S.A. Parts & Service Fax (800) 690-2966 Printed in U.S.A. October 2005 HATCO AUTHORIZED PARTS DISTRIBUTORS NEW YORK Acme American Repairs, Inc. 317-545-9655 Brooklyn Alpro Service Co. Brooklyn...
Need help?
Do you have a question about the TQ-10 and is the answer not in the manual?
Questions and answers