Table of Contents
Advertisement
Quick Links
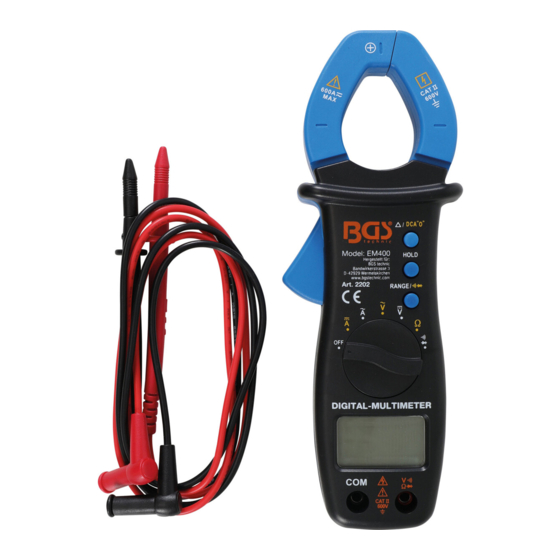
STRUCTURE
1. Trigger Used to open and close the jaws.
2. Function / Range Switch Used to select desired function or range as well as to turn on or off the
meter.
3. Display
4. COM-Jack Plug-in jack for the black (Negative) test lead.
5.
Plug-in jack for the red (Positive) test lead.
6. "RANGE" Button Used to switch between autorange mode and manual range mode as well as to
select desired manual range.
7.
a. In resistance, AC/DC current or AC/DC voltage measurement, press this button to enter or exit
Data Hold mode.
b. In diode or continuity test function, press this button to switch between the diode and
Continuity Test functions.
8.
In current measurements, this button can be used for zeroing before
measurement. In other measurements, this button can be used to enter or exit relative mode.
The "ZERO" button must be pressed for compensation of measurement error in the 400A range.
9. Tactile Barrier
10. Jaw used for clamping the conductor for current measurements.
Introduction for the Built-in Buzzer
When you press a button Function / Range Switch, the buzzer will sound a beep if the press is
effective. Before the meter turns off automatically. The meter will give several short beeps, 1 minute
later it gives a long beep and then turns off automatically.
SAFETY INFORMATION
This meter has been designed according to IEC-81010 concerning electronic measuring instrument
with a measurement category (CAT II 600V) and Pollution degree 2.
WARNING
To avoid possible electric shock or personal injury, follow these guidelines:
x
Do not use the meter if it is damaged. Before you use the meter, inspect the case. Pay particular
attention to the insulation surrounding the connectors.
x
Inspect the test leads for damaged insulation or exposed metal. Check: the test leads for
continuity. Replace damaged test lead before you use the meter.
x
Do not use the meter if it operates abnormally. Protection may be impaired. When in doubt, have
the meter serviced.
x
Do not operate the meter around explosive gas, vapour or dusts.
x
Do not apply more than the rated voltage, as marked on the meter, between terminals or between
any terminal and earth ground.
DIGITAL CLAMP METER
Art. 2202
Advertisement
Table of Contents

Related Manuals for BGS technic 2202


Summary of Contents for BGS technic 2202
- Page 1 Art. 2202 DIGITAL CLAMP METER STRUCTURE 1. Trigger Used to open and close the jaws. 2. Function / Range Switch Used to select desired function or range as well as to turn on or off the meter. 3. Display 4. COM-Jack Plug-in jack for the black (Negative) test lead.
- Page 2 Before use, verify the meter's operation by measuring a known voltage. When servicing the meter, use only specified replacement parts. Use caution when working with voltage above 30V ac rms, 42V peak, or 60V dc. Such voltages pose a shock hazard. When using the probes or meter, keep your fingers behind the finger guards on the probes or the meter.
- Page 3 INSTRUCTION This meter is a 3 3/4m digit autorange digital clamp meter for measuring DC and AC voltage, DC and AC current, resistance, diode and continuity. It is easy to operate and is an ideal measurement tool. GENERAL SPECIFICATION Display: 3 3/4-digit LCD with a max. reading of 3999 Negative Polarity Indication: “...
- Page 4 40 MŸ 10 KŸ ± (1.5%+7) Continuity Range Resolution Description Overload Protection If the resistance is less 0.1 Ÿ than about 30 the 600V rms buzzer will sound. Note: When the resistance is between 30 Ÿ and 150 Ÿ, the buzzer may sound or may not sound. When the resistance is more than 150 Ÿ, the buzzer will not sound.
- Page 5 Manual Ranging and Autoranging The meter defaults to autorange mode in measurement functions which have both autorange and manual range mode. When the meter is in autorange mode, “Auto" is displayed. 1. Press the "RANGE” button to enter the manual range mode. The symbol ”Auto" disappears. 2.
- Page 6 3. Connect the test leads across the load to be measured. 4. Read the reading on the display. Note: If the resistance is more than 1 MŸ, it may take several seconds for the reading stabilize. It is normal for high resistance measurements. If the input terminals are in open circuit state, over range indicator “OL”...
- Page 7 We declare that the following designated product: Nous déclarons sous propre responsabilité que ce produit: Declaramos bajo nuestra sola responsabilidad que este producto: Zangen-Multimeter ( BGS Art. 2202 ) Digital Clamp Meter Pince amperemetrique et miltimetre electrinique ac/dc Multímetro digital con pinzas para corriente continua y alterna folgenden einschlägigen Bestimmungen entspricht:...
Need help?
Do you have a question about the 2202 and is the answer not in the manual?
Questions and answers