Harman Kardon TC 30 Owner's Manual
Activity-based remote
Hide thumbs
Also See for TC 30:
- Installation manual (2 pages) ,
- Function manual (1 page) ,
- Brochure (40 pages)
Table of Contents
Advertisement
Advertisement
Table of Contents

Related Manuals for Harman Kardon TC 30


Summary of Contents for Harman Kardon TC 30
- Page 1 ® Power for the Digital Revolution ® TC 30 ACTIVITY-BASED REMOTE...
-
Page 2: Table Of Contents
“Watch TV” or “Listen to FM Radio” together, making it simple for anyone to operate even the most sophisticated system without having to worry about which remote to use or which button to press. The TC 30’s activity-based system lets the remote operate based on the way you use your system, and the automated setup wizards do all the programming for you. -
Page 3: Introduction
3. Follow the prompts to tell the software what devices are in your entertainment system. This enables the TC 30 Web site to send the correct remote codes back to your TC 30. If one of your devices is not in the TC 30 Web site’s database, the TC 30 can learn those codes and add them to your configuration. -
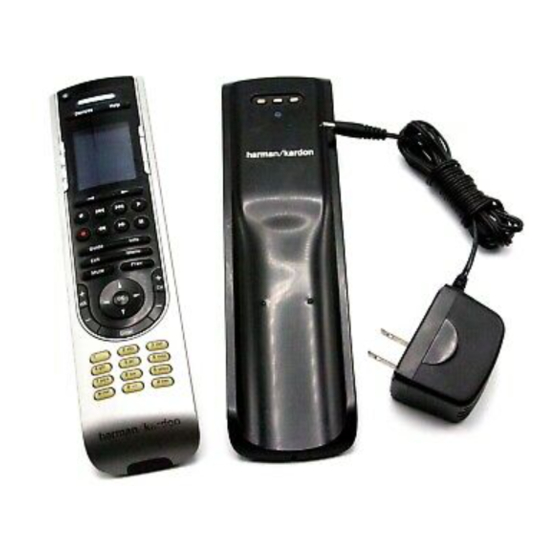
Page 4: Getting To Know Your Tc 30
Many of the TC 30’s buttons are similar to those found on conventional remote controls. However, some of the buttons and hardware functions are unique to the TC 30. These extra buttons and hardware give you access to the special features of the TC 30. - Page 5 F Glow Button: Press this button to illuminate the LCD screen and the button backlighting. The backlighting will also come on when any button is pushed. You may change the setting for the length of time the lighting is on via the TC 30 Web site (see page 9). The backlighting will also turn on automatically any time you move the remote, thanks to a built-in “tilt sensor.
-
Page 6: Setup And Configuration
Be sure to remove any protective film covering the well of the charging cradle and then connect the transformer to an AC outlet. The blue LED will light to confirm that power is connected. Place the TC 30 in the well of the cradle so that it sits firmly. You will hear a beep when the TC 30 is placed in the charging cradle, and again when it is picked up. -
Page 7: The Setup Process
Product Support section of our Web site at www.harmankardon.com. Once the software is installed on your computer, you will be taken to the TC 30 Internet site. If the TC 30 Login page does not appear, try the following, depending on your computer type: •... -
Page 8: Step 2: Complete The Online Setup Process
3. Set Up Devices: This is where you select the devices used in your system so that their remote codes may be sent to the TC 30. Before proceeding, make sure you have the brand and model number for each product you will be programming into the TC 30. -
Page 9: Using Your Tc 30
Selecting an Activity In normal use, the Activities you have programmed into your TC 30 are shown on the LCD screen. You may also display them at any time by pressing the Activities Button 3. To select an Activity, press the Screen Button 6 next to the desired Activity’s name in the LCD Screen 7. -
Page 10: Viewing The Status And Navigation Bars
The Status bar that normally appears at the top of the LCD screen provides you with important information about the TC 30’s operation. • Date and time. The TC 30’s internal clock is set from the master clock on our Web site, reflecting the time zone you selected during setup. -
Page 11: Displaying On-Screen Help On Your Tc 30
Pressing the Help Button 5 will start a process to resynchronize all the devices in your system. Before pressing the Help Button 5, first make certain that you are pointing the TC 30 at the devices in your system and that there is no obstruction between the remote and the devices. -
Page 12: Controlling Individual Devices
System Options The System Options Activity allows you to turn the Remote Assistant on or off, set the time and date for your TC 30 or start a Slide Show programmed into your TC 30. To access one of these options, press the Activities Button 3 and then press the Screen Buttons 6 next to the System Options. -
Page 13: Customizing Your Tc 30
Click on an option to begin the customization process. NOTE: Sample screen only; your screen may differ. At the top right side of the home page, as well as on the main page of each subsection of the TC 30 Web site, you will see the following options. -
Page 14: Troubleshoot
Logout so that all settings are entered and the session is properly closed. Once you are connected to the TC 30 Web site, six options will appear on the left side of the screen to direct you to the part of the site that assists you with different aspects of the TC 30. -
Page 15: Remote Preferences
Remote Preferences The options in this area allow you to change the TC 30’s settings to customize the look of the LCD screen. Within this area of the TC 30 Web site are the following ways to change the way your TC 30 looks and operates: •... -
Page 16: Support
The options in this area provide information that will help you with any problems you might encounter with the TC 30 as well as enabling you to change the settings for your account. • To change any of the settings for the account on the TC 30 Web site associated with your remote, click on My Profile and follow the steps that appear. -
Page 17: Web Page Options
Web Page Options The options at the top of the TC 30 Web page provide additional options to assist you in getting the best performance from your TC 30. Depending on the page you are on, some of these options may not appear. -
Page 18: Technical Specifications
*Depth measurement includes knobs, buttons and terminal connections. All features and specifications are subject to change without notice. Harman Kardon, Harman International and Power for the Digital Revolution are trademarks of Harman International Industries, Incorporated, registered in the United States and/or other countries. - Page 19 250 Crossways Park Drive, Woodbury, New York 11797 www.harmankardon.com © 2006 Harman International Industries, Incorporated. All rights reserved. Part No. TC30OM4/06...
Need help?
Do you have a question about the TC 30 and is the answer not in the manual?
Questions and answers