
Subscribe to Our Youtube Channel
Related Manuals for Nauticam NA-A7C


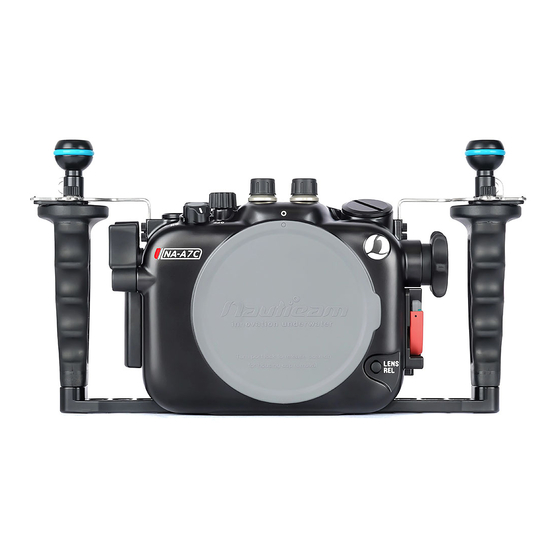
Summary of Contents for Nauticam NA-A7C
-
Page 1: Table Of Contents
NA - A7C For Sony Alpha a7C Camera PN 17429 User Manual Housing FF-MIL Introduction Package Contents Important Instructions Part Names and Functions Opening the Housing Closing the Housing Preparation for Use Recommended Accessory Care/Storage Warranty Speci cations... -
Page 2: Introduction
PACKAGE CONTENTS Make sure that you have all the included items listed below before using this product. If some items are missing or damaged, contact your local Nauticam dealer. NA-A7C Padded Travel Case... -
Page 3: Important Instructions
O-ring renewal between the atmosphere and inside the and port change. housing. Only the accesories speci ed by Use only Nauticam lubricant on silicone Nauticam must be used. Third-party rubber O-ring. accessories may result in malfunctions or damage to the product. -
Page 4: Part Names And Functions
PART NAMES AND FUNCTIONS Rear View View nder Movie button Menu button Fn button ISO button Image index button Delete button / Custom button Moisture alarm window Display button Drive mode button Playback button Control wheel - center Control wheel... - Page 5 PART NAMES AND FUNCTIONS Top + Front Views Optical ber cable connection M24 Accessory port M14 Accessory port Main Switch Mode Dial M14 Accessory port Exposure compensation dial Rear dial Accessory mounting ball Lens release button...
- Page 6 PART NAMES AND FUNCTIONS Back + Side Views 1/4” Threaded tripod holes Zinc Anodes Zoom/Focus dial Port lock safety button Port locking lever Enlarge / AF-ON lever Shutter release lever Housing unlock button...
-
Page 7: Opening The Housing
OPENING THE HOUSING * drawings as illustrations only depress housing unlock button turn housing lock latch anti-clockwise to open the housing ip open the back housing when lock latch is aligned to ‘open’ position... -
Page 8: Closing The Housing
CLOSING THE HOUSING * drawings as illustrations only before closing the housing, clean and lubricate the main O-ring make sure nothing is caught between front and back housing and that they are fully aligned before locking main O-ring insert the housing shaft into the shaft hole and then rotate the lock latch clockwise until you hear and feel it click into place... -
Page 9: Preparation For Use
PREPARATION FOR USE Installing the Camera unlock camera tray lever and remove the tray from the housing attach the camera tray by tightening the tray screw into the tripod socket of the camera slide the camera tray back into the housing along the tray rail lock camera tray... - Page 10 PREPARATION FOR USE * drawings as illustrations only Port Mounting depress port lock safety button and rotate anti-clockwise lubricant the port O-ring before mounting align index mark push port assembly straight in rotate locking lever clockwise to lock...
- Page 11 PREPARATION FOR USE Coating housing O-ring Main O-ring remove the main O-ring using an O-ring remover clean the O-ring groove with a cloth and ensure that it is free from salt or other foreign materials lightly coat it with provided lubricant return the main O-ring by slowly pressing from one corner to the whole perimeter...
- Page 12 PREPARATION FOR USE * drawings as illustrations only Setting up moisture alarm CR2032 Battery Alarm ON/OFF remove battery press the battery down until it insulation lm click into place switch on the alarm test the alarm - the moisture alarm - connect the wires with a window will ash in...
-
Page 13: Recommended Accessory
RECOMMENDED ACCESSORY * drawings as illustrations only Vacuum valve system remove the plug of M16 accessory port from the housing remove the cap from the vacuum valve hand pump slightly lubricate the o-ring and tighten the vacuum valve to the vacuum valve housing with the tool provided accesory port... -
Page 14: Care/Storage
CARE/STORAGE Soak the housing system in fresh water Operate all controls and buttons at after salt water usage least 3 times while immersed in fresh water We recommand cleaning and inspecting Protect the housing with robust and the main O-ring each time after diving for shock-proof travel case during trans- any damage and every time the housing portation. -
Page 15: Warranty
NAUTICAM accepts no liability for any damage to and defects in the housing caused by improper use and/or poor maintenance; it is the responsibility of the own- er to carefully follow the instructions in our manuals. -
Page 16: Speci Cations
25098 M24D3R140-M28A1R170 HDMI 2.0 Cable (for NA-A7C to use with Ninja V monitor housing) Monitor options 17922 Nauticam Atomos Ninja V Housing for Atomos Ninja V 5” (excl. HDMI 2.0 cable) HDMI connectivity accessories ( 1.4 ) 25033 Standard HDMI bulkhead with M16 thread 25081 M24-M16 Step Down Adaptor 25076 HDMI (D-D) 1.4 cable in 200mm length... - Page 17 Nauticam Internationl Ltd. Rm 2203, CCT Telecom Bldg, 11 Wo Shing St, Fo Tan, Hong Kong Tel. +852 - 26902711 Fax. +852 - 26909778 URL. www.nauticam.com Gallery. www.nauticam.smugmug.com...
Need help?
Do you have a question about the NA-A7C and is the answer not in the manual?
Questions and answers