Table of Contents
Advertisement
Quick Links
Advertisement
Table of Contents

Related Manuals for Rinnai RDT-90-RM-S


Summary of Contents for Rinnai RDT-90-RM-S
- Page 1 Model Name: RDT-90-RM-S Thank you for buying this Gas Clothes Dryer. Read This Document Thoroughly to Ensure Safe Use • Before you use this dryer, thoroughly read these Operating Instructions to ensure safe and correct use. Gas Clothes Dryer Operating Instructions...
- Page 2 Drying Is Now a Joy to Do and Feel! 9 kg l arge oads oF lothes ried • Leave large loads that have been batch washed up to the drier to dry. You can dry clothes easily in a single operation by the THICK course. uiCK rying •...
-
Page 3: Table Of Contents
Table of contents ourses to hoose From 1. GENERAL course To Ensure Safe Use For drying 9 kg of clothes such as underwear and shirts Safety Precautions 2. THICK course (Be Sure to Follow These Precautions) ∙∙∙∙∙∙∙∙∙∙∙∙∙∙∙∙∙∙∙∙∙∙∙∙ 3 For drying 9 kg of thick clothes Safety Precautions 3. -
Page 4: Safety Precautions
Safety Precautions (Be Sure to Follow These Precautions) • The following describes precautions that must be followed to ensure the same use of the product and to prevent injury to the customer or others and damage to property. • Fully understand the meaning of the following symbols before reading this document. - Page 5 This symbol indicates that ignoring the accompanying explanation and mishandling the Danger product might result in death or serious injury or a fi re hazard. The following actions are prohibited when there is a gas leak: • Never light a fire M a t c •...
-
Page 6: Safety Precautions
Safety Precautions (Installation) This symbol indicates that ignoring the accompanying explanation and mishandling the Warning product might result in death or serious injury or might cause the risk of fire. Remodeling/Disassembly Prohibited • Users must never use tools to install, move, disassemble, repair, or remodel the equipments themselves. - Page 7 Installation Site • Do not install the equipment in hot and humid locations such as bathrooms or in locations (excluding veranda installations) that are exposed to wind and rain. Splashing With Water Doing so may cause a short circuit, and result in electric shock or fire. Prohibited This may also cause the equipment to malfunction.
- Page 8 Safety Precautions (Installation) This symbol indicates that ignoring the accompanying explanation and mishandling the Caution product might result in slight injury or might cause property damage. Installation Site • Do not use the equipment where there is the risk of objects falling such as under shelves.
- Page 9 • Use the equipment at a flat, stable and sturdy location, a location that can sufficiently withstand the weight of the dryer, and a location that is not subject to excessive noise or vibration. Using a spirit level, make sure that the equipment is level. If the equipment is used at an unstable or tilted location, the safety interlock might not function properly or the equipment might tip over and cause an injury.
-
Page 10: Safety Precautions (Actual Use)
Safety Precautions (Actual Use) This symbol indicates that ignoring the accompanying explanation and mishandling the Warning product might result in death or serious injury or might cause the risk of fire. Fire Prevention • Do not use objects that might ignite near the equipment. Do not place or use objects, etc. - Page 11 When Using the Gas Dryer • Do not allow unaccompanied small children to use the gas dryer by themselves, and do not use the gas dryer within the reach of infants. Doing so might cause burns, electric shock or injury. •...
- Page 12 Safety Precautions (Actual Use) Power Cord and Plug • Do not remove or insert with wet hands. This may cause electric shock or injury. Wet Hands Prohibited • Do not extend power cords by cutting them. Install the equipment within reach of the power cord to the power outlet. This may cause electric shock or injury.
- Page 13 This symbol indicates that ignoring the accompanying explanation and mishandling the Warning product might result in death or serious injury or might cause the risk of fire. Remedies for Abnormal Operation • If operation is abnormal, immediately stop use of the equipment, close the gas cock, and remove clothes.
- Page 14 Safety Precautions (Actual Use) Ventilation • During use, ventilate the room, for example, by opening the window. Not ventilating the room will cause incomplete combustion which might Ventilation Required result in carbon monoxide poisoning. This symbol indicates that ignoring the accompanying explanation and mishandling the Caution product might result in slight injury or might cause property damage.
- Page 15 Fire Prevention, Be Careful of Burns • Do not remove clothes during operation. The inside of the drum, front door and clothes are hot. Do not touch these directly with your hands. Doing so might cause burns. Wait for operation to end before removing clothes.
-
Page 16: Safety Precautions (Notes) ∙∙∙∙∙∙∙∙∙∙∙∙∙∙∙∙∙∙∙∙∙∙∙∙∙∙∙∙∙∙∙∙∙∙∙∙∙∙∙∙∙∙∙∙∙∙∙∙∙15
Safety Precautions (Notes) Notes Checks Before Use • Remove paper padding or packing material from each of the parts on the equipment, and check the contents of the package and accessories against the Packing List. (See page 20.) Checking the Installation Site •... - Page 17 Cautions During Thunderstorms • When a thunderstorm starts up, promptly stop operation, and remove the power plug from the power outlet. Lightning from thunderstorms causes an overcurrent to flow momentarily which may damage electronic components. Handling Clothes • Do not operate the equipment with clothes trapped in the front door.
- Page 18 Safety Precautions (Notes) Handling the Equipment • Do not hang down from or hang heavy objects on the equipment or front door. Doing so may cause injury or burns. This may also cause the equipment to tip over, cause gas leaks or incomplete combustion as a result of equipment deformation, or cause other equipment malfunctions.
- Page 19 Drying Cautions • Clothes must be sufficiently spun-dried in a washing machine before they are dried in this equipment. Insufficient spin-drying may increase the drying time, or cause abnormal equipment malfunction or a short circuit. • If chlorine-based bleaching agents have been used in washing the clothes, thoroughly rinse before drying.
-
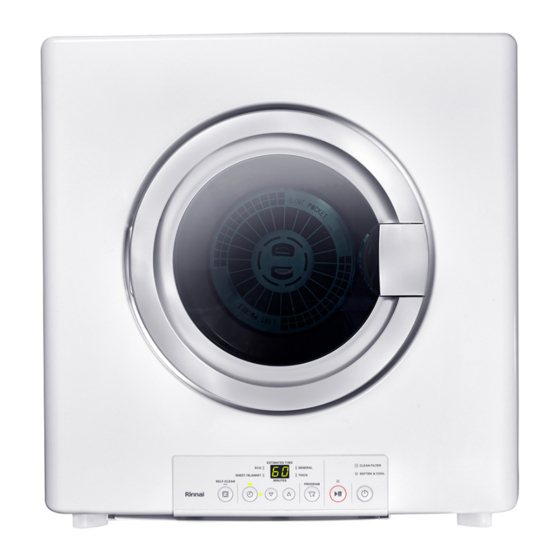
Page 20: Names & Functions Of Parts
Names & Functions of Parts Figure shows a left-opening door. Front Front door Front door handle This is used for opening and closing the front door. Press here to close the door. Note: Open and close the front door gently. Air inlet filter This prevents dust from entering the combustion area. - Page 21 Figure shows a left-opening door. Drum Front Front door Warning label Data plate Operation indicator panel Operation indicator (See pages 21 and 22.) Accessories Accessories Lint fi lter This prevents fabric lint from being discharged from the equipment. (See pages 41 and 42.) Operating Exhaust Humidity Instructions...
- Page 22 Names & Functions of Parts Operation indicator panel SELF-CLEAN Digital indicator (green) operation switch/lamp (green) This displays estimated remaining time in drying operation This is used for selecting SELF- and the time set to timer operation. CLEAN operation. (See pages 31 and 38.) (See page 33.) It also displays details of safety interlock...
- Page 23 Operation/combustion Filter cleaning lamp (red) lamp (green/red) This lights to notify you when too much lint has accumulated on the lint fi lter inside the Lamp indications equipment. When this lamp is lit (red) or is (lit green) In operation blinking, perform maintenance on the lint fi lter.
-
Page 24: Before Using The Equipment
Before Using the Equipment Flow of Operations • Check attachment of the air inlet filter and lint filter. Lint filter Check the filter Air inlet filter • Course operation • Sort the clothes to match operation or drying course. To select drying course, see page 25. -
Page 25: Items You Must Not Dry ∙∙∙∙∙∙∙∙∙∙∙∙∙∙∙∙∙∙∙∙∙∙∙∙∙∙∙∙∙∙∙∙∙∙∙∙∙∙∙∙∙∙∙∙∙∙∙∙∙∙24
Items You Must Not Dry Items that cause fire • Clothes with oil, chemicals, etc. on them (including floor cloths and towels) • Clothes with resin (cellulose type) on them • Clothes containing polypropylene fiber (See page 9.) Items that damage clothes themselves Silk products Items with a “do not tumble dry”... -
Page 26: How To Select Courses
How to Select Courses Microcomputer control performs automatic operation based on the detected amount of clothes and how dry they are (excluding timer operation). Moreover, the ideal course can be select to suit the type of clothes. GENERAL • Regular clothes that are washed daily Towels Underwear Long-sleeved shirts... - Page 27 Approximate Drying Weights and Drying Times Amount of Clothes That Type of Clothes Weight of 1 Item (size) Can Be Dried in a Single Drying Time Operation. Long-sleeved shirts (mixed spun fiber) Approx. 200 g Approx. 45 Approx. 90 minutes Work clothes tops and bottoms (mixed spun fiber) Approx.
-
Page 28: How To Use Drying Course Operation ∙∙∙∙∙∙∙∙∙∙∙∙∙∙∙∙∙∙∙∙∙∙∙∙∙27
How to Use Drying Course Operation • Select the drying course to match the type of clothes. Caution • Before opening or closing the front door, make sure that there are no people or obstacles in the immediate surrounding area, and gently open or close with your hand on the door. - Page 29 Press and select the course. Select the operation course to match the type of Information clothes. (See page 25.) • Each press switches the course as follows. • The course can be switched even during operation. When Short beep the course is switched during operation, drying operation starts with the new course that you switched to after cooling operation of two minutes maximum.
- Page 30 How to Use Drying Course Operation The temperature inside the drum is automatically lowered after drying ends. (cool operation) Cool operation The inside of the drum is hot after drying ends. Since oil 1 minute after drying remaining on clothes may cause spontaneous combustion, During cool operation operation ends cool operation is automatically started one minute after drying...
-
Page 32: How To Use Timer Operation
How to Use Timer Operation • Decide on the drying operation time and perform drying. (Operation automatically stops after a fi xed amount of time regardless of how dry the clothes are.) Note Caution • Before opening or closing the front door, make sure that there are no people or obstacles in the immediate •... - Page 33 Press , and set the timer time. Short beep Lights (green) Short beep Short beep Blinks (green) Each press switches the time Information • The timer operation time can be set within the range 5 to 90 minutes. (5 to 30 minutes can be set in 5-minute increments, and 30 to 90 minutes can be set in 10-minute increments.) •...
-
Page 34: How To Use Self-Clean Operation
How to Use SELF-CLEAN Operation • This mode operates with the drum empty and cleans the inside of the drum (about three minutes). It sterilizes the inside of the drum with warm air of 80°C or higher. Caution • Do not put clothes in. •... - Page 35 Press and select the SELF-CLEAN course. Information Lights (green) • To cancel SELF-CLEAN operation, press SELF-CLEAN cannot be stopped even by pressing Short beep Press Information Lights (green) Lights (red) • If the switch is pressed during operation, the drum stops. If the equipment is left in this state for Short beep approximately two minutes, drying operation is stopped, ESTIMATE TIME...
-
Page 37: Buzzer Functions
Buzzer Functions • Buzzer functions notify you by sounding a buzzer when a switch is operated or when a safety interlock has operated. At purchase, the buzzer is set to sound to notify you. However, you can turn the buzzer sound off , if necessary. Switch Operation and Equipment Operating State Buzzer sound At switch “ON/acceptance”... -
Page 38: Advanced Operation∙∙∙∙∙∙∙∙∙∙∙∙∙∙∙∙∙∙∙∙∙∙∙∙∙∙∙∙∙∙∙∙∙∙∙∙∙∙∙∙∙∙∙∙∙∙∙∙∙∙∙∙∙∙∙∙∙∙∙∙∙∙37
Advanced Operation Take care not to put too many Clothing that easily produces lint clothes into the equipment. • Sort clothes such as new • Too many clothes in the dryer might result in towels that easily produce the drum stopping at start of operation or during lint and dry them separately. - Page 39 Remaining time display (course operation) • The estimated remaining time is displayed matched to the amount of clothes and their dampness. <Example> With course operation, is displayed blinking for approximately two minutes after operation is started. In the case of ECO course operation, will blink for about six minutes after the start of operation.
-
Page 40: Daily Inspection And Maintenance
Daily Inspection and Maintenance Performing Daily Maintenance • Is the power cord damaged? – Inspect the power cord for damage and the power plug for accumulation of dust. (See pages 6 and 11.) • Is the lint filter or air inlet filter blocked with dust? Are the filters set correctly in place? –... -
Page 41: Maintenance Methods ∙∙∙∙∙∙∙∙∙∙∙∙∙∙∙∙∙∙∙∙∙∙∙∙∙∙∙∙∙∙∙∙∙∙∙∙∙∙∙∙∙∙∙∙∙∙∙∙∙∙∙∙∙∙∙∙∙40
Maintenance Methods Tools and Detergents Used for Daily Maintenance Tools/detergents that may be used Soft cloth Soft toothbrush Neutral detergents for kitchens (for washing vegetables and dishes) Tools/detergents that must not be used Items that may cause painted surfaces to degenerate, peel or become discolored, and resin parts to become discolored or crack Chemical Acid/alkaline... - Page 42 Maintenance Methods Before performing daily maintenance, allow the equipment to cool down, close the gas cock, remove the power plug, and put on gloves. Filter cleaning lamp The fi lter cleaning lamp lights or blinks when too much lint has accumulated on the lint fi lter. This increases the drying time or may cause the inside of the equipment to overheat.
- Page 43 Caution • Note that the lint filter is hot immediately after operation ends. • Be sure to set the lint filter in place after cleaning. Cleaning the Lint Filter (every time after use) The fi lter cleaning lamp lights or blinks when too much lint has accumulated on the lint fi lter. This increase the drying time or may cause the inside of the equipment to overheat.
-
Page 44: Troubleshooting
Troubleshooting If you think that a problem has occurred, after careful checking you might find that the problem is not an equipment malfunction. Before asking for repair, check the following points again. If this does not remedy the problem or you do not know the cause, contact the store of purchase or call Customer Services Hotline. - Page 45 The Following Symptoms Are Not Equipment Malfunctions Symptom Cause and Remedy Reference Page Cool operation is being performed to lower the temperature inside the drum. (three minutes of continuous operation followed by Equipment also operates after intermittent operation of the drum for a maximum of 76 minutes) clothes are removed.
-
Page 46: Displayed Messages
Displayed Messages • When the safety interlock operates, you will be notified on the display and by a buzzer, and cool operation will automatically be performed. During cool operation, the SOFTEN&COOL lamp lights. Wait for this lamp to automatically go out. The blinking display goes out by pressing the “Power”... - Page 47 Note Information • Even if inspection is performed according to the • Cooling operation stops temporarily when the front door is opened during cool descriptions in the table below, repair is necessary when operation or when the “Start / Pause” switch is pressed. Cool operation is resumed the safety interlocks frequently operate in the same way by closing the front door or by pressing the “Start / Pause”...
- Page 48 Displayed Messages Display For displays marked by *, the buzzer does Safety Interlock Function not sound. Gas supply is stopped and cool operation is automatically Drum rotation sensor <blinks> started when the drum does not rotate or drum rotation is (drum rotation abnormality) insufficient.
- Page 49 Reference Cause Remedy Page Reduce the amount of washing, and perform operation again. (as a guideline There is too much washing loaded in the equipment. 26, 37 after spin drying, within 13 kg) Repair is necessary. Contact the store of purchase or call Customer The electrical circuit of a motor, etc.
-
Page 50: Specifications And Dimensional Diagram
Specifications and Dimensional Diagram Specifications Model RDT-90-RM-S Dimensional diagram (mm) 684 (Height) x 650 (Width) x 641 (Length) NG: 15,800 Btu/hr Gas consumption LPG: 15,200 Btu/hr Weight (body) 33 kg Standard drying capacity 9 kg Standard drying time 90 minutes Gas inlet connection ø9.5 Hose end... - Page 51 Dimensional diagram (Unit: mm) Front Side 122.5...
- Page 52 RDT90-0274(00) 210600 ◎ 223694...
Need help?
Do you have a question about the RDT-90-RM-S and is the answer not in the manual?
Questions and answers