Advertisement
Quick Links
Advertisement

Subscribe to Our Youtube Channel
Related Manuals for Minolta MN24Z


Summary of Contents for Minolta MN24Z
- Page 1 MN24Z User Manual...
- Page 2 1. About Your Camera About this Manual Congratulations on purchasing the Minolta MN24Z Digital Camera! The contents of this manual are subject to change without notice. Note that the differ somewhat from the screens and configuration of the actual camera.
- Page 3 1. About Your Camera FCC: SAR standard Value: 1.6 W/Kg, Maximal Measure: 0.4 W/kg CE Mark Warning This is a Class B product, in a domestic environment, this product may cause radio interference, in which case the user may be required to take adequate measures.
- Page 4 1. About Your Camera USB Adaptor Information Do not expose the adapter to high temperatures or moisture places. Otherwise, it may cause fire or electric shock. Do not attempt to repair, disassemble, change or transform the adapter. Avoid sudden changes in temperature, which may cause condensation on the Do not touch the plug with wet hands.
- Page 5 1. About Your Camera before Removing or Disconnecting the Power Source or Memory Card Do not remove the battery while the product is on, or while images are being saved or deleted. Forcibly cutting power in these circumstances could result in loss of data or cause damage to the memory card or internal circuitry.
- Page 6 1. About Your Camera malfunction. Using the Battery When Cold On cold days, the capacity of batteries tends to decrease. If an exhausted battery is used at a low temperature, the camera may not turn on. Keep spare batteries in a warm place and exchange as necessary. Once warmed, a cold battery may recover some of its charge.
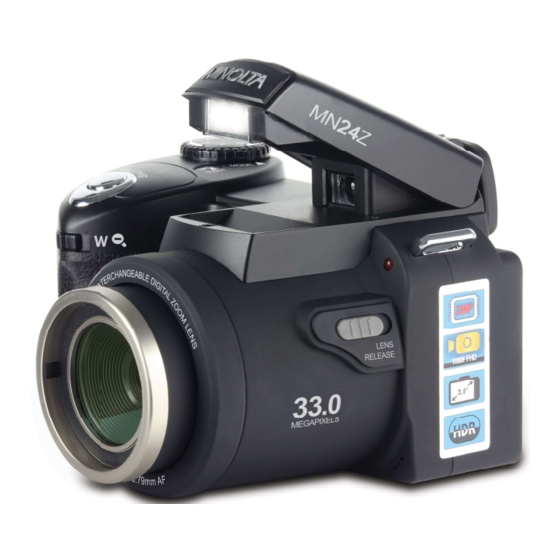
- Page 7 4. Shutter 16. Viewfinder 5. Zoom 17. LCD Screen 6. Remote Control Sensor 18. Tripod Mount 7. Minolta Logo Plate 19. Menu Button 8. Lens Cap 20. Battery Door 21. Memory Card and Port Door 9. Interchangeable Lens 10. Microphone 22.
- Page 8 1.2 Button Function Description Function Description Power Press and hold to power on or off. In Photo or Telephoto: Tap to capture a photo. In Video: Tap to start and stop recording. Shutter In Playback: Tap to play and stop recorded videos.
- Page 9 Tripod Mount Mount port for attaching to a tripod nut. LED Flash Used to illuminate dark scenes. Used to capture audio during video and audio Microphone recording. Accessory Shoe Mount Used to attach accessories to your camera.
- Page 10 1.3 Accessories Your camera comes with a number of different accessories that can be attached to or used with the camera.
- Page 11 1.3.1 Swapping Camera Lenses The camera lens can easily be swapped out easily by following the steps below. 1. Slide and hold the lens release switch towards the rear of the camera. rotate further pull the lens away from the camera body. The lens will come away from the camera body easily, if it does not, then continue rotating the lens until it does.
- Page 12 1.3.4 Accessory Shoe Attachments Accessories can be attached to the top of the camera using the accessory shoe mount, such as the included LED spotlight. Follow the steps below to attach and detach accessories using the accessory shoe mount. 1. Remove the accessory shoe tab by sliding it towards the rear of the camera.
-
Page 13: First Use
First Use 2.1 To Open the Battery Door Unlock the battery door by sliding the battery door toward the front of the camera. The battery door will then flip open. 2.2 Installing the Battery Insert the lithium-ion battery into the battery compartment with the metal contacts facing the inside of the camera. - Page 14 4. To remove the memory card, simply push in and the card will eject back out. NOTE: Please format the memory card before using the camera (Caution, this will erase all data on the card). Do not remove or insert the memory card when recording. It may damage the card or cause data loss.
- Page 15 2.6 Switching Modes Rotate the Mode Dial to cycle between Photo/Video, Playback, Audio Recording, Setup and Telephoto Photo/Video Modes. The corresponding mode will be displayed in the top left corner of the screen. 2.7 Connecting to a Computer Your camera can connect to a computer to transfer photo and video files for viewing and editing, use the camera as a webcam or charge the camera.
- Page 16 2.10 Using the Remote Control Note: Before using the remote, remove the battery tab on the back. When using the remote, it should be pointed towards the remote control sensor on the front the camera. There in between the remote and camera as this can block the signal from the remote.
- Page 17 2.11 Photo/Video, Telephoto Photo/Video Modes Using the Mode Dial, select Photo/Video or Telephoto Photo/Video modes. The meaning of each icon within Photo Mode is explained in the image below: Exposure Flash Image Resolution Number of saved files Video Resolution Memory Card Inserted Battery Level Camera Mode...
-
Page 18: Using The Camera
3 Using the Camera 3.1 Photo Shooting & Video Recording Power the camera on and it will be ready to take pictures and record videos right away. The steps below are the same for Photo/Video and Telephoto Photo/Video Modes. You may rotate the Mode Dial to switch to another mode. - Page 19 selection. 3.1.3 HDR This setting allows you to turn High Dynamic Range on and off. HDR improves the range of color and contrast in a digital image and video. 1. In Photo/Video and Telephoto Photo/Video Modes press the MENU button. 2.
- Page 20 pressed. 3-Photo Burst The camera will capture 3 photos when the shutter is pressed. 1. In Photo/Video and Telephoto Photo/Video Modes press the MENU button. 2. Select Capture Mode using the UP or DOWN buttons and press the OK or RIGHT buttons to enter the Capture Mode submenu. 3.
- Page 21 1. In Photo/Video and Telephoto Photo/Video Modes press the MENU button. 2. Select Date Stamp using the UP or DOWN buttons and press the OK or RIGHT buttons to enter the Date Stamp submenu. 3. Press the UP or DOWN buttons to navigate the menu, and press the OK or RIGHT buttons to confirm your required quality option (Off, On).
-
Page 22: Playback Mode
3.2 Playback Mode Videos and photos captured on your camera can be easily played back. 1. Rotate the mode dial to enter Playback mode, a play icon will display in the top left corner of the screen. 2. Press the LEFT or RIGHT buttons to cycle through the captured videos and photos stored on the memory card. - Page 23 1. In Playback Mode press the MENU button. 2. Select using the UP or DOWN buttons and press the OK or RIGHT buttons to view the File Information. 3. Press the LEFT, RIGHT, UP, DOWN or OK buttons to exit the file information.
-
Page 24: Audio Recording
3.3 Audio Recording Power the camera on and rotate the mode dial to the Audio Recording mode. A microphone icon will appear in the top left corner of the screen when you are in Audio Recording mode. 1. Place the camera close to the audio source that you wish to record. 2. -
Page 25: Settings Mode
3.4 Settings Mode Basic settings can be changed in the Settings menu. These include date & time, language and sound options. Power the camera on and rotate the mode dial to switch to settings mode. A menu will display on the screen. 3.4.1 Language e language. - Page 26 or RIGHT buttons to confirm your selected option (NTSC, PAL). NTSC is the standard TV type in the United States is NTSC. If the image on the TV is black and white, change the TV type setting. Press the MENU button to exit the settings menu without making a selection.
- Page 27 3.4.8 Format Memory Card The format setting erases all photos, videos and data stored on your memory card. 1. In Settings Mode select using the UP or DOWN buttons and press the OK or RIGHT buttons to enter the submenu. 2.
- Page 28 4.1 Technical Specifications Model Number Minolta MN24Z Lens Auto 3.79 Zoom 16X Digital Zoom Shutter Electronic Pixels (photo) JPEG: 33 3 MP Pixels (video) MOV: 1080p 720p LCD Screen Assistive Light White LED Power Saving 3 Minutes 5 7 Minutes...
- Page 29 Minolta is a registered trademark of JMM Lee Properties, LLC and is used in the United States by Elite Brands Inc. under license. -441-1100 www.minoltadigital.com www.elitebrands.com Copyright © 2022 Elite Brands Inc. please call our toll-free technical support hotline at 800-441-1100. Please be...
Need help?
Do you have a question about the MN24Z and is the answer not in the manual?
Questions and answers