Table of Contents
Advertisement
Advertisement
Table of Contents

Subscribe to Our Youtube Channel
Related Manuals for ASCOM NISM2


Summary of Contents for ASCOM NISM2
- Page 1 TD 93272EN Installation Guide Application Suite 08 October 2018 / Ver. D...
- Page 2 The material in this manual is protected by copyright law and international treaties. It is intended to be used by Ascom employees and distributors. Our authorisation is required for reproduction and / or distribution of any material herein to others.
-
Page 3: Table Of Contents
Installation Guide TD 93272EN Application Server Contents 1 Introduction ..........................4 1.1 About this Document ......................4 1.2 Abbreviations and Glossary ....................5 1.3 Requirements ......................... 5 1.4 FCC Compliance Statements for Class B Digital Device ............5 2 General Information ........................6 2.1 General .......................... -
Page 4: Introduction
NUAPPSVC-H is one part of the MARi hardware package that also includes the FE3- NKABAE teleCARE IP System Manager (NISM2). MARi integrates with teleCARE IP NISM software and Telligence Integration Module. -
Page 5: Abbreviations And Glossary
Installation Guide TD 93272EN Application Server • The administrator responsible for the daily administration at the customer site, that needs to change and edit settings. Abbreviations and Glossary Nurse Call System Manager Application NISM Graphical User Interface Requirements Refer to the Application Suite Install Sheet for MARi, TD 93267US. FCC Compliance Statements for Class B Digital Device This equipment has been tested and found to comply with the limits for a Class B digital device, pursuant to Part 15 of the FCC Rules. -
Page 6: General Information
Installation Guide Introduction TD 93272EN Application Server General Information General The Application Suite must be setup in a system with a NISM. No licenses are needed.. The MAC address The MAC address can be found on a label on the products rear side, in the application’s GUI in the Setup Wizard. -
Page 7: Description
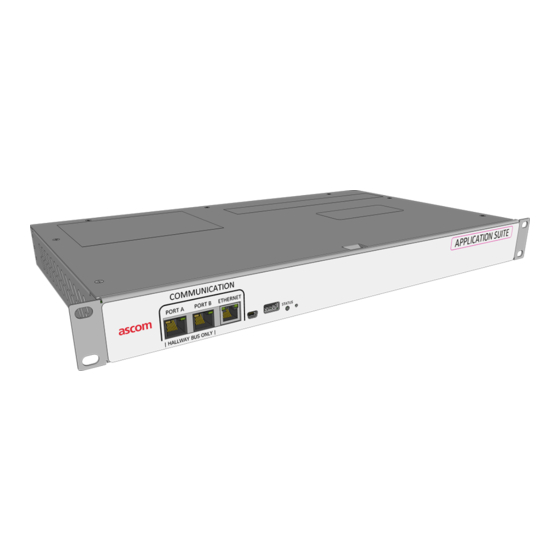
Installation Guide TD 93272EN Application Server Description Figure 1. Front and Rear view. Legend: 1) Ethernet port to connect to the LAN 2) Mini USB management port 3) Status LED 4) Reset or Mode Button (through a pin hole) 5) Power Supply connection 6) Fuse Figure 2. - Page 8 Installation Guide TD 93272EN teleCARE IP separate application documentation. The application GUI is the web user interface for the software application running on the Application Suite. 3.2.2 Boot Mode Placing the module in Boot Mode is performed manually by the user but if the module detects several major errors, the module can place itself in Boot Mode, refer to Chapter 5, “Boot Mode,”...
-
Page 9: Installation And Configuration
Installation Guide TD 93272EN Application Server Installation and Configuration The Application Suite can be placed horizontally in a 19inch rack. It must be fixed by screws or other fixtures to the rack, and must not be easily movable. Installation Procedure Mount the device, see 4.2 Mounting below. -
Page 10: Supply Voltage
Installation Guide TD 93272EN Application server Screw the Application Suite with screws to the 19inch rack as shown below. Note: Screws for fastening the assembly brackets in the rack are not included in the delivery. Supply Voltage The Application Suite uses a primary power supply (100-240 V AC). •... -
Page 11: Accessing The Application Suite
Installation Guide TD 93272EN Application server Accessing the Application Suite The Application Suite can be accessed either via an IP network or directly via the management port (mini-USB), see #2 in 7. The web browser Internet Figure 1., on page Explorer 8.0™... -
Page 12: Basic Configuration
Installation Guide TD 93272EN Application server Click “Install this driver software anyway”. The installation of the port driver begins. Click “Close” when the installation has finished. The port driver “Linux USB Ethernet/RNDIS Gadget” is now installed in Control Panel > Hardware and Sound >... - Page 13 Installation Guide TD 93272EN Application server Login with user “admin”, password “changeme”. Note: user “admin” and “changeme” are the default settings The Status Page will show up first. 4.6.2 Changing the network settings Access the Application Suite via the network using the IP-address and the config extension: “xxx.xxx.xxx.xxx/config”.
- Page 14 Installation Guide TD 93272EN Application server Enter the network settings Click ‘Save’ to save the settings. 4.6.3 Adding External Pages to the User GUI Up to 3 external URLs can be added to the User GUI. These links will appear in the left column of the main screen Access the Application Suite via the network using the IP-address and the config extension: “xxx.xxx.xxx.xxx/config”.
- Page 15 IMPORTANT: Check that the link is correctly working in the User GUI. The external link will show up in side bar of the MARi User GUI. With the example given above, the Ascom logo shows as a link in the side bar and the webpage in the main screen:...
- Page 16 Installation Guide TD 93272EN Application server 4.6.4 Changing the time zone settings Setting the time server and the time zone. The time server provides a system wide synchronized clock. Access the Application Suite via the network using the IP-address and the config extension: “xxx.xxx.xxx.xxx/config”.
- Page 17 Installation Guide TD 93272EN Application server Access the Application Suite via the network using the IP-address and the config extension: “xxx.xxx.xxx.xxx/config”. Login with user and password Select ‘Configuration Sections’ to change locale settings. Select ‘Locale Settings’: Locale Settings: e.g. English - UNITED STATES OF AMERICA Select the language Click ‘Save’...
- Page 18 Installation Guide TD 93272EN Application server Select ‘Language’: Enter a name for the translation and online help language Select the language translation file, and/or Select the help translation file Click ‘Save’ to save the settings and start the uploading of the file(s). Note: User GUI shows the new language after several processing seconds, the browser needs reloading of the pages.
- Page 19 Installation Guide TD 93272EN Application server Select ‘Language’: Click on the ‘Download’ to download the current file. 4.6.8 Downloading templates for the language files For starting a new language file, templates can be downloaded to which new translations can be added. Access the Application Suite via the network using the IP-address and the config extension: “xxx.xxx.xxx.xxx/config”.
- Page 20 Installation Guide TD 93272EN Application server E.g. for a NISM with IP-address 172.20.154.22: Click ‘Save’ to save the settings IMPORTANT: Without the NISM IP-address, the Application Suite will not be able to receive events. Use the browser to start the NISM Advanced Configuration Set the Application Suite IP-address in the “NISM Advanced Configuration”: 08 October 2018 / Ver.
- Page 21 Installation Guide TD 93272EN Application server Click on ‘Logging’ and add a destination with the IP-address of the Application Suite and with the extension “/ActivityLogger”. E.g.: Here the Application Suite has IP-address 172.20.154.73. Use the browser to start the NISM and click on ‘Installation’, click on ‘Modules’, and click on ‘Centralized Settings’.
- Page 22 Installation Guide TD 93272EN Application server In the “Logging” section, set the Application Suite’s IP-address in the “System activ- ity Log IP address”. E.g.: here the IP-address of the Application Suite is 172.20.154.73. 4.6.10 External Storage of data The Application Suite stores data locally by default. The storage space is limited to about 500,000 entries.
- Page 23 Installation Guide TD 93272EN Application server Select ‘SAL’: Enter the information for the postgreSQL database and the IP address of the server of the postgreSQL database. Click ‘Save’ to save the settings. IMPORTANT: The postgreSQL database needs to be version 9.6 or higher. 4.6.11 Configuring the SMTP settings For configuring a Simple Mail Transfer Protocol (SMTP) Access the Application Suite via the network using the IP-address and the config...
-
Page 24: Upgrading Of Software Package
Installation Guide TD 93272EN Application server Enter an IP-address of the SMTP server (or use the default 127.0.0.1) Enter the port on which the protocol will work. If necessary, enter the credentials and the default sender. Click ‘Save’ to save the settings. Upgrading of software package Before the upgrade: •... - Page 25 Installation Guide TD 93272EN Application server The status page shows the new software version and how long it has been running: E.g. here a new version v2.1.0-beta2 is running for 0 hours and 3 minutes. Select 'Configuration Sections'. Re-enter all configuration settings (see “Basic Configuration”...
-
Page 26: Boot Mode
Installation Guide TD 93272EN Application Server Boot Mode If no application is running on the Application Suite or if the application cannot be started, the Boot Mode can be used for installing new software. If the module detects several major errors (for example restart loop), the module can set itself in Boot Mode. This mode is for future use. -
Page 27: Related Documents
Installation Guide TD 93272EN Application Server Related Documents TD93267US Install sheet TD93281EN Data Sheet TD93222EN User Manual 08 October 2018 / Ver. D... -
Page 28: Appendix
Installation Guide TD 93272EN Application Server Appendix 08 October 2018 / Ver. D... - Page 29 Installation Guide TD 93272EN Application Server Document History Version Date Description 2018-02-20 • First released version A 2018-05-17 • Added information on linking an external postgreSQL database, see “External Storage of data” on page 22 • Added on how to upgrade the Application Suite with a new package, see “Upgrading of software package”...
Need help?
Do you have a question about the NISM2 and is the answer not in the manual?
Questions and answers