HP iPAQ rz1700 series User Manual
Hp ipaq rz1700: users guide
Hide thumbs
Also See for iPAQ rz1700 series:
- Frequently asked questions manual (40 pages) ,
- Overview (8 pages) ,
- Quickspecs (8 pages)
Table of Contents
Advertisement
Advertisement
Table of Contents

Related Manuals for HP iPAQ rz1700 series


Summary of Contents for HP iPAQ rz1700 series
- Page 1 User’s Guide HP iPAQ rz1700 series Document Part Number: 366075-001 May 2004...
- Page 2 The warranties for HP products are set forth in the express limited warranty statements accompanying such products. Nothing herein should be construed as constituting an additional warranty.
-
Page 3: Table Of Contents
Entering Owner Information ..... . 1–8 Resetting the HP iPAQ......1–9 Performing a Soft (“Normal”) Reset . - Page 4 Locking the Program Buttons ....5–6 Using HP Profiles ......5–6 Using HP Image Zone .
- Page 5 Adjusting Word Suggestion Options ....6–1 Using the On-screen Keyboard ....6–3 Using Letter Recognizer .
- Page 6 Contents Japanese Notice ....... . A–3 Korean Notice ....... . . A–3 European Union Notice .
-
Page 7: Getting To Know Your Hp Ipaq
Congratulations on purchasing your HP iPAQ. Use this guide to learn about the device functionality. You can find detailed information in the Help files on your HP iPAQ. To access Help, from the Today screen, tap Start > Help, and select a topic. -
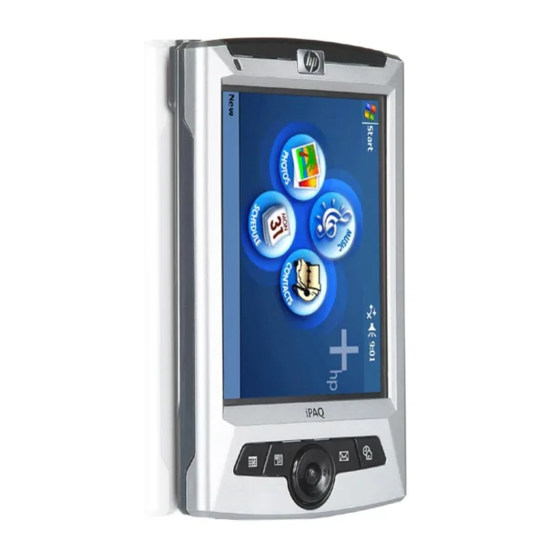
Page 8: Identifying Product Components
HP Image Zone* * To access this function, press and hold for two seconds. User’s Guide Secure Digital I/O (SDIO) Expansion Slot 5-Way Navigation Button Getting to Know Your HP iPAQ Infrared Port Power Button HP Profiles* Stylus Today Screen... - Page 9 Infrared Port Power Button Stylus 5-Way Navigation Button QVGA Color Display Program Buttons User’s Guide Getting to Know Your HP iPAQ Description Amber or green indicator. Indicates battery charge status and message status. Amber flash = charging Amber solid = charged...
-
Page 10: Back And Bottom Views
Universal Sync Connector Component Headphone Jack Speaker Reset Button Universal Sync Connector User’s Guide Getting to Know Your HP iPAQ Headphone Jack Speaker Reset Button Description 3.5 mm stereo audio jack for listening to audio media. Lets you listen to audio media. -
Page 11: Using The Stylus
If you lose or break your stylus, you can order extras at www.hp.com/go/ipaqaccessories. Aligning the Screen The first time you turn on the HP iPAQ, you must align the screen. You need to realign the screen if: ■... -
Page 12: Adjusting Text Size
Setting Date and Time When you turn on your HP iPAQ for the first time, you are requested to select your time zone. After setting the time zone, you still need to set the time and date. The three settings are located in the Clock Settings screen, and you can set them at the same time. -
Page 13: Setting The Date
You need to reset your time zone, time, and date if: ■ The location time (Home or Visiting) needs to be changed. ■ All power to the HP iPAQ is lost, which removes all saved settings. ■ You perform a full reset of your HP iPAQ. -
Page 14: Entering Owner Information
7. Tap OK. Entering Owner Information You can personalize your HP iPAQ by entering owner information. To enter owner information: 1. From the Today screen, tap Start > Settings > Owner Information > Identification tab. -
Page 15: Resetting The Hp Ipaq
If your HP iPAQ stops responding. To perform a soft reset: 1. Locate the Reset button. 2. Use the stylus to briefly press the Reset button. The HP iPAQ restarts and displays the Today screen. User’s Guide Getting to Know Your HP iPAQ... -
Page 16: Performing A Hard ("Full") Reset
RAM (Random Access Memory, where data and applications you have loaded are stored). If the battery installed in your HP iPAQ discharges completely, your HP iPAQ will operate as if a hard reset had been performed once the battery has been recharged. Ä... - Page 17 Note: Verify the full reset by pressing the Power button. When the HP iPAQ has been fully reset, it does not power on until the battery is reactivated. 2. A hard reset deactivates the battery. The Power button does not function until the battery is reactivated. To reactivate the battery: ❏...
-
Page 18: Caring For Your Device
■ When not in use, store your HP iPAQ in a case. You can select from a wide variety of cases at www.hp.com/go/ipaqaccessories ■... -
Page 19: Synchronizing With Your Computer
In this manner, you only have to input information once either at your computer or your HP iPAQ. Using ActiveSync and the sync cable, you connect your HP iPAQ and a computer to: ■... - Page 20 Note: Do not connect the sync cable to the computer yet. 4. When instructed by Setup Wizard, connect the HP iPAQ to the computer by inserting the USB plug on the sync cable into a USB port on your computer.
- Page 21 Note: The HP iPAQ supports a serial connection. However, to synchronize via a serial connection, you must use a serial sync cable (sold separately.) 5. The Setup Wizard detects the programs on your computer, and guides you step-by-step so you can install ActiveSync on your computer and other optional programs on your device.
-
Page 22: Changing Synchronization Settings
To synchronize files, select files in your computer; then drag and drop the files into the synchronization folder on your device. If you named your HP iPAQ “PC1” when you created your partnership, then the synchronized folder is named “PC1.”... -
Page 23: Manually Copying Or Moving Files
HP iPAQ and the computer. Using the Serial Infrared (IR) Connection Your HP iPAQ has an infrared port. If your computer has an infrared port or an infrared USB adapter, you can synchronize your HP iPAQ and your computer using an infrared connection instead of the sync cable. -
Page 24: Installing A Program
My Documents) on your HP iPAQ assures that the programs will locate them. 10. If you want, on your HP iPAQ, open File Explorer. Tap My Device. See the file(s) you have just copied or moved. Installing a Program To install a program from your computer using ActiveSync: 1. -
Page 25: Backing Up And Restoring Files
3. Check the screen on your HP iPAQ to see if further steps are necessary to complete the installation. Backing up and Restoring Files To help reduce the chance of losing information, you should back up information to your computer regularly. For more information... -
Page 26: Sending And Receiving Email Messages
Sending and Receiving Email Messages You can send and receive email messages by synchronizing your HP iPAQ with your computer using ActiveSync. When sending and receiving email messages, the name of the current folder is displayed at the bottom of the screen. -
Page 27: Managing The Battery
Your device is shipped with a partially charged internal battery. It is recommended that you fully charge the device before setting up the unit. Note: It can take up to four hours to fully charge the battery. Even when not in use, the device uses battery power to run the clock and maintain files. - Page 28 To charge the HP iPAQ: 1. Insert the round connector on the AC Adapter cable into the connector on the sync cable. 2. Insert the connector on the sync cable into the connector on the bottom of the device. 3. Connect the AC Adapter to a standard electrical outlet.
-
Page 29: Checking The Battery
Checking the Battery To view the battery gauge to see how much battery power remains: From the Start menu, tap Settings > System tab > Power. If the battery is low, use the AC Adapter to connect the device to an electrical outlet and recharge it to its full capacity. -
Page 30: Using The Screen
Using the HP Launch Screen (Select Models Only) On some models, when you first turn on your device, the Launch screen is displayed. Use this screen to access the following programs: ■ Music (Windows Media Player) ■ Contacts ■ Schedule (Calendar) ■... -
Page 31: Using The Today Screen
To change to the standard Today screen: 1. Tap Items tab. 2. Check or uncheck iPAQ Entertainment. Note: If iPAQ Entertainment is checked, no other Today screen items will be visible. 3. Check other items you want to see on the Today screen. 4. -
Page 32: Customizing The Today Screen
Customizing the Today Screen You can customize the appearance of the Today screen by: ■ Setting a theme for your device. ■ Using a picture as the background. ■ Selecting the items listed on the Today screen. To select a theme or a picture as a background: 1. -
Page 33: Navigation Bar And Taskbar
Using the Screen Navigation Bar and Taskbar The navigation bar displays connectivity status and the time. The taskbar lists the menu tabs, buttons, and commands you have available while you are using the current program. Navigation bar Tap to open a program. to open a recently used program. -
Page 34: Status Icons
You may see the following status icons displayed on the navigation bar or taskbar. Tap the icon to view more information related to the item. There is no active connection between the HP iPAQ and the computer. The HP iPAQ and a computer are connected. This icon appears only when there is an active connection. -
Page 35: Sounds And Notifications
Sounds and Notifications You can schedule various types of events (appointments, tasks, email notification) and set an alarm as reminder so that at the scheduled time or when you have a message, the indicator light on the front of the device flashes green and or a sound is played. To set alarms and sounds: Go to Start >... -
Page 36: Creating Information
Creating Information From the Today screen, you can create various types of items: 1. Tap ■ Appointment ■ Contact ■ Excel Workbook ■ Message ■ Note ■ Task ■ Word document 2. In the popup menu, tap a task to create a new item. 3. -
Page 37: Finding Information
Finding Information You can search through the My Documents folder and any subfolder you have created in your HP iPAQ. To find a program or file: 1. From the Start menu, tap Programs > Find. ■ If you know the filename, tap Find: and type the filename. -
Page 38: Using Programs
You can install programs on your HP iPAQ using Microsoft ActiveSync and the sync cable. You can install programs: ■ From your HP iPAQ or your computer by copying a program file that has an .exe or .cef extension. ■... -
Page 39: Using Hp Task Switch
By default, HP Task Switch runs in the background on your HP iPAQ. For help on HP Task Switch, go to Start > Help > View > All Installed Help > HP Task Switch. You can access HP Task Switch in two ways: ■... - Page 40 The following screen displays: If you select Icon pad, then the screen looks similar to the following: Tap to close all running programs. Tap to switch between programs. User’s Guide Using Programs Shows the current running program. Tap to adjust settings. 5–3...
-
Page 41: Using Program Buttons
The following table describes the default program buttons on the HP iPAQ. Each button can be assigned up to two programs. The primary program for the button can be accessed by briefly User’s Guide Using Programs 5–4... - Page 42 Play digital audio and video Media Player files. Contacts Keep a list of friends and colleagues. HP Image Zone Display individual images and run slide shows. Display images from a digital camera SD storage card. Messaging Receive and send Internet...
-
Page 43: Locking The Program Buttons
The Power button cannot be locked. Pressing the button and turning on the unit unlocks the other program buttons. Using HP Profiles You can change your HP iPAQ settings quickly depending on where you are at a given moment. Use HP Profiles to: ■... - Page 44 Power button. To launch HP Profiles: ■ Turn the HP iPAQ on; then press and hold the Power button for two seconds. The HP Profiles menu screen is displayed. ■ Go to Start > Settings> System tab > HP Profiles.
- Page 45 You can rename these profiles, but you cannot delete them. To rename a profile: 1. Go to Start > Settings> System tab > HP Profiles. 2. The Current profile is always the first profile displayed. Tap any profile from the HP Profiles dropdown list.
- Page 46 Adjusting the Alert Volume in a Profile 1. From the HP Profiles dropdown list, select the profile you wish to change and tap the Speaker icon. 2. On the volume screen, tap either Alerts On or Off.
- Page 47 Inactivity Having your HP iPAQ turned on plays a major part in how long your battery will last. You may want to set the HP iPAQ so that it turns off rather quickly when not in use. To set the shutdown period: 1.
-
Page 48: Using Hp Image Zone
Using HP Image Zone You can use HP Image Zone to see photos or video clips and organize them into slideshows or playlists. You can also add audio files to images by recording voices or sounds and associating them with an image. - Page 49 4. To view another picture, tap OK. HP Image Zone Icons The following table describes the HP Image Zone icons. Icon User’s Guide Preview area Thumbnails...
- Page 50 (Continued) Icon Adding Sound to a Picture You can add sound to a picture to listen to when you view the picture. You can see when a picture has an audio file associated with it by the speaker icon displayed in its thumbnail. To add sound to a picture: 1.
-
Page 51: Safekeeping Files In Ipaq File Store
Safekeeping Files in iPAQ File Store Storing programs and files in the iPAQ File Store folder protects them from being deleted in case you perform a full reset on the HP iPAQ, or the battery discharges completely. User’s Guide Using Programs... -
Page 52: Backing Up Programs And Files
To store a file in iPAQ File Store: 1. Browse for programs and files in your HP iPAQ by tapping Start > Programs > File Explorer > My Documents > My Device. 2. Copy the programs or file(s) you want to store: ❏... -
Page 53: Programs Available On The Hp Ipaq
4. Click the Backup or Restore tab, and click each option. 5. Click Backup Now or Restore Now. Programs Available on the HP iPAQ The following table lists programs included in your HP iPAQ. For additional programs to install, see the Companion CD. HP iPAQ Software... - Page 54 (Continued) HP iPAQ Software HP Profiles HP Task Switch iPAQ File Store SelfTest User’s Guide Function Customize characteristics (alarm, volume, backlight and battery conservation settings) and save them in memory. Invoke them according to your surroundings. Switch between running programs.
- Page 55 Be sure you install ActiveSync on your computer before connecting the sync cable and HP iPAQ to your computer. Perform basic mathematical calculations. Schedule and keep track of appointments, meetings, and other events, and set an alarm to remind you of the appointments.
- Page 56 (Continued) Microsoft Windows Mobile Software Notes Pocket Excel Pocket Internet Explorer Pocket Word Settings Tasks Windows Media Player 9 Series User’s Guide Function Create handwritten or typed notes, drawings, and recordings. Create new workbooks or view and edit Excel spreadsheets created on your computer. Browse the Internet.
-
Page 57: Entering Information
Microsoft Transcriber is a free program that you can download from the Microsoft website. Adjusting Word Suggestion Options As you type or write, the HP iPAQ suggests words for you in a box above the input panel. You determine: User’s Guide Entering Information 6–1... - Page 58 ■ Whether words are suggested. ■ The number of letters you want to enter before a word is suggested. ■ The number of suggested words per entry. Note: Word suggestion is not available in Microsoft Transcriber. To change settings for word suggestions: 1.
-
Page 59: Using The On-Screen Keyboard
Using the On-screen Keyboard Use the stylus to tap letters, numbers, and symbols on the on-screen keyboard. To type with the on-screen keyboard: 1. From any program, tap the up arrow next to the Input Panel button and tap Keyboard to display a keyboard on the screen. Note: To see symbols, tap the 2. -
Page 60: Using Block Recognizer
1. From any program, tap the up arrow next to the Input Panel button. 2. Tap Letter Recognizer. 3. Write a letter or symbol between the dashed line and baseline. a. To display in uppercase, write a letter between the hatch marks labeled ABC. -
Page 61: Using Microsoft Transcriber
1. From any program, tap the up arrow next to the Input Panel button. 2. Tap Block Recognizer. 3. Write a word, letter, or symbol between the hatch marks. a. To type text, write a letter between the hatch marks labeled “abc.”... -
Page 62: Writing And Drawing On The Screen
Writing and Drawing on the Screen Use the stylus to draw and write on the screen as if it were on paper. 1. From the Start menu, tap Notes > New or tap the Notes tab from within Calendar, Contacts, or Tasks. 2. -
Page 63: Word Recognition Tips
Word Recognition Tips Not all letters or words are recognized. When this occurs, they are ignored. To increase the likelihood that an input programs will recognize your writing, do the following: ■ Write neatly. ■ Tap Tools and increase the zoom level on the screen while you enter input. -
Page 64: Expansion Cards
Using an Expansion Card You can expand the memory and connectivity of your HP iPAQ by using an expansion card to: ■ Add an SDIO camera or other SDIO accessories ■ Expand the memory on the device Note: Expansion cards must be purchased separately and are not included with your HP iPAQ. - Page 65 Forcefully removing an expansion card might damage the card and/or the HP iPAQ. 4. Insert the expansion card into the expansion slot and push it in firmly 3.
-
Page 66: Viewing The Contents Of A Card
Viewing the Contents of a Card To view the contents of a card: 1. From the Start menu, tap Programs > File Explorer > My Device. 2. Under My Device, select the card folder to see a list of files or subfolders. -
Page 67: Connecting To The Internet
Browsing the Internet With Pocket Internet Explorer and a connection to the Internet, you can view websites on your HP iPAQ by typing an address or Universal Resource Locator (URL) in the Address bar. Note: Websites that use HTML 4.0, DHTML, animated GIF images, and Java applets may not work correctly with Pocket Internet Explorer without additional software. -
Page 68: Connecting To A Private Network
Favorites list. To save a website URL address as a link in Favorites while using the HP iPAQ: 1. Open a webpage to save. 2. Tap and hold the page; then tap Add to Favorites. -
Page 69: Troubleshooting
Use the following suggestions to troubleshoot problems with the HP iPAQ. It is recommended that you print this chapter for quick reference if you need to troubleshoot a problem. Common Problems Problem Solution I cannot see anything on the screen. - Page 70 Back up your information to your computer using ActiveSync. Disconnect all external devices. Take the AC Adapter with you. Keep your HP iPAQ in a protective case in your carry-on luggage. To purchase a case, visit: www.hp.com/go/ipaqaccessories or www.casesonline.com. ActiveSync.
- Page 71 You must browse for your document or workbook by tapping Start > Programs > File Explorer. Tap the subfolder you created; your file should be in that folder. My HP iPAQ is Tap Start > Settings > Password to be sure the password always asking settings are configured according to your preferences.
-
Page 72: Activesync
HP iPAQ to it. ■ Be sure your HP iPAQ is connected to the sync cable and the cable is connected to your computer. ■ Be sure your HP iPAQ is securely connected and making good contact with the sync cable connector. - Page 73 Disconnect your HP iPAQ from the sync cable, power on the unit by pressing the Power button, then reconnect it to the cable. Reset the HP iPAQ by using the stylus to lightly press the Reset button. Check Connection Settings in ActiveSync on your computer to ensure the communications port you are using is active.
-
Page 74: Expansion Cards
■ Be sure you have installed the drivers that came with the expansion card. ■ Be sure the label is facing the front of the HP iPAQ. ■ Be sure you are not inserting the card at an angle. ■... -
Page 75: A Regulatory Notices
Federal Communications Commission Notice This equipment has been tested and found to comply with the limits for a Class B digital device, pursuant to Part 15 of the FCC Rules. These limits are designed to provide reasonable protection against harmful interference in a residential installation. This equipment generates, uses, and can radiate radio frequency energy and, if not installed and used in accordance with the instructions, may cause harmful interference to radio... -
Page 76: Declaration Of Conformity For Products Marked With The Fcc Logo-United States Only
Modifications The FCC requires the user to be notified that any changes or modifications made to this device that are not expressly approved by Hewlett-Packard Company may void the authority to operate the equipment. Cables Connections to this device must be made with shielded cables with metallic RFI/EMI connector hoods in order to maintain compliance with FCC Rules and Regulations. -
Page 77: Canadian Notice
Canadian Notice This Class B digital apparatus meets all requirements of the Canadian Interference-Causing Equipment Regulations. Avis Canadien Cet appareil numérique de la classe B respecte toutes les exigences du Règlement sur le matériel brouilleur du Canada. Japanese Notice Korean Notice User’s Guide Regulatory Notices A–3... -
Page 78: European Union Notice
Directive (1999/5/EC), EMC Directive (89/336/EEC), and the Low Voltage Directive (73/23/EEC) issued by the Commission of the European Community. CE compliance of this computer is valid only if powered with an HP-provided CE marked AC Adapter. Compliance with these directives implies conformity to the... -
Page 79: Battery Warning
To reduce the risk of fire or burns, do not disassemble, crush, puncture, or dispose of in fire or water. Replacement should only be done by an HP authorized service provider using the HP spare part for this computer. -
Page 80: Airline Travel Notice
Regulatory Notices Airline Travel Notice Use of electronic equipment aboard commercial aircraft is at the discretion of the airline. User’s Guide A–6... -
Page 81: System Specifications
System Specifications System Feature Processor RAM (Random Access Memory) SD I/O slot Display Backlight Audio Infrared (IrDA) External Power Indicators Battery User’s Guide Description 203 MHz Samsung 2410 32 MB SDRAM SD memory and SDIO card support 3.5 in. transflective color TFT QVGA, 240 x 320 pixels, 64K colors;... -
Page 82: Physical Specifications
(Continued) System Feature Expansion capabilities Data transfer port USB/serial support Physical Specifications Length 4.47 in. Width 2.78 in. Depth 0.53 in. Weight 4.23 oz Operating Environment Temperature Relative Humidity Maximum Altitude User’s Guide Description 1 SDIO slot (4-bit) synchronization via 22-pin USB connector (serial cable sold separately) USB 1.0 USB –...