Table of Contents
Advertisement
Available languages
Available languages
Quick Links
Advertisement
Chapters
Table of Contents

Subscribe to Our Youtube Channel
Related Manuals for HOFFEN LT-1480


Summary of Contents for HOFFEN LT-1480
- Page 1 TRYMER DAMSKI LADIES’ TRIMMER INSTRUKCJA INSTRUCTION MANUAL...
-
Page 3: Table Of Contents
TRYMER DAMSKI Model: LT-1480 (Kolorystyka i wygląd urządzenia może się różnić od oryginału) SPIS TREŚCI 1. UŻYCIE ZGODNIE Z PRZEZNACZENIEM......4 2. DANE TECHNICZNE..............4 3. ZASADY BEZPIECZNEGO UŻYTKOWANIA ....4 4. OBJAŚNIENIE SYMBOLI ............7 5. BUDOWA ..................9 6. ZAWARTOŚĆ ZESTAWU ........... 10 7. -
Page 4: Użycie Zgodnie Z Przeznaczeniem
2. DANE TECHNICZNE Nr partii POJM210480 Model LT-1480 Zasilanie 1 x Bateria AA 1,5 V 3. ZASADY BEZPIECZNEGO UŻYTKOWANIA 1. Produkt nie jest zabawką. Należy zwracać uwagę na dzieci by nie bawiły się urządzeniem. - Page 5 6. Przestrzeganie instrukcji zapewnia bezpieczną instalację i użytkowanie urządzenia. 7. Nie należy używać nasadek innych niż dołączona do zestawu. 8. Jeżeli przekazujemy urządzenie osobie trzeciej, musimy przekazać wraz z nim tę instrukcję obsługi. 9. W przypadku wystąpienia jakiegokolwiek podrażnienia, natychmiast zaprzestać używania urządzenia i zgłosić...
- Page 6 sierści zwierząt. Używanie produktu do celów innych niż zgodne z przeznaczeniem spowoduje unieważnienie gwarancji. 18. Za każdym razem po użyciu, oczyść urządzenie. 19. UWAGA! Nie należy używać urządzenia w pobliżu wody, nad wanną, basenem, pod prysznicem, nad umywalką lub innym zbiornikiem wodnym. 20.
-
Page 7: Objaśnienie Symboli
adresem http://instrukcje.vershold.com. 4. OBJAŚNIENIE SYMBOLI Przeczytaj instrukcję. Produkt zgodny wymaganiami dyrektyw Unii Europejskiej. Urządzenie użytku wewnątrz pomieszczeń. Utylizacja urządzeń elektrycznych elektronicznych – patrz punkt UTYLIZACJA w niniejszej instrukcji. Utylizacja baterii – patrz punkt UTYLIZACJA w niniejszej instrukcji. Całkowita ochrona przed strumieniem wody płynącej z różnych kierunków z wydajnością... - Page 8 Znak towarowy, który oznacza, że producent wniósł wkład finansowy w budowę i funkcjonowanie systemu odzysku recyklingu odpadów opakowaniowych. Oznaczenie materiału, którego wykonane jest opakowanie – tektura falista. Segreguj odpady – oznakowanie wskazujące potrzebę segregacji odpadów. Opakowanie papier – oznaczenie pojemnika, do którego powinien trafić odpad.
-
Page 9: Budowa
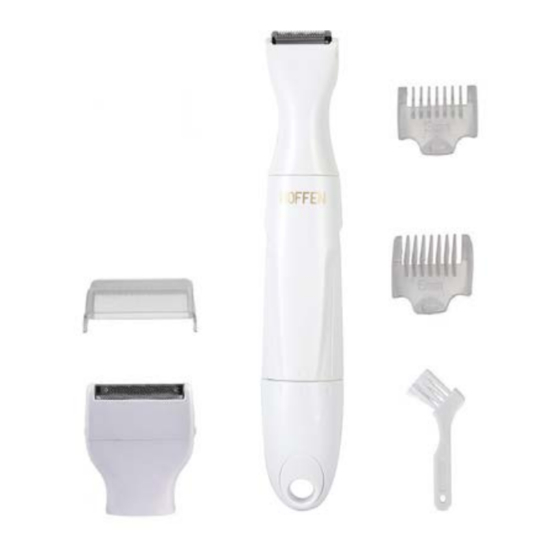
5. BUDOWA 1. Głowica trymera do bikini 2. Głowica golarki do bikini 3. Obrotowy włącznik/wyłącznik/otwieranie komory baterii 4. Uchwyt do zawieszenia 5. Mała nasadka na trymer – 3 mm 6. Duża nasadka na trymer – 6 mm 7. Osłonka na głowicę golarki do bikini 8. -
Page 10: Zawartość Zestawu
6. ZAWARTOŚĆ ZESTAWU 1 x Trymer damski 1 x Głowica trymera do bikini 1 x Głowica golarki do bikini 1 x Mała nasadka na trymer – 3 mm 1 x Duża nasadka na trymer – 6 mm 1 x Osłonka na głowicę golarki do bikini 1 x Pędzelek 1 x Bateria AA 1,5 V 1 x Instrukcja obsługi... -
Page 11: Użytkowanie
Uwaga! Dla bezpieczeństwa dzieci proszę zostawiać swobodnie dostępnych części opakowania (torby plastikowe, kartony, styropian itp.). Niebezpieczeństwo uduszenia! 7. UŻYTKOWANIE 7.1 Montaż / wymiana baterii 1. Przekręć obrotowy włącznik/wyłącznik/ otwieranie komory baterii tak by symbole na korpusie i głowicy ustawione były w pozycji: 2. - Page 12 Uwaga! • Urządzenie jest przystosowane zasilania bateriami typu AA 1,5 V • Baterie są dołączone do zestawu. • Przy instalacji nowych baterii odnieś się do oznaczeń znajdujących się w komorze baterii. • Stosuj baterie takiego samego typu jakie są rekomendowane do stosowania w tym urządzeniu: AA 1,5 V •...
- Page 13 • Wyczerpane baterie należy bezzwłocznie wyjąć z urządzenia. • Rozładowane baterie mogą wyciekać, powodując uszkodzenie urządzenia. • W razie kontaktu rąk z kwasem z baterii, opłucz ręce pod bieżącą wodą. W przypadku dostania się do oczu, skontaktuj się z lekarzem. Kwas zawarty w ...
- Page 14 4. Aby nałożyć głowicę, postępuj odwrotnie. Symbole na głowicy i korpusie musza być w pozycji a następnie przekręć aby symbol strzałki na korpusie wskazywał na I. 7.3 Montaż / demontaż nasadki trymera, małej i dużej Nasadkę na trymer (3 i 6 mm) montujemy na głowicę trymera do bikini.
- Page 15 1. Aby włączyć urządzenie przekręć obrotowy włącznik/wyłącznik/otwieranie komory baterii tak by strzałka wskazywała I. 2. Aby wyłączyć urządzenie przekręć obrotowy włącznik/wyłącznik/ otwieranie komory baterii tak by strzałka wskazywała 0. Użycie Uwaga! Nie zaleca się używania urządzenia pod prysznicem, podczas kąpieli ani pod bieżącą wodą, czy zamaczania w płynach, cieczach, mimo, iż...
- Page 16 trymer pod kątem prostym do powierzchni skóry, lekko przyciśnij i delikatnie przesuwaj trymer w kierunku przeciwnym do kierunku wzrostu włosów. 5. Przycinaj i modeluj na powierzchni skóry według potrzeb. 6. Po zakończeniu trymowania, wyłącz urządzenie, a następnie oczyść. Golenie: Użyć głowicy golarki do bikini. Do całkowitego golenia powierzchni bikini 1.
-
Page 17: Czyszczenie I Konserwacja
8. CZYSZCZENIE I KONSERWACJA Główne zasady Właściwe i regularne czyszczenie zapewnia bezpieczeństwo użytkowania oraz przedłuża żywotność urządzenia. Ostrzeżenie! Wyłącz urządzenie oraz wyjmij baterię przed czyszczeniem urządzenia. Uwaga! Nie stosować do czyszczenia żadnych środków chemicznych, alkalicznych, ściernych lub dezynfekujących, gdyż mogą szkodliwie wpływać na powierzchnię... -
Page 18: Naprawa
9. NAPRAWA Urządzenie nie zawiera części serwisowanych przez użytkownika. Nie naprawiaj urządzenia samodzielnie. Zawsze zlecaj naprawę fachowcowi. 10. PRZECHOWYWANIE I TRANSPORT Urządzenie należy czyścić zgodnie z opisem. Zawsze przechowuj urządzenie suchym wentylowanym miejscu, niedostępnym dla dzieci. Chronić urządzenie przed wibracjami i wstrząsami podczas transportu. - Page 19 Właściwa utylizacja urządzenia: 1. Zgodnie z dyrektywą WEEE 2012/19/ EU symbolem przekreślonego kołowego kontenera na odpady (jak obok) oznacza się wszelkie urządzenia elektryczne i elektroniczne podlegające selektywnej zbiórce. 2. Po zakończeniu okresu użytkowania nie wolno usuwać niniejszego produktu poprzez normalne odpady komunalne, lecz należy go oddać...
-
Page 20: Deklaracja Ce
5. Zużyte, całkowicie rozładowane baterie i akumulatory muszą być wyrzucane do specjalnie oznakowanych pojemników, oddawane punktów przyjmowania odpadów specjalnych lub sprzedawcom sprzętu elektrycznego. 12. DEKLARACJA CE Urządzenie zostało zaprojektowane, wyprodukowane i wprowadzone na rynek zgodnie z wymaganiami dyrektyw nowego podejścia i dlatego wyrób został... - Page 21 Twoja opinia jest dla nas ważna. Oceń nasz produkt pod adresem: www.vershold.com/opinie 1. Gwarant niniejszego produktu udziela 36 miesięcy gwarancji od daty zakupu. W przypadku wykrycia wady, urządzenie należy zareklamować w miejscu zakupu. 2. Za produkt uszkodzony uważa się taki produkt, który nie spełnia funkcji określonych w instrukcji obsługi, a przyczyną...
- Page 22 działania siły wyższej. 5. Gwarancją nie są objęte produkty, w których usunięta została plomba zabezpieczająca oraz w których dokonano prób naprawy, przeróbek lub zmian konstrukcyjnych. 6. Gwarancją nieobjęte są podzespoły ulegające naturalnemu zużyciu podczas eksploatacji. 7. Zaleca się reklamowanie sprzętu kompletnego celem ułatwienia weryfikacji usterki.
- Page 23 LADIES’ TRIMMER Model: LT-1480 (The device design and colour may differ slightly from the original) TABLE OF CONTENTS 1. INTENDED USE ..............24 2. TECHNICAL SPECIFICATIONS ........24 3. SAFETY INSTRUCTIONS ..........24 4. EXPLANATION OF SYMBOLS ......... 27 5. DEVICE COMPONENTS ............ 29 6.
-
Page 24: Intended Use
The device is intended for indoor use and may not be used for professional purposes. 2. TECHNICAL SPECIFICATIONS Lot No. POJM210480 Model LT-1480 Power supply 1 x AA 1,5 V battery 3. SAFETY INSTRUCTIONS 1. The product is not a toy. Children must not play with the device. - Page 25 6. If you hand this device over to a third party, transfer this instruction manual as well. 7. In the event you experience any skin irritation, stop using the device immediately and consult a doctor. 8. If you have experienced skin problems in the past, consult a doctor before using the device.
-
Page 26: Explanation Of Symbols
18. Do not use the device in the vicinity of heat sources (heaters, fire). 19. Never immerse the device in water. 20. When shaving, do not use any shaving liquids, soaps or similar products. 21. Remove the battery whenever you intend not to use the device or before cleaning it. - Page 27 Disposal of waste electrical and electronic equipment — see the DI POSAL section of this manual. Instructions disposal batteries — see the DISPOSAL section. Full protection against a jet of water spraying from any direction at a rate of up to 12.5 litres per minute. Watertight in the rain and when splashed on.
- Page 28 – Segregation sign Labeling indicating the need for waste segregation. – Paper waste Designation of the container to which the waste should Designation of type of waste bin for the – packaging PLASTIC/ METAL. Symbols in monochrome printout only for illustration.
-
Page 29: Device Components
5. DEVICE COMPONENTS 1. Bikini line trimmer head 2. Bikini line shaver head 3. Rotary ON/OFF switch / battery compartment opening 4. Hanging eyelet 5. Small trimmer attachment – 3 mm 6. Large trimmer attachment – 6 mm 7. Bikini line shaver head protective cap 8. -
Page 30: Kit Contents
6. KIT CONTENTS 1. 1 x Ladies’ trimmer 2. 1 x Bikini line trimmer head 3. 1 x Bikini line shaver head 4. 1 x Small trimmer attachment – 3 mm 5. 1 x Large trimmer attachment – 6 mm 6. -
Page 31: Use
7. USE 7.1 Inserting and changing batteries 1. Rotate the rotary ON/OFF switch / battery compartment opening until the arrow symbols on the housing and the head point at each other: 2. Take off the battery compartment cover by pulling on it. 3. - Page 32 Caution! • The device is designed to be used with AA 1,5 V batteries. • The batteries are included in the set. • When installing a new battery, observe the polarity markings in the battery compartment. • Use the same type of batteries as recommended for this device: AA 1.5 V .
- Page 33 • Spent batteries may leak, which may damage the device. • If you touch acid from a battery, rinse your hands under running water. If any acid gets into your eyes, contact a doctor. The acid contained in the battery may cause irritation or burns.
- Page 34 7.3 Large and small trimmer attachment installation/ removal Install the trimmer attachment (3 and 6 mm) on the bikini line trimmer head. It enables adjustment of trimmed hair length. 1. Put the attachment on the bikini line trimmer head. Make sure that the head blades are on the same side as the teeth in the attachment.
- Page 35 / battery compartment opening until the arrow points at I. 2. To turn the device off, rotate the rotary ON/OFF switch / battery compartment opening until the arrow points at 0. Operation Caution! The device may be used when taking a shower or a bath.
- Page 36 and gently slide the trimmer in the direction opposite that of hair growth. 5. Trim and shape hair on the skin surface as needed. 6. When you have finished trimming, turn off and clean the device. Shaving: Use the bikini line shaver head for thorough shaving of the bikini area: 1.
-
Page 37: Cleaning And Care
8. CLEANING AND CARE Basic principles Correct and regular cleaning will improve the safety and extend the life span of the device. Warning! Prior to cleaning the device, turn it off and remove the battery. Caution! Do not clean the device with any chemicals, alkali, abrasive or disinfecting agents, as they may damage the surface of the device. -
Page 38: Repair
9. REPAIR The device does not contain any user-serviceable parts. Do not attempt to repair the device on your own. Always have a specialist perform repairs. 10. HANDLING AND STORAGE Clean the device as described. Keep the device in a dry and well-ventilated place inaccessible to children. - Page 39 Correct disposal of the device: 1. According WEEE Directive (2012/19/EU), the crossed-out wheelie bin symbol (shown on the side) is used to label all electric and electronic devices requiring segregation. 2. Do not dispose of the spent product with domestic waste: turn it over to an electric and electronic devices collection and recycling centre.
-
Page 40: Ce Declaration
5. Spent or fully discharged single-use and rechargeable batteries must be discarded in dedicated labelled bins, turned over to hazardous waste collectors or returned to electric equipment dealers. 12. CE DECLARATION This device has been designed, manufactured and marketed in accordance with the requirements of the New Approach Directives. - Page 41 Your opinion is important to us. Evaluate our product at: www.vershold.com/opinie 1. The Warrantor of this product grants a 36-month warranty valid from the date of purchase. If any defect is found, a complaint about the product should be lodged at the point of purchase. 2.
- Page 42 structural modifications have been made or attempted. 6. The warranty does not cover components subject to natural wear and tear during operation. 7. It is recommended that the complete product be submitted together with the complaint so as to facilitate service operations. 8.
Need help?
Do you have a question about the LT-1480 and is the answer not in the manual?
Questions and answers