Table of Contents
Advertisement
Advertisement
Table of Contents

Subscribe to Our Youtube Channel
Related Manuals for DigiTech XC0436


Summary of Contents for DigiTech XC0436
- Page 1 Wi-Fi Weather Station with Colour LED Display XC0436 User Manual...
- Page 2 ABOUT THIS USER’S MANUAL This symbol represents a warning. To ensure safe use, always adhere to the instructions described in this documentation. This symbol is followed by a user’s tip. PRECAUTIONS - Keep and reading the “User manual” is highly recommended. The manufacturer and supplier cannot accept any responsibility for any incorrect readings, export data lost and any consequences that occur should an inaccurate reading take place.
-
Page 3: Table Of Contents
TABLE OF CONTENTS INTRODUCTION ..........OVERVIEW . -
Page 4: Introduction
INTRODUCTION Thank you for selecting Wi-fi weather station with 5-in-1 professional sensor. This system gathers and automatically uploads accurate and detailed weather data to Weather Underground and Weathercloud website - the famous weather service which allows weather observers to upload their local weather data with automated personal weather stations (PWS) - at which you can access and upload your weather data freely. -
Page 5: Lcd Display
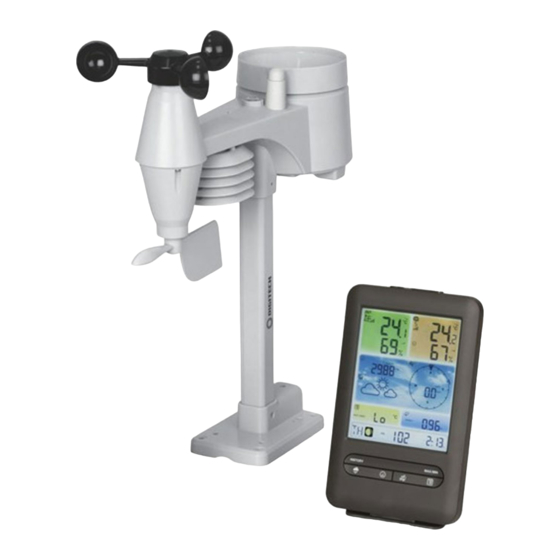
1. [ ALARM/SNOOZE ] key 9. Table stand 17. Battery door 2. LCD display 10. Wall mounting holder 18. USB Power socket 3. [ HISTORY ] key 11. [ ALERT ] key 19. [ ] key 4. [ RAIN ] key 12. -
Page 6: Installation And Setup
RAIN GAUGE 1. Rain collector 2. Tipping bucket 3. Drain holes 4. Rain sensor TEMPERATURE AND HUMIDITY SENSOR 1. Radiation shield Sensor casing 2. Temperature and humidity sensor (inside the radiation shield) WIND SENSOR 1. Wind cups (anemometer) 2. Wind vane INSTALLATION AND SETUP INSTALL WIRELESS 5-IN-1 WEATHER SENSOR Your wireless 5-IN-1 sensor measures wind-speed, wind-direction, rainfall, temperature and... - Page 7 ASSEMBLY THE STAND AND POLE Step 1 Insert the top side of the pole to the square hole of the weather sensor. NOTE: Ensure the pole and sensor's indicator align. Step 2 Place the nut in the hexagon hole on the sensor, then insert the screw in other side and tighten it by the screw driver.
-
Page 8: Power Up Console
Install the wireless 5-IN-1 sensor in an Add rubber open location with no obstructions above pads before Point to and around the sensor for accurate mount on NORTH rain and wind measurement. Install the pole the sensor with the smaller end facing the North to properly orient the wind direction vane. -
Page 9: Pairing Wireless 5-In-1 Weather Sensor & Console
SET LCD DISPLAY VIEWING ANGLE Press [ ] or [ mount situation. PAIRING WIRELESS 5-IN-1 WEATHER SENSOR & CONSOLE After insert of batteries, the console will automatically search and connect the wireless 5-IN-1 sensor (the sensor antenna icon blinking). Once the connection is successful, antenna icon and readings for outdoor temperature & humidity, wind speed, wind direction and rainfall will appear on the LCD. - Page 10 3. In "My Weather Station" page bottom, press the "Add New Device" button to add your device. 4. Follow their instruction to enter your station information, in the Step "Tell Us More About Your Device", enter a Name for your weather station, then choose “Other” in “Device Hardware”...
-
Page 11: Create Weathercloud Account
NOTE: Use the valid email address to register your account. 2. Sign in weathercloud and then you will go the "Devices" page, click "+ New" to create new device. 3. Enter all the information in Create new device page, for the Model* selection box select the "W100 Series"... -
Page 12: Setup Wi-Fi Connection
SETUP WI-FI CONNECTION 1. When you first power up the console, or press and hold the [ SENSOR / WI-FI ]key for 6 seconds in normal mode, the console LCD will show "AP" and " " icon to signify that it has entered AP (access point) mode, and is ready for WI-FI settings. -
Page 13: Setup The Weather Server Connection
SETUP THE WEATHER SERVER CONNECTION Enter the following information into the below web interface "SETUP" page. If you choose not to use Wunderground.com or Weathercloud.net, leave the check boxes unchecked. Press “SETUP” icon Language: English to SETUP page SETUP ADVANCED WiFi Router setup Press to search router Select the Wi-fi router (SSID) you will connect to... -
Page 14: Advance Setting In Web Interface
The time will automatically synchronize Internet time server at 12:00AM and 12:00PM per day. Also you can press the [REFRESH ] key to get the internet time manually within 1 minute. ADVANCE SETTING IN WEB INTERFACE Press "ADVANCED" key at the top of web interface to enter the advance setting page, this page allow you to set and view the calibration data of the console, also you can update the firmware in here (Only available in PC platform). -
Page 15: View Your Weather Data In Weathercloud
Another way to view your station is use the web browser URL bar, type below in the URL bar: https://www.wunderground.com/dashboard/pws/XXXX Then replace the XXXX by your Weather underground station ID to go to your station live view directly. You can also check Weather Underground web site to learn more about their mobile App for Android and iOS. -
Page 16: Other Setting & Functions Of The Console
FIRMWARE UPDATE STEP 1. Download the latest version firmware (function or WI-FI) to your PC. 2. Set the Console into AP (access point) mode then connect the PC to the console (ref to "SETUP WI-FI CONNECTION" section in previous page). 3. -
Page 17: Moon Phase
MOON PHASE The moon phase is determined by Northern Southern Moon Phase the time, date and time zone. The hemisphere hemisphere following table explains the moon New Moon phase icons of the Northern and Southern hemispheres. Please refer to ORIENTING THE 5-IN-1 SENSOR Waxing Crescent TOWARDS SOUTH section about how to setup for the Southern... -
Page 18: Activating Alarm And Temperature Pre-Alarm Function
ACTIVATING ALARM AND TEMPERATURE PRE-ALARM FUNCTION 1. In normal mode, press [ ALARM ] key to show the alarm time for 5 seconds. 2. When the alarm time displays, press [ ALARM ] key again to activate the alarm function. Or press [ ALARM ] key twice to activate the alarm with ice pre-alarm function. -
Page 19: Wireless Sensor Signal Receiving
WIRELESS SENSOR SIGNAL RECEIVING 1. The console display signal strength for the wireless 5-IN-1 sensor, as per table below: No signal Weak signal Good signal 2. If the signal has discontinued and does not recover within 15 minutes, the signal icon will disappear. -
Page 20: Weather Forecast
FEELS LIKE Feels Like Temperature shows what the outdoor temperature will feel like. It’s a collective mixture of Wind Chill factor (18°C or below) and the Heat Index (26°C or above). For temperatures in the region between 18.1°C to actual outdoor measured temperature as Feels Like Temperature. HEAT INDEX The heat index, which is determined by the wireless 5-IN-1 sensor's temperature &... -
Page 21: Barometric Pressure
BAROMETRIC PRESSURE The atmospheric pressure is the pressure at any location of the earth caused by the weight of the column of air above it. One atmospheric pressure refers to the average pressure and gradually decreases as altitude increases. Meteorologists use barometers to measure atmospheric pressure. -
Page 22: Past 24 Hours History Data
TO VIEW THE ACCUMULATED MAX / MIN In normal mode, press [ MAX / MIN ] key to check MAX/MIN records. The display sequence is: indoor (or current channel) MAX temperature indoor (or current channel) MIN temperature indoor (or current channel) MAX humidity indoor (or current channel) MIN humidity outdoor MAX temperature outdoor MIN temperature... -
Page 23: Backlight
2. Under the current alert reading, press and hold [ ALERT ] key for 2 seconds to enter alert setting and the alert reading will flash. 3. Press [ ] or [ ] key to adjust the value or press and hold the key to change rapidly. 4. -
Page 24: Cleaning Hygro-Thermo Sensor Of Wireless 5-In-1 Sensor
CLEANING HYGRO-THERMO SENSOR OF WIRELESS 5-IN-1 SENSOR 1. Remove the 2 screws at the bottom of the radiation shield. 2. Gently pull out the shield. 3. Carefully remove any dirt or insects on the sensor casing (do not let the sensors inside get wet). 4. - Page 25 (700 ~ 1100hPa ± 5hPa) / (540 ~ 696hPa ± 8hPa) (20.67 ~ 32.48inHg ± 0.15inHg) / (15.95 ~ 20.55inHg ± Accuracy 0.24inHg) (525 ~ 825mmHg ± 3.8mmHg) / (405 ~ 522mmHg ± 6mmHg) Typical at 25°C (77°F) Resolution 1hPa / 0.01inHg / 0.1mmHg Sunny / Clear, Slightly Cloudy, Cloudy, Rainy, Rainy / Stormy Weather forecast and Snowy...
-
Page 26: Wireless 5-In-1 Sensor
Alarm Hi Wind Speed Alert (Average / Gust) Wind direction resolutions 16 directions Rain Display & Function Specification Note: The following details are listed as they are displayed or operate on the console. Unit for rainfall mm and in Accuracy for rainfall ±...
Need help?
Do you have a question about the XC0436 and is the answer not in the manual?
Questions and answers
my weathers station is not showing any outdoor information. We have replaced the batteries and the red light is blinking but no outdoor information is showing on the LCD screen. Wifi is connected and the OUT weather station image is showing on the screen just no information.
The issue could be a lost or weak signal from the wireless 5-IN-1 outdoor sensor. If the signal is lost and not recovered within 15 minutes, the signal icon disappears and temperature/humidity displays “Er”. After 48 hours without signal, “Er” becomes permanent. Replacing the sensor batteries and pressing [SENSOR] may resolve the issue.
This answer is automatically generated