Advertisement
Quick Links
Temperature/Humidity
Weather Station
Thank you for selecting this
delicate wireless weather station.
Utmost care has gone into the
design and manufacture of the
clock. This manual is used for
AU version. Please read the
instructions carefully according
to the version you purchased and
keep the manual well for future
reference.
OVERVIEW
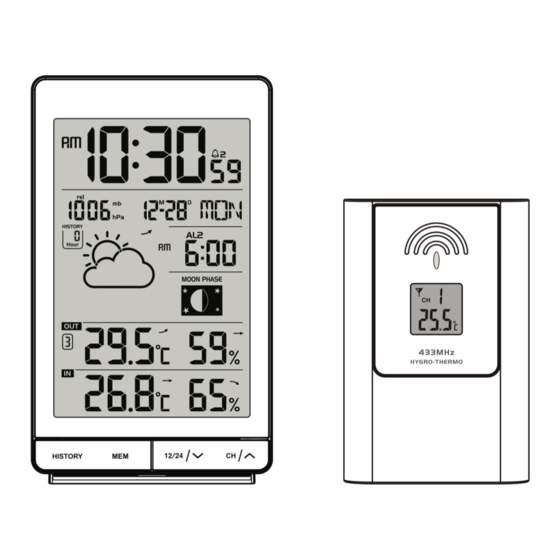
MAIN UNIT
1
1. LCD display
2. [ HISTORY ] key
- In normal mode, press to display the past 24 hour pressure records.
3. [ MEM ] key
- In normal mode, press to check maximum and minimum thermo-hygro reading, or
press and hold for 3 seconds to delete both records.
4. [ 12/24 /
] key
- In normal mode, press to switch between 12 or 24 hour format of time display, or
press and hold for 3 seconds to activate wireless sensor pairing mode.
- In setting mode, press to decrease the setting values.
5. [ CH /
] key
- In normal mode, press to switch between CH 1~3 of outdoor sensor's weather
display, or press and hold for 2 seconds to enter auto-cycle mode.
- In setting mode, press to increase the setting values.
6. [ TIME ] key
- In normal mode, press to switch between alarm 1 and alarm 2, or press and hold for
2 seconds to enter time setting mode.
- In time setting mode, press to step the setting.
7. [ ALARM ] key
- In normal mode, press to turn on/off alarm1 and alarm 2, or press and hold for 2
seconds to enter alarm setting mode.
- In alarm setting mode, press to step the setting.
8. [ RESET ] key
- In case of malfunction, press to reset the main unit.
9. [ SNOOZE / LIGHT ] key
- When alarm is sounding, press to stop the current alarm and enter snooze.
- When alarm is sounding, press and hold for 2 seconds to stop the current alarm, the
clock will sound again in the next day.
10. [ BARO ] key
- In normal mode, press to switch between hPa (mb) and inHg, or press and hold for 3
seconds to enter the "rel" and "abs" switch mode.
11. [ °C / °F ] key
- In normal mode, press to switch between Celsius and Fahrenheit.
12. Battery compartment
LCD DISPLAY
1. Time section
2. Weather forecast & baro pressure
section
3. Ch. 1-3 temperature & humidity
reading
4. Indoor temperature & humidity
reading
5. Calendar and alarm section
6. Moon phase section
XC0412
User Manual
6
7
8
1
2
3
4
WIRELESS THERMO-HYGRO SENSOR
1. LED indicator
- Flashes when the remote unit is
transmitting.
2. LCD display
- to show the detected temperature or
humidity of the sensor.
3. Wall mounting holder
4. [ RESET ] key
- Press to restart the sensor.
5. [ CHANNEL ] slide switch
- Assign the transmitter to Channel
from 1 to 3.
6. Battery compartment
- Accommodates 2 x AA size batteries.
GETTING STARTED
WIRELESS SENSOR
1. Remove the battery door.
2. Insert 2 x AA size batteries into the battery compartment. Make sure you insert
them the right way according to the polarity information marked on the battery
compartment.
3. Replace the battery door.
NOTE:
- Once the channel is assigned to a sensor, you can only change it by removing the
batteries or resetting the sensor, you also need to press and hold [ 12/24 /
3 seconds on main unit to pair this sensor.
- After replacing the batteries of the wireless sensor or the unit fails to receive wireless
seconds on main unit to pair this sensor again.
- Avoid placing the transmitter in direct sunlight, rain or snow.
9
- The building material and the position of the receiver and transmitter affect the
effective range. So try various locations to obtain the best result.
10
- Place the units away from metal objects and electrical appliances to minimize the
interference. Position the receiver and transmitter within the effective transmission
11
range: 30m in usual circumstances.
MAIN UNIT
1. Remove the battery door and insert 2 x AA batteries into the battery compartment,
according to the polarity mark on the battery compartment.
2. After the batteries are installed, all LCD segment will be shown.
3. Press the [ RESET ]
4. Replace the battery door.
NOTE:
- If no display appears on the LCD after installing the batteries, press the [ RESET ] key
by using a metal wire.
VIEW MULTIPLE WIRELESS SENSOR CHANNELS
1. In normal mode, press [ CH /
2. In normal mode, press and hold [ CH /
mode, After a "bi" sounds, it will alternately displays the CH 1~3 at 4 second intervals.
3. During auto-cycle mode, press [ CH /
display the current channel.
TIME AND CALENDAR SETTING
1. In normal mode, press and hold [ TIME ] key for 2 seconds to enter date and time
setting mode.
2. Press [ CH /
] or [ 12/24 /
3. Press [ TIME ] key to enter the next setting.
4. The setting sequence: year
hour
minute
5. Press [ TIME ] key or leave the unit for 30 seconds to complete the setting and return
to normal mode.
Weekday language GB
ALARM TIME SETTING AND DISPLAY
1. In normal time mode, press [ TIME ] key to select the alarm 1 or alarm 2.
2. In alarm1/alarm2 mode, press and hold [ ALARM ] key for 2 seconds until alarm hour
3. Press [ CH /
] or [ 12/24 /
4. Repeat the above operations to set the alarm time in this order: Hour
Ice pre-alarm on/off.
5. Press [ ALARM ] key or leave the unit for 30 seconds to return to normal mode.
Ice alert icon
USING ALARM AND SNOOZE FUNCTION
1. Set the desired alarm time as described in the previous section.
2. Or press [ ALARM ] key to turn on alarm 1, press it again to turn on alarm 2, press
it thrice to turn on both alarm 1 and alarm 2, with the alarm icons " " and / or "
" displays on the LCD. Press it again to turn off both alarm 1 and alarm 2, with the
icons disappear.
3. When clock reach the alarm time, alarm sound will start.
Where it can be stopped by following operation:
5
a) Auto-stop after 2 minutes alarming if without any operation and the alarm will activate
again in the next day.
b) By pressing [ SNOOZE / LIGHT ] key to enter snooze that the alarm will sound again
after 5 minutes.
6
c) By pressing and hold [ SNOOZE / LIGHT ] key for 2 seconds to stop the alarm and
will activate again in the next day
d) By pressing [ ALARM ] key to stop the alarm and the alarm will activate again in the
next day.
NOTE:
- The alarm function will turn on automatically once you set the alarm time.
- The snooze could be used continuously in 24 hours.
- During the snooze, the alarm icons " " and / or "
] key to switch the display between CH 1~3.
] key for 2 seconds to enter auto-cycle
] key again to stop auto-cycle mode and
] key to adjust the setting.
DM / MD
month
day
second
weekday language.
FR
DE
ES
IT
] key to change the value
Time of alarm 2
] key for
[ 12/24 /
] key for 3
DST AUTO / OFF
Minute
Advertisement

Subscribe to Our Youtube Channel
Related Manuals for DigiTech XC0412


Summary of Contents for DigiTech XC0412
- Page 1 1. LED indicator - Flashes when the remote unit is Temperature/Humidity transmitting. Weather Station 2. LCD display XC0412 - to show the detected temperature or User Manual humidity of the sensor. 3. Wall mounting holder Thank you for selecting this 4.
- Page 2 - The ice pre-alarm will be activated when the alarm 1 and / or 2 is on. MOON PHASE - Once the ice pre-alarm activates, the preset alarm will sound 30 minutes earlier if the The main unit can show the northern hemisphere moon phase status, below is the table outdoor temperature is below -3°C.
Need help?
Do you have a question about the XC0412 and is the answer not in the manual?
Questions and answers
If the alarm bell icon is not showing, is the alarm off?