Table of Contents
Advertisement
Quick Links
Advertisement
Table of Contents

Subscribe to Our Youtube Channel
Related Manuals for AVer X18iS


Summary of Contents for AVer X18iS
- Page 1 X18iS User Manual ...
- Page 3 Product is to marked to read the instructions before use or with the symbol. WARNING AVERTISSEMENT ALWAYS FOLLOW SAFETY PRECAUTIONS RESPECTEZ TOUJOURS LES CONSIGNES DE SÉCURITÉ IMPORTANT SAFEGUARDS Death or serious injury may occur when children climb on audio and/or video ...
- Page 4 UV-C Light Hazard • When cart is in use, there is UV-C light inside. • Eye and skin hazard — avoid exposure to eyes/skin. • Do not look directly at U V-C light. Take precautions to protect eyes and skin from direct exposure. ...
- Page 5 CAUTION! DO NOT allow anyone to sit, stand, or climb on the cart. DO NOT lift the cart. DO NOT block the ventilation holes used for air circulation. DO NOT overload objects on the cart shelves. (Work platform maximum ...
- Page 6 The information contained in this documentation is subject to change without notice. In no event will AVer Information Inc. be liable for direct, indirect, special, incidental, or consequential damages arising out of the use or inability to use this product or documentation, even if advised of the possibility of such damages.
- Page 7 For more information about where to drop off your waste equipment for recycling, please contact your household waste disposal service or the shop where you purchased the product. Contact Information AVer Information Inc. https://www.averusa.com 668 Mission Ct., Fremont, CA 94539...
-
Page 9: Table Of Contents
Contents Package Contents ....................1 Dimensions ......................1 Diagram ........................ 2 Secure the Cart ..................... 3 Door Lock ......................3 UV Lamp Installation ..................... 5 Cable Management ....................6 Charging Cart ....................... 8 Adaptive Intelligent Charging System..............9 UV Lamp Panel Setup ..................10 LED Indicators ..................... -
Page 11: Package Contents
Package Contents The following items are included in the package. Please check if each item is available before using. Door Key x4 User Manual UV Lamp x6 Power Cable X18iS Cart Dimensions 687mm (27.05”) 638mm (25.12”) -
Page 12: Diagram
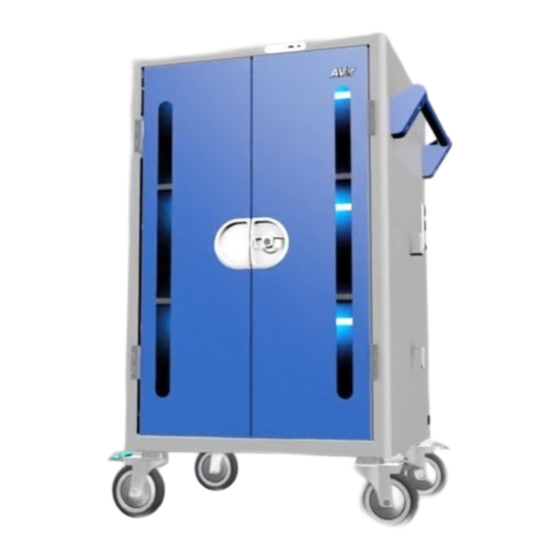
Diagram Front Side Back 1. Work platform 8. LED indicators 15. Door lock 2. UV lamp panel 9. Auxiliary outlets 16. Security hook 3. Observation 10. USB firmware upgrade windows port (not for charging 4. Handle or storage) 5. Door lock 11. -
Page 13: Secure The Cart
Secure the Cart Door Lock Unlock the door Use key to unlock the door. The number on the key must match the number on the door lock Turn the door lock to vertical position to open the door. ... - Page 14 Lock the door To lock the door, close the door and turn the door lock back to horizontal position. Then, use the key to lock the door. For more security, use padlock to double secure the door. [Note] The shackle dimension of front and back doors are limited to Ø8mm (0.31”).
-
Page 15: Uv Lamp Installation
UV Lamp Installation 1. Set the power switch to the OFF position. Unplug the power cord. 2. Open the rear door and find the lamp holders above the drawer. 3. Find the UV lamps in the package. 4. Loosen screws of both sides of lamp holders and rotate the lamp holders down 90°. -
Page 16: Cable Management
Cable Management Back 1. Open the rear door. 2. Bundle the DC power cord with cable tie or zip-tie (not supplied) and leave proper length for connecting to the device. 3. For the ventilation purpose, EPEs are purposed placed alternately. Do not remove the EPEs. - Page 17 Front 1. Open the front doors. 180° 2. Release the cable clamp by pulling locking feature (A). 3. Route the adaptor DC-end cable along with the V-shape routing groove. 4. Snap the locking piece (B) to firmly secure the DC-end cable. 5.
-
Page 18: Charging Cart
Charging Cart Set the power switch to “ON” to begin charging. Wall outlet Connect power cord to the cart and wall outlet. [Notes] Set the power switch to the OFF position before plugging the cart to wall outlet. ... -
Page 19: Adaptive Intelligent Charging System
Adaptive Intelligent Charging System 18 bays for X18iS are divided into 2 zones (12 bays for each zone). It is recommended to plug the top bays into the top zone. -
Page 20: Uv Lamp Panel Setup
Solid/Flashing Ensure doors are properly closed. Orange Solid/Flashing System error. Please contact AVer’s technical support team: support.usa@aver.com 3. Use the Time Slide Switch to select the disinfecting duration: 5, 10, 15 or 20 minutes. [Note] The sanitizing duration can be reselected even when the UV lamps are... -
Page 21: Led Indicators
Solid Orange: Short Solution: Please check devices which Protection connected to auxiliary outlet and charging zone for it might have problems. Flashing Red: Abnormal Solution: Contact Technical Support Failure (support.usa@aver.com) -
Page 22: Troubleshooting
Troubleshooting Q: Why are all of my devices plugged in but not charging? A: 1. Make sure power cords are undamaged. 2. Make sure power cords are firmly inserted into the available socket with stable current. 3. Make sure the power plug and current consumption are compliant with your country specification standards. -
Page 23: Specifications
Specifications Model X18iS Capacity 18 (three shelves, 6 bays per shelf) Supported Devices Mobile devices up to 15" AUX Outlets Power LED: Red/Green LEDs Status Indicators Status LED (x2): Solid Blue: Charging Charging Type AC Adaptive Intelligent Charging AC IN: 100-120V ~ 50/60Hz, 12A... -
Page 24: Service And Warranty
[Note] Specifications are subject to change without prior notice. Service and Warranty All of our products come with a quality and safety assurance. For customers located in North America, please visit the AVer USA support site for comprehensive RMA, Warranty, and Service information: https://www.averusa.com/classroom-technology/support/... -
Page 25: Appendix - Earthing
Appendix – Earthing [Caution] High touch current, Connect to earth before connecting to supply. (Yellow/Green wire min. 14AWG) [Note] Installation of the protective earthing connection of the socket-outlet by a skilled person. [Attention] Contact à courant élevé, Reliez l’appareil à la terre avant de la connexion à l’alimentation en courant. (Câble jaune/vert min. - Page 28 ...
Need help?
Do you have a question about the X18iS and is the answer not in the manual?
Questions and answers