Advertisement
Quick Links
Advertisement

Related Manuals for Globalmediapro HUS03-4K6G


Summary of Contents for Globalmediapro HUS03-4K6G
- Page 1 HDMI Switcher Series User Manual...
- Page 2 Model : HUS03-4K6G 4K60 3x1 HDMI/USB-C Presentation Switcher...
- Page 3 Introduction HUS03-4K6G is a 3-in-1-out 4K@60Hz 4:4:4 video switcher designed to provide a user-friendly and intuitive operation for presenters to have their thoughts well-delivered during a meeting. The switcher supports HDMI and USB Type-C interfaces which can connect with most electronic devices and fulfill the BYOD need.
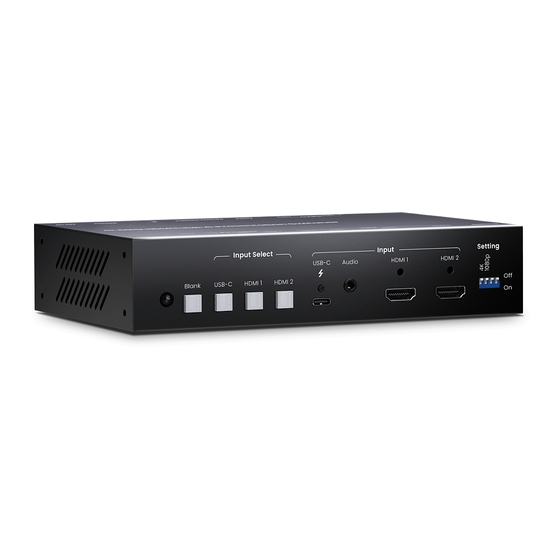
- Page 4 Panel View Interface/ Port Description Internal IR Receiver To receive IR signal from IR remote, carrier frequency at 38KHz. To turn on/off the video display, auto-sensing, and default to factory Blank LED Button settings (Please refer to Description 7). USB-C LED Button To select USB Type-C DP Alternate Mode as the video source.
- Page 5 DIP Switch To set up the EDID function (Please refer to Description 3) To use an HDMI cable to connect with a HDMI display, such as a HDMI Output Port monitor or a projector. To use an audio cable to connect with speakers or an amplifier Audio Output Interface (Please refer to Description 4).
- Page 6 Description 3 - EDID Mode & Configuration EDID Mode Switch 1 Switch 2 Description Refer to the connected monitor EDID (audio supports Pass Through Mode OFF↑ OFF↑ 192KHz) 4K Mode ON↓ OFF↑ Resolution at 4K (Audio supports 2CH@48KHz) 1080p Mode ON↓...
- Page 7 Description 5 – Relay Interface Description Normally Open Common Contact Normally Closed Contact Rating Load Type AC 120V Max. Allowable Voltage DC 24V Max. Allowable Current AC 1A...
- Page 8 Description 6 – Contact Closure Please pay attention to the electrical wiring, wrong wiring may damage the product. Function To enable LED indications on the control keypad To provide 5V for the control keypad To connect a ground wire for the control keypad Connect a control keypad module to trigger USB-C USB-C button...
- Page 9 Description 7 – Console Please use a male to female RS232 cable to connect the console port (Female) with a PC ● (Male). Pinout ● Position Pin Definition Pin 2 Pin 3 Pin 5...
- Page 10 When the auto-switch function is disabled, you can only switch the video inputs from the panel buttons, IR remote or using RS232 commands. Auto Mode HUS03-4K6G will auto-detect the USB-C, HDMI 1, and HDMI 2 input and display the corresponding video. Auto mode priority...
- Page 11 Auto Mode: On a. LED Indications: USB-C, HDMI 1, HDMI 2 will blink 6 times (About 5 secs) after turning on HUS03-4K6G. And the LED of connected inputs will stay on. Auto Mode: Off a. LED Indications: USB-C, HDMI 1, HDMI 2 will blink 2 times (About 5 secs) after turning on HUS03-4K6G.
- Page 12 Reserved Select USB-Type C as the video source Select HDMI 1 as the video source Select HDMI 2 as the video source Select USB Type-C/ HDMI 1/ HDMI 2 as the audio input source Select 3.5mm as the audio input source RELAY OFF RELAY ON Select HDMI audio as the audio output...
- Page 13 Description 10 – RS232 Configuration & Commands Serial Configuration: 8-N-1, Baud Rate at 115200. ● All commands (Non-case sensitive) are shown below: ● Command Function Remark 1: OFF BLANK△ 1/0 BLANK ON/OFF 0: ON BLANK△ ? Get BLANK status 1: ON POWER△...
- Page 14 VERSION Get firmware version 0: OFF AUTO△1/0 Auto Mode ON/ OFF 1: ON AUTO△? Get Auto Mode status DEFAULT Default to Factory & Reset HELP Show all commands...
- Page 15 Description 11 – Factory Default Use Blank Button Step 1 - Push and hold the “Blank” button when power off. ● Step 2 - Immediately turn on the power and push and hold the “Blank” button for 5 secs until 4 LEDs ●...
-
Page 16: Specification
Specification Item No HUS03-4K6G Support Compliance HDMI 2.0、HDCP 1.4/2.3、HDR10、DP1.3 Max. Video Resolution 4096 x 2160@60Hz Chroma Subsampling 4:4:4, 4:2:2, 4:2:0 Color Space RGB, YCbCr Color Depth 8-bit, 10-bit, 12-bit, 16-bit Audio Format LPCM 7.1 @ 192KHz / Dolby TrueHD / DTS-HD MA Ports &... - Page 17 Weight 605g Installation Guide Accessory Corner Iron SMF Screw (Machine Screw) SWT Screw (Self-drilled Screw) Rubber Pads...
- Page 18 Fix on a Table Step 1 - Evenly install 2 SMF screws and 1 corner iron on each side of HUS03-4K6G. Step 2 - Use 4 SWT screws to firmly fix HUS03-4K6G on a table.
- Page 19 Fix beneath a table Step 1 - Evenly install 2 SMF screws and 1 corner iron on each side of HUS03-4K6G. Step 2 - Use 4 SWT screws to firmly fix HUS03-4K6G beneath the table.
- Page 20 Use rubber pads to prevent the product from slipping down the platform ...
- Page 21 Wall Mounting Step 1: Install the SWT screws on a platform, and leave a 2mm high clearance. Step 2: Place HUS03-4K6G on the platform and fit its holes in the corresponding screw positions.
- Page 22 Step 3: Move HUS03-4K6G in a parallel direction until it gets fixed.
-
Page 23: Troubleshooting
Troubleshooting If no video is shown after connecting all cables and power, please follow the EDID configuration instruction or refer to the charts below to change your TV resolution to supported one. Resolution DCI Standard Resolution Refresh Rate (Hz) 4096 × 2160p DCI 3840 ×... - Page 24 1600 × 1024 1600 × 900 1440 × 960 1440 × 900 1440 × 788 1400 × 1050 1400 × 788 1366 × 768 1360 × 768 1280 × 1024 1280 × 960 1280 × 800 1280 × 768 1152 × 870 1152 ×...
Need help?
Do you have a question about the HUS03-4K6G and is the answer not in the manual?
Questions and answers