Table of Contents
Advertisement
Quick Links
Advertisement
Table of Contents

Related Manuals for Astera ARC2


Summary of Contents for Astera ARC2
- Page 1 USER MANUAL Radio Frequency Remote Control (ARC2) Manual Version: 3.3.18 Release Date: April. 25 2011 Astera LED Technology GmbH Address : Nahestrasse 68-70, 55593 Rüdesheim an der Nahe, Germany Tel.: +49(0)6536-355361 Email: sales@astera-led.com...
-
Page 2: Table Of Contents
Table of Contents Table of Contents ....................2 Safety ........................3 Getting Started ...................... 4 Overview ....................... 4 b. LCD Display ....................... 4 Introduction ......................... 5 d. Navigation ........................5 Power Button....................... 5 Micro SD card ......................6 g. Batteries ........................6 Direct Control Tab .................... -
Page 3: Safety
Keep batteries away from children. In case of a choking hazard go to the doctor immediately. Make sure contacts are clean before you insert batteries. Watch the polarity. Don't try to recharge batteries. MAKE SURE TO FULLY CHARGE ALL BATTERY-POWERED ASTERA LAMPS WHEN STORING THEM. PARTIALLY CHARGED BATTERIES WILL LOOSE CAPACITY... -
Page 4: Getting Started
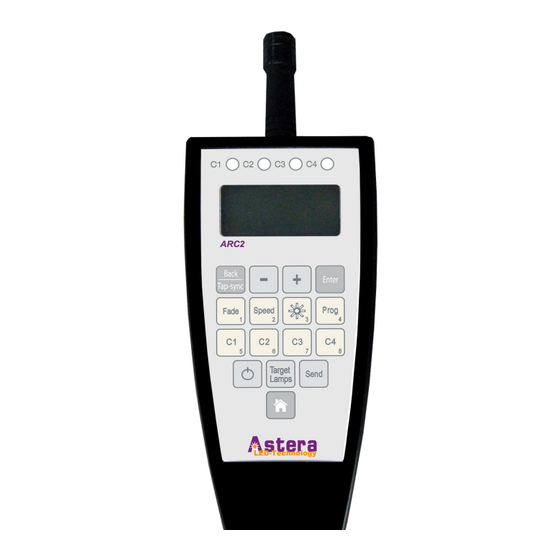
3. Getting Started Overview Antenna Display user colors Navigate through menu, adjust values LCD display back one level, Save / Send values in top level: adjust bpm Adjust fade time Adjust brightness Adjust speed Choose program Choose user colors Switch LEDs on/off Update all devices in selected groups with current settings Home button:... -
Page 5: Introduction
Introduction Astera ARC2 radio frequency remote control is being used to control Astera's wireless lamps, wireless controllers and wireless DMX transmitters. The system offers several sets of predefined effects and predefined programs that can be quickly launched. For advanced applications the programs can be customized over the Editor (see Chapter 5.a). The re- playing colors can be defined to fit a theme or corporate identity. -
Page 6: Micro Sd Card
ARC2. For detailed instructions about how to do a factory reset, refer to Appendix 5. g. Batteries In many countries, the ARC2 ships without batteries due to safety regulations. If this is the case for you, please buy 2 Alkaline AA batteries and insert them in the correct positioning with + and – posi- tioned correctly. -
Page 7: Direct Control Tab
4. Direct Control Tab a. Direct Control To change the displayed colors and effects, the ARC2 offers a straightforward interface called direct control tab. While in this tab, the white buttons can be pressed to quickly change values of colors, effects, fade, speed and brightness. -
Page 8: Adjustments
Attention: Battery runtime of all the Astera lamps is stated for the Normal power scheme. Altering the power scheme will lead to different battery runtime. Note: New Astera fixtures and ARC2s are set to HIGH BRIGHTNESS. Also, after a factory reset they will switch back to HIGH BRIGHTNESS. -
Page 9: Preset Programs (Memory 1-4)
It is suited for dancing events and to hightlight special parts of a show. MEMORY 4 user define: This set is not pre-programed by Astera. Chapter 5.a will discuss how its 8 keys can be programmed with customized colors and effects. -
Page 10: Advanced Adjustments
Fading time of the random chaser. c. Saving Customized Programs At the end of setting Colors, Programs, Adjustments and Advanced Adjustments your ARC2 can save the chosen setting to one of the 8 white keys. To save settings select SAVE TO KEY x while inside the Editor. If you have not finished a selection, press the Back button until you see “Editor active”. -
Page 11: Tap-Sync
Show Firmware version, Hardware version and RF frequency Keylock: Set a keylock before handing the ARC2 to a customer to prevent him from deleting important program settings. You can choose to hide the SETUP menu from him or to hide SETUP and disable the function to overwrite programs. -
Page 12: Targeting Lamps
6. Targeting Lamps A special button has been assigned to targeting only a selection of lamps that are within the reach of the remote control. Once one of the Target lamps options has been selected by choosing ENTER, BACK or the HOME button you will only target those selected lamps until another value in Target Lamps is chosen. -
Page 13: Setup
DMX Setup: Some Astera lamps do not have a LCD-display so the ARC2 can be used to set them up for DMX usage. Also, Astera lamps with LCD-display might be easier configured re- motely for DMX because their display cannot be reached. - Page 14 If a lamp has several input signals (for example it is connected to a DMX cable but should be targeted by the ARC2) the preferred input signal can be defined XLR DMX for the signal of wired DMX Wireless DMX for the signal of wireless DMX...
- Page 15 The Test pattern Color Change allows you to test the radio frequency range conveniently by walking away from a lamp just 8-16m while holding the ARC2. If the Test Radio is activated, the remote switches to minimum output power and transmits a color change, change every second.
-
Page 16: Technical Data
8. Technical Data Environment Temperature (operation) 5 °C – 40 °C Temperature (transport) -25 °C – 55 °C (70 °C for 24h) Relative Humidity 0 - 95% Altitude up to 2000m above sea level Site interior Battery 2x 1,5V AA (LR6) Measurements Unit Size in mm L183mm x W62mm x H31mm... -
Page 17: Troubleshooting
9. Troubleshooting Faulty condition Cause Troubleshooting Units are out of sync Adjustment of the SPEED parameter Press SEND button or change can cause deviation between the units; PROGRAM. also the units will drift out of sync after a few hours. Units behave incorrectly Due to the vast number of settings, Do FACTORY RESET on units and/or... -
Page 18: Appendix
Appendix Appendix 1: Color Index... -
Page 19: Appendix 2: Customizable Programs
Appendix 2: Customizable Programs Name Light Effect Used colors ONE COLOR STATIC All pixels show the same color TWO COLOR STATIC Same as ONE COLOR STATIC, but not all C1 C2 pixels show the same color, they are THREE COLOR STATIC C1 C2 C3 divided into 2, 3 or 4 parts. -
Page 20: Appendix 3: Color Chaser For Random Modes
Appendix 3: Color Chaser for Random Modes RANDOM MODE[7..0]: 7..6: strobe-override mode 00: strobe not overridden 01: strobe disabled for C2, C4 10: strobe disabled for C2, C3 11: stribe disabled for C1 5..4: timeline parameters 00: at each step all colors change 01: colors change one by one 10: one step colored, next step black 11: three steps colors, one step black... -
Page 21: Appendix 4: Dmx Table For Effect Mode
Appendix 4: DMX table for Effect Mode Channel EFFECT MODE FIX EFFECT MODE RGB INTENSITY STROBE PROGRAM SPEED FADE DIRECTION: 0..63: FFW+LOOP 64..127: FFW 128..190: REW 191..255: REW+LOOP SIZE: defines the virtual size of the program in groups. For example if SIZE is set to 2 groups, only half of the program is shown on the unit. -
Page 22: Appendix 5: Firmware Updating Process
Appendix 5: Firmware Updating Process Introduction The ARC2 remote control can be used to update the firmware of most Astera lamps that are equipped with a RF receiver (Antenna) and can also update other ARC2 remotes. Preparation Download the .FRM file of the new firmware from www.astera-led.com/downloads. - Page 23 3. Choose suitable file with + and – keys, then press Enter 4. The LCD will show “POWER ON LAMPS”. While this is shown on the ARC2, press the on/off button of all lamps you want to update. They will not power up as usual, but stay in an up- date mode instead (see below table to find out how this mode is shown) If a lamp powers up as usual, either the wireless connection is bad or the .FRM file does not...
-
Page 24: Disposal
Disposal Follow local ordinances and/or regulations for disposal! PACKAGING: The unit is shipped in protective packaging. This packaging can be recycled! UNIT: Don't throw the unit into the garbage at the end of its lifetime. Make sure to dispose is according to your local ordinances and/or regulations, to avoid polluting the environment! BATTERIES: Don't throw empty batteries into the garbage! - Page 25 If the device is being sold, this instruction manual has to be translated into the national language of the destination country. If discrepancies occur in the translated text, the original instruction manual has to be used to solve them tor the manufac- turer has to be contacted. Astera LED Technology GmbH ©2010, All rights reserved...
Need help?
Do you have a question about the ARC2 and is the answer not in the manual?
Questions and answers