
Related Manuals for Em-Trak I100-X Series


Summary of Contents for Em-Trak I100-X Series
- Page 1 I100 Product confi guration manual www.em-trak.com High Performance Maritime Products...
-
Page 3: Table Of Contents
Contents List of Figures 1 - Notices ................. 2 Figure 1 - Identifier package contents ........5 1.1 - Safety warnings..............2 Figure 2 - Configuration pack contents........6 1.2 - General notices ..............2 Figure 3 - Installing the Identifier bracket ........7 2 - About AIS................ -
Page 4: Notices
Notices Notices When reading this manual please pay attention to warnings marked with the warning triangle shown on the left. These are important messages for safety, installation and usage of the product. Safety warnings This equipment must be installed in accordance with the instructions provided in this manual. Do not install this equipment in a flammable atmosphere such as in an engine room or near to fuel tanks. -
Page 5: About Ais
About AIS About AIS The marine Automatic Identification System (AIS) is a location and vessel information reporting system. It allows vessels equipped with AIS to automatically and dynamically share and regularly update their position, speed, course and other information such as vessel identity with similarly equipped vessels. -
Page 6: Static And Dynamic Vessel Data
About AIS Static and dynamic vessel data There are two categories of information transmitted by an AIS transceiver: static and dynamic data. The vessel's dynamic data, which includes location, speed over ground (SOG) and course over ground (COG), is calculated automatically using the internal GPS receiver. -
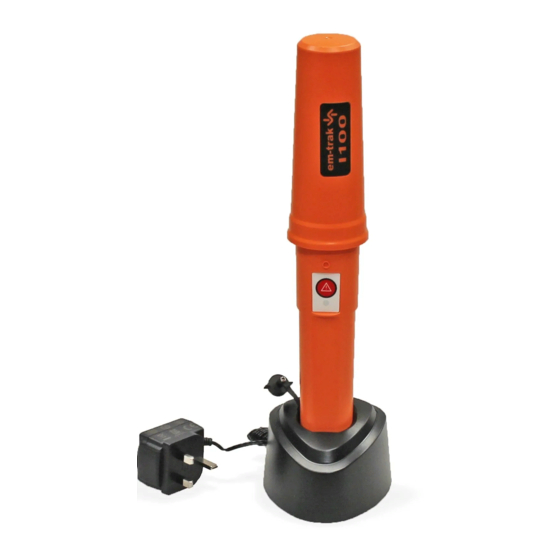
Page 7: Installing And Charging The Identifier
Installing and charging the Identifier Installing and charging the Identifier Supplied items Figure 1 shows the items that are included with each Identifier. Note that a configuration dock and PC configuration software are supplied separately in a configuration pack. The contents of the configuration pack are shown in Figure 2. Charger Vessel bracket and fixings Quick... -
Page 8: Figure 2 Configuration Pack Contents
Installing and charging the Identifier Vessel bracket and fixings The vessel bracket is used to attach the Identifier to the vessel. It also automatically switches the Identifier on when installed in the bracket. Configuration dock Product CD USB Cable Figure 2 Configuration pack contents Configuration dock The configuration dock is used to connect the Identifier to a PC or Mac during configuration. -
Page 9: Installing The Identifier Bracket
Installing and charging the Identifier Installing the Identifier bracket The Identifier must be located in the supplied mounting bracket when in use. Insertion into the bracket activates the Identifier and the Identifier is inactive when removed from the bracket. The bracket should be fixed to the vessel using the supplied u-bolts, washers and nuts as shown in Figure 3. The bracket should be mounted to a non-metallic vertical pole and installed in a location where the status indicator is visible. -
Page 10: Charging The Identifier
Installing and charging the Identifier Charging the Identifier The Identifier is shipped with a partial charge and requires a full charge prior to installation on a vessel. The Identifier is charged by placing it in the charging dock as shown in Figure 4. During charging the status indicator will flash at a steady rate. -
Page 11: Configuring The Identifier
Configuring the Identifier Configuring the Identifier The Identifier transmits standard AIS position and vessel data reports. It requires configuration with the relevant vessel information prior to installation. Configuration is carried out from a PC or using the quickAIS application supplied on CD in the configuration pack. Installing quickAIS Insert the CD into your PC and navigate to the ‘quickAIS’... -
Page 12: Identifier Configuration
It is possible to change any previously configured information except for the MMSI number. Changes to he MMSI number can only be made in the quickAIS ‘Advanced’ mode. Please contact your suplier or em-trak technical support for further details. Page 10... -
Page 13: Figure 5 Quickais Layout
Configuring the Identifier Retrieve configuration from Identifier Send configuration to Identifier Vessel details and dimensions Access advanced configuration settings Figure 5 quickAIS layout Page 11... -
Page 14: Using The Identifier
Using the Identifier Using the Identifier The Identifier is ready for use once charged and configured. The location of the status indicator and SOS button are shown in Figure 6. SOS button Status indicator Figure 6 Identifier status indicator and SOS button Page 12... -
Page 15: Activating And Deactivating The Identifier
Using the Identifier Activating and deactivating the Identifier The Identifier is activated by placing it in the supplied vessel bracket and de-activated when removed from the bracket. Note that the Identifier is ‘paired’ to the first bracket with which it is used. When inserted into an incorrect bracket the Identifier will continue to report position and vessel data combined with a bracket security alert. -
Page 16: Status Indicator
Using the Identifier Status indicator While active in the vessel bracket The status indicator shows the current operating state of the Identifier. The status indicator flashes every 5 seconds. The number of flashes indicates the status conditions defined in the table below. The key status indications are also shown in Figure 8. Number of flashes Status Identifier is active and operating normally... - Page 17 Using the Identifier Figure 8 Common status indications - while active While charging The status indicator flashes every second. When charging is complete the status indicator will remain continuously illuminated. A charging error is indicated by continuous rapid flashes of the status indicator. The most likely cause of a charging error is high temperature.
-
Page 18: Sos Button
Using the Identifier SOS button The SOS function is activated by pressing and holding the SOS button for a minimum of five seconds. When activated the Identifier will transmit an AIS Safety Related Message with the text contents ‘MAYDAY MAYDAY’. The message is repeated every minute while the function is active. -
Page 19: Troubleshooting
Troubleshooting Troubleshooting Issue Possible cause and remedy The Identifier status indicator does not flash • The Identifier is in ‘deep sleep’ mode and requires charging in order to when placed in the holder activate for use. • The Identifier battery is exhausted and requires charging. The Identifier status indicator periodically •... -
Page 20: Identifier Specification
Identifier specification Identifier specification Parameter Value Dimensions 350mm x 63mm max. diameter (without bracket) Weight 250g (Identifier unit only) Power Built in 2200mAh Lithium-Ion battery pack Charger 100-240VAC input, 5V 1.2A output. GPS receiver 50 channel receiver and internal GPS antenna transmitter 156.025 to 162.025MHz frequency range... - Page 22 High Performance Maritime Products The em-trak I100 is an aid to navigation and must not be relied upon to provide accurate navigation information. AIS is not a replacement for vigilant human lookouts and other navigation aids such as Radar. The performance of the I100 may be seriously impaired if not installed as instructed in the user manual, or due to other factors such as weather and or nearby transmitting devices.
Need help?
Do you have a question about the I100-X Series and is the answer not in the manual?
Questions and answers