
Related Manuals for BRONZE GYM MT-017


Summary of Contents for BRONZE GYM MT-017
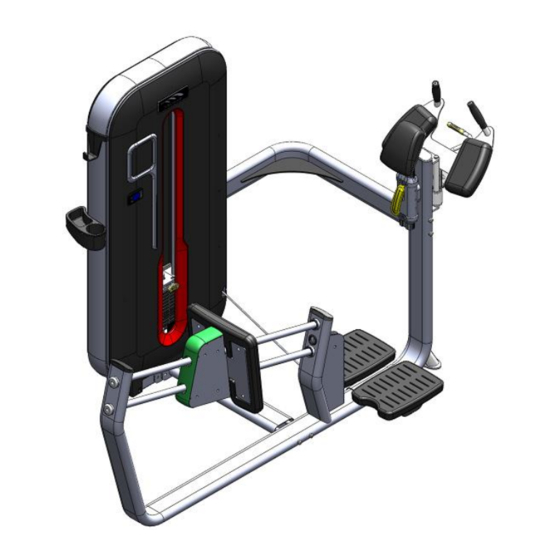
- Page 1 STANDING CALF MACHINE MT-017 http://bronze-gym.ru/bronze-gym-mt-017-zhim-nogami USER MANUAL...
-
Page 2: Table Of Contents
CONTENTS 1. INTRODUCTION.........................1 2. FEATURE.............................1 3. WARNING..........................1, 2 4. USAGE GUIDANCE........................2, 3 5. NOTICE............................3 6. MAINTENANCE..........................3 7. ASSEMBLY INSTRUCTION.......................4 8. CABLE............................5 9. EXPLODED VIEW........................6 10. ASSEMBLY TOOLS ........................7 11. ASSEMBLY STEPS ....................8, 9, 10, 11... -
Page 3: Introduction
1. INTRODUCTION Thank you for purchasing this unit. For your health and safety, please make a reasonable training program with suitable load and correct postures under the coach’s guidance before starting the workout as well as reading this manual. Please fill out the maintenance form carefully and keep it with receipt for after-sales service. -
Page 4: Usage Guidance
3.24 Please check if the unit is well fastened before starting your workout. 3.25 Any adjustment to the unit which may interfere with the users’ exercise is not allowed. 4. USAGE GUIDANCE MT-017 Standing Calf Machine Targeted muscle: calf muscles Dimension:1310mm×1560mm×1670 mm N.W.:... -
Page 5: Notice
(2) Selected desired load by inserting weight stack pin at corresponding level. (3) Stand on pedal; adjust handrails to appropriate height and grip them. (4) Stand with one leg and lift up the other backward and paste its lower part onto leg roller. -
Page 6: Cable
7.2 Remove all the packing materials and put all the parts on the floor tidily. 7.3 Tighten the screws to avoid slack except for special requirement. 7.4 Assure that the unit gets assembled with all the parts according to the assembly steps. -
Page 7: Exploded View
9. EXPLODED VIEW... -
Page 8: Assembly Tools
10. ASSEMBLY TOOLS... -
Page 9: Assembly Steps
(1) M6 Allen wrench, 1 piece (2) M8 Allen wrench, 1 piece (3) M10 Allen wrench, 1 piece (4) 17-19 wrench, 1 piece 11. ASSEMBLY STEPS...
Need help?
Do you have a question about the MT-017 and is the answer not in the manual?
Questions and answers