Table of Contents
Advertisement
Quick Links
Advertisement
Table of Contents

Related Manuals for Alecto DVM-76


Summary of Contents for Alecto DVM-76
- Page 1 USER MANUAL DVM-76...
-
Page 2: Table Of Contents
CONTENTS INTRODUCTION ............3 FUNCTIONS OVERVIEW BABY-UNIT ............... 3 PARENT UNIT ............4 ICONS ON THE DISPLAY ........5 INSTALLATION BABY-UNIT ............... 7 PARENT UNIT ............8 BABY-UNIT Switching on/off ............10 Volume ..............10 Automatic night vision ..........10 PARENT UNIT Switching on/off ............ -
Page 3: Introduction
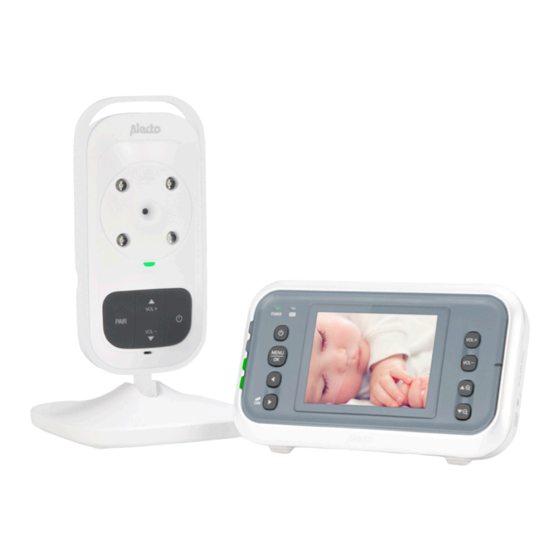
1 INTRODUCTION The Alecto DVM-76 is a wireless audio/video baby monitor, suitable for private use indoors. You can either watch and listen continuously or you can have the baby monitor switch on automatically as soon as your baby starts crying. -
Page 4: Parent Unit
2.2 PARENT UNIT: 10 11 in menu mode to scroll the setup options / in zoom mode press and hold to view to the right / for multi-camera: go to the next camera in menu mode to scroll the setup options / in zoom mode press and hold to view to the left menu/OK button visual sound indication... -
Page 5: Icons On The Display
2.3 ICONS ON THE DISPLAY: upper part of the display, during normal use indicates the reception strength: strong reception good reception average reception bad reception minimum reception indicates which camera you’re wat- ching, when using only one camera this is always indicates that the ‘surveillance mode’... - Page 6 in this menu, you can register additional cameras on the receiver or deregister old cameras, see chapter 5 in this menu, you may determine after which period of time the display should switch off, for this refer to chapter in this menu, you may have the unit sound a beep tone when the baby is crying loudly and for a long time while the speaker of the baby monitor is switched off, see also chapter 4.3...
-
Page 7: Installation
3 INSTALLATION 3.1 BABY-UNIT: Power: Connect one of the supplied 6V power adaptors to the 6V DC input of the baby unit. Insert the adapter into a 230V wall socket. Only use the supplied power adaptor with model number S005BNV0600060. When used as a baby monitor: >2m Make sure the baby cannot... -
Page 8: Parent Unit
3.2 PARENT UNIT: Power supply: The parent unit can be powered directly by the included rechargeable battery or via the supplied power adapter. As soon as you connect the power adapter, it will charge the battery allowing for mobile use of the parent unit. Battery: Open the battery com- partment by sliding off... - Page 9 Charging: The battery will be charged as soon as you connect the power adapter and insert it into a 230V wall socket. • For initial use, charge the battery for at least 15 hours, even if the indicator shows a fully charged battery. •...
-
Page 10: Use
4 USE 4.1 BABY-UNIT: Switching on/off: • press briefly to switch on • press and hold for 2 seconds to turn off The green indicator on the baby unit flashes while the baby unit is trying to esta- blish a connection with the parent unit, this indicator remains lit when the connection is successful. Volume: Use the buttons to adjust the reception volume... -
Page 11: Talk Back
While adjusting, the volume level will be indicated on the display and the icon will appear in the upper part when the volume level is set to 0 (no sound). Talk back: With the display switched on, press the TALK button to talk back to your baby. -
Page 12: Switching The Display On/Off Manually
Switching the display on/off manually: Briefly press the LCD ON/OFF button to turn off the display. Press the LCD ON/OFF button again to turn the display back on. When the baby starts crying, the display is switched on automatically. Sound indicators: To the left of the screen 4 sound indicators indicate whether the baby is crying by starting to flash. In this way you can monitor your baby also when the volume is set to a low level or even turned off or when the baby monitor is... -
Page 13: Add Camera
Add camera (menu Refer to chapter 5 for a detailed description of this function Remove camera (menu Refer to chapter 5 for a detailed description of this function Switching the display on/off automatically: In this menu you may have the display switch off after an adjustable delay. As soon as the baby starts crying, the display is switched back on again. -
Page 14: Alert Sounds On/Off
5 MULTI CAMERA 5.1 INTRODUCTION: You can register up to a maximum of 4 baby units (came- ras) on the DVM-76 parent unit. Separate cameras are available via the service department of Alecto via internet www.alecto.nl Order nr.: DVM-75C... -
Page 15: Registering Additional Cameras
See paragraph 4.2 (Multi-camera) for instructions on how to switch to the image from other cameras. 5.2 REGISTERING ADDITIONAL CAMERAS: Connect the power adaptor supplied with the camera to the new camera and turn the camera on (also see paragraph 3.1 of this manual). Press the MENU button on the parent unit and use the button to select the option. -
Page 16: Tips And Warnings
6 TIPS AND WARNINGS 6.1 GENERAL: • Thoroughly read the user’s manual and follow all indications. • Never place the baby unit or parent unit in wet or humid room or environment. • Ensure adequate heat dissipation; never cover the parent unit, the baby unit and/or the power adapter(s) and never place them directly next to a heat source. -
Page 17: Eavesdropping/Wiretapping
6.4 EAVESDROPPING/WIRETAPPING: • Eavesdropping/wiretapping of the signals from this baby video monitor is nearly impossible. Not only must one be within range of the baby video monitor, one also needs some very costly equipment. 6.5 MAINTENANCE: • Only clean the baby monitor with a moist cloth; never use chemical cleaners. -
Page 18: Problems
Now, switch the parent unit and baby unit back on. • If you still receive no images or sound, please contact the customer service of Alecto via internet www.alecto. 7 SPECIFICATIONS Range: up to 50 meters indoors up to 300 meters outdoors Parent unit power: 3.6V NiMH battery pack, 800mAh... -
Page 19: Warranty
No load Power consumption : 0.04 W 8 WARRANTY For the Alecto DVM-76 you have a warranty of 24 months from the date of purchase. During this period, we guaran- tee the free repair of defects caused by material and work- manship errors. All this subjected to the final assessment... - Page 20 Service Help WWW.ALECTO.NL SERVICE@ALECTO.NL Hesdo, Australiëlaan 1 5232 BB, ‘s-Hertogenbosch The Netherlands Service WWW.ALECTO.NL SERVICE@ALECTO.NL Help Hesdo, Australiëlaan 1, 5232 BB, The Netherlands ‘s-Hertogenbosch, v1.6...
Need help?
Do you have a question about the DVM-76 and is the answer not in the manual?
Questions and answers