Table of Contents
Advertisement
Quick Links
Advertisement
Table of Contents

Related Manuals for Alecto DVM-80


Summary of Contents for Alecto DVM-80
- Page 1 USER MANUAL DVM-80 DVM-81...
-
Page 2: Table Of Contents
INDEX INTRODUCTION ..........................4 FUNCTION LIST ICONS ON THE SCREEN OF THE PARENTS UNIT ............4 PARENT UNIT .........................4 BABY-UNIT ........................5 INSTALL BABY UNIT ........................6 PARENT UNIT ........................8 SWITCH ON/OFF ......................10 DISPLAY OPTIONS ......................10 CONNECTION INDICATOR LIGHT ..................10 ZOOMING .........................10 PARENT UNIT VOLUME ....................11 BABY UNIT VOLUME .......................11 TALK BACK ........................11 LULLABIES ........................12... - Page 3 REGISTER / LOG OFF BABY UNIT (DVM-80 or extension-unit DVM-81) REGISTER NEW BABY UNIT ..................18 LOG OFF BABY UNIT ......................18 POSSIBLE MESSAGES ON THE SCREEN ................19 TIPS AND WARNINGS GENERAL .........................20 INSTALLATION .........................20 INTERFERENCE FREE ....................20 EAVESDROPPING/INTERCEPTION ................20 MAINTENANCE ........................21 REACH ..........................21...
-
Page 4: Introduction
INTRODUCTION The Alecto DVM-80 is a wireless audio/video observation system, suitable for indoor use. By default the set is delivered including one baby unit, but the parent unit is suitable to display the images of 4 baby units at a time. Individual baby units are available under model number DVM-81. -
Page 5: Baby-Unit
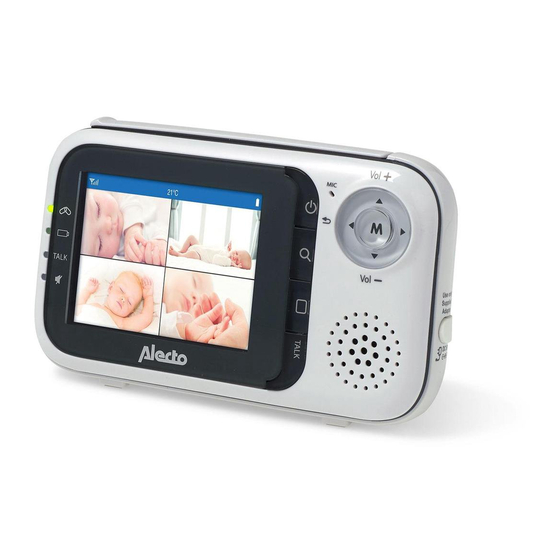
4 lights when speaker is turned off 13 menu button 5 screen = volume up/down in view mode 6 battery compartment (back) = look up/down/left/right in zoom 7 on/off push button mode 8 zoom push button = scroll through menu options during 9 baby unit selection pushbutton setup 10 talk back button... -
Page 6: Install
INSTALL BABY UNIT: Power: Either the baby unit can be powered with the supplied power adapter or through 4x 1,5 Volt AA penlight batteries (add.). If the baby unit is regularly used mobile, insert the batteries, but connect the adapter when you are at home. Once you unplug, the adapter will switch to battery power. - Page 7 Tripod: The bottom of the baby unit is equipped with a tripod attachment point with a 6 mm (1/4”) thread. You can screw a stand or a tripod here. (add.) Wall bracket: Attach, according the figure shown below, the wall bracket to the wall and screw it to the baby unit.
-
Page 8: Parent Unit
PARENT UNIT: Power: The parent unit can be directly charged with the supplied rechargeable battery or through the supplied power adapter with the thin plug. Once you connect the power adapter the battery will be charged so that the parent unit can also be used mobile. Battery: 1. - Page 9 Charging: Once you have connected the parent unit to the power adapter and the adapter is plugged into a 230V power outlet, the battery will be charged. • The indicator lights up. This indicator lights up when and as long as the battery is charging and turns off when the battery is full.
-
Page 10: Use
SWITCH ON/OFF: • Push button shortly to switch on the baby unit or the parent unit • Hold this button 2 to 3 seconds to turn off the unit. DISPLAY OPTIONS: 1. when you switch on, the image of baby unit 1 will be full screen displayed 2. -
Page 11: Parent Unit Volume
PARENT UNIT VOLUME: • Push button repeatedly to increase the receiver volume. • Push button repeatedly to lower the receiver volume. In case the ‘ zooming’ (see section 4.4) is switched on, you cannot adjust the volume; first turn off ‘ zooming’. •... -
Page 12: Lullabies
LULLABIES: In the baby unit 5 lullabies are programmed. The selected lullaby will be played for 20 minutes: • Push button to start the lullabies. • Lullaby 1 is repeatedly played for 20 minutes. • Push button in order to select a different song. •... -
Page 13: Reception-Indication / Out Of Range Notification
4.11 RECEPTION-INDICATION / OUT OF RANGE NOTIFICATION: • Top left in the display of the parent unit the strength with which the signal from the baby unit is received is displayed. very good reception, normal good reception: proper reception • In all cases, the image and sound are indicated with the same quality. -
Page 14: Settings
SETTINGS INTRODUCTION: The DVM-80 has several preset settings that you set via a simple menu on the display. 1. Push button M to open the menu 2. Use buttons to scroll through the menu options 3. Push button M to select the setting (the color changes from light blue to dark blue) 4. -
Page 15: Temperature
6. use button to scroll to the preferred sensitivity. level 1: activation to loud noise level 4: activation to soft noise level 5: all sounds are transmitted you must experimentally determine the ideal level for your situation. 7. push button M to set your choice 8. -
Page 16: Activate Image With Sound
at ‘Warning’ – first use button to select the preferred baby unit (or select ‘all cams’ to set the same minimum temperature for all baby units – push button M – use button to turn the alarm on or off 7. -
Page 17: Vibration Mode
VIBRATION MODE: You can have the DVM-80 shortly vibrate as extra attention if the baby unit hears a sound after a silence of 20 seconds. 1. Push button M 2. Push button to scroll to VIBRATION 3. Push button M 4. -
Page 18: Register / Log Off Baby Unit (Dvm-80 Or Extension-Unit Dvm-81)
REGISTER / LOG OFF BABY UNIT (DVM-80 or extension-unit DVM-81) REGISTER NEW BABY UNIT: You can register a new baby unit to the parent unit as follows: 1. Make sure you have the new baby unit at hand and that it is switched on 2. -
Page 19: Possible Messages On The Screen
POSSIBLE MESSAGES ON THE SCREEN The following possible comments can be shown on the screen during use, whether or not in combi- nation with warning beeps. # stands for baby unit 1, 2, 3 of 4. “No Link to CAM #” and “Waiting for linking...” The connection between the baby unit and the parent unit has disappeared. -
Page 20: Tips And Warnings
Only connect or disconnect the power adapter to the baby unit or the parent unit when the power adapter is taken from the power outlet. • Never install the DVM-80 during a thunderstorm. • Avoid touching any not insulated adapter cords unless the adapter cords have been taken from the power outlet. -
Page 21: Maintenance
1 minute now and put every- thing back in place. • If you still do not have any image or sound, please contact the Alecto customer service at www. alecto.nl. -
Page 22: Declaration Of Conformity
DECLARATION OF CONFORMITY The Alecto DVM-80 / DVM-81 meets the essential requirements and conditions as defined by European directive 1999/5/EC. The declaration of conformity is available on the website www.alecto.nl The use is permitted in all EU countries. In France, Italy, Russia and the Ukraine is only indoor use permitted. -
Page 23: Warranty
WARRANTY On the Alecto DVM-80 / DVM-81 you have 24 months of warranty from date of purchase. We gua- rantee during this period the free repair of defects caused by errors in material and construction. All this at the final judgment of the importer. - Page 24 The Netherlands WWW.ALECTO.NL Service SERVICE@ALECTO.NL NL 073 6411 355 (Lokaal tarief) (Lokaal tarief) BE 03 238 5666 (Tarif local) Help DE 0180 503 0085 (Lokale Festnetzkosten) Hesdo, Australiëlaan 1, 5232 BB, The Netherlands ‘s-Hertogenbosch, v2.1 ver1.0...
Need help?
Do you have a question about the DVM-80 and is the answer not in the manual?
Questions and answers