Table of Contents
Advertisement
Quick Links
Advertisement
Table of Contents

Subscribe to Our Youtube Channel
Related Manuals for Gorenje RK6161AW


Summary of Contents for Gorenje RK6161AW
- Page 1 Instructions for use Refrigerator-freezer...
-
Page 2: Table Of Contents
We thank you for the confi dence you have shown by purchasing our appliance. We wish you a lot of pleasure using the appliance. The appliance is intended solely for household use. The refrigerator-freezer (hereinafter referred to as the appliance) consists of two parts: the upper part is the refrigerator compartment, and the lower part is the freezer compartment –... -
Page 3: Important Warnings
Important warnings • This appliance can be used by children aged from 8 years and above and persons with reduced physical, sensory or metal capabilities or lack of experience and knowledge if they have been given supervision or instruction concerning use of the appliance in a safe way and understand the hazards involved. -
Page 4: A Few Tips On How To Save Power With Your Refrigerator-Freezer Combo
• WARNING! Keep ventilation openings, in the appliance enclosure or in the built-in structure, clear of obstruction. • WARNING! Do not use mechanical devices or other means to accelerate the defrosting process, other than those recommended by the manufacturer. • WARNING! Do not damage the refrigerant circuit. •... -
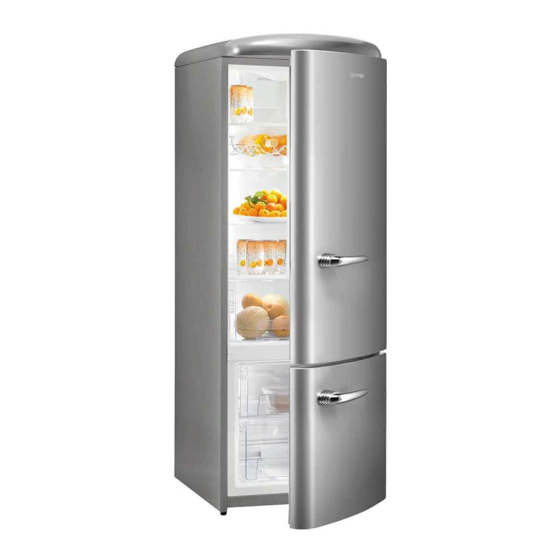
Page 5: Appliance Description
Appliance description A Refrigerator compartment 1 Control unit 2 Interior illumination lamp 3 Shelf (height adjustable) 4 Fruit and vegetables bin / drawer 5 Refrigerator door rack (deep and shallow version) 6 Bottle rack B Standard freezer 7 Freezing drawer 8 Storage drawer 9 Foot* 10 Wheel*... - Page 6 A Refrigerator compartment 1 Control unit 2 Interior illumination lamp 3 Shelf (height adjustable) 4 Fruit and vegetables bin / drawer 5 Refrigerator door rack (deep and shallow version) 6 Bottle rack B Standard freezer 7 Freezing drawer 8 Storage drawer 9 Foot* 10 Wheel* •...
-
Page 7: Installation And Connection
Installation and connection Selecting the room • The appliance should be installed in a dry and well ventilated room. The appliance will operate correctly if the environment temperature is within the ranges listed in the table below. The appliance class is indicated on the label with the basic information on the appliance. - Page 8 Remark: * Applies to OLD TIMER appliances. Connecting the • Use the power cord to connect the appliance to the power appliance mains. The wall outlet should be fi tted with a ground contact (safety socket). Nominal voltage and frequency are indicated on the label with basic information on the appliance.
-
Page 9: Changing The Door Opening Direction
Changing the door opening direction Tools required: socket wrench / spanner Nr. 8, slot and cross screwdriver 1. Use the slot screwdriver to remove the covers A and B. 2. Undo / remove the hinges (C, D, E1) and the door (F, G), starting from the top and working your way down. -
Page 10: Operating The Appliance
Reverse door swing Remark: • At OLD TIMER appliances alteration of door opening direction is not possible. Operating the appliance Model without fan Model with fan A Temperature setting and on/off knob B Fan on/off switch (only with some models) Turning the appliance Turn on: rotate the thermostat knob clockwise towards position 7. - Page 11 Turn off: rotate the knob back to position STOP (0). Setting the temperature • Higher settings (towards 7) selected with the knob correspond to lower (cooler) temperatures. The temperature in the refrigerator interior may drop below 0°C. Only use higher settings when a lower temperature is desired and recommended or when environment temperature is lower than 16°C.
-
Page 12: Recommended Food Arrangement In The Appliance
Recommended food arrangement in the appliance Recommended food Refrigerator compartment areas: arrangement in the - upper area: canned / preserved food, bread, wine, pastry, etc. appliance - medium area: dairy products, ready-to-eat meals, deserts, juices, beer, cooked food, etc. - lower area: meat, meat produce, delicatessen, etc. - vegetable drawer / bin: fresh fruit, vegetables, salads, root vegetables, potatoes, onions, garlic, tomatoes, tropical fruit, sauerkraut, turnips, etc. -
Page 13: Storing Food In The Refrigerator
Storing food in the refrigerator Important warnings on Appropriate use of the appliance, appropriate food food storage packaging, maintaining the appropriate temperature and observing the hygienic guidelines will affect decisively the quality of food storage. Observe the best before dates indicated on the product packaging. -
Page 14: Storage Of Food In The Cool'n'fresh
order to prevent emitting or receiving smell and moisture. • Interior side of the refrigerator door is fi tted with racks and bins intended for storing cheese, butter, eggs, yoghurt, and other smaller packages, tubes, cans, etc. The lower part of the door is fi... -
Page 15: Freezing Fresh Food And Storing Frozen Food
Freezing fresh food and storing frozen food Freezing procedure Maximum quantity of fresh food that can be introduced into the appliance at a time is indicated on the label with basic information on the appliance. If this quantity is exceeded, freezing quality will deteriorate, as will the quality of the already frozen food. - Page 16 Storing pre-frozen food • When storing or using frozen food, observe the manufacturer’s instructions. Temperature and best before date are indicated on the packaging. • Only choose food with undamaged packaging, stored in freezers at temperatures of -18°C or lower. •...
-
Page 17: Defrosting The Appliance
Defrosting the appliance Automatic refrigerator The refrigerator does not require defrosting, as ice accumulated defrosting on the back wall of the refrigerator compartment interior is melted automatically. The accumulated ice is thawed when the compressor is not operating. The drops will drip through the opening in the refrigerator back wall into a container above the compressor, from where they will evaporate. -
Page 18: Cleaning The Appliance
Cleaning the appliance Before cleaning, disconnect the appliance from the power mains - rotate the thermostat knob A to the STOP (0) position and unplug the power cord from the wall outlet. • Use a soft cloth to clean all surfaces. Cleaners containing abrasive particles, acids, or solvents, are not appropriate as they will damage the surface. -
Page 19: Troubleshooting
Troubleshooting Problem: Cause or remedy: After connecting to the power • Make sure the wall outlet is powered and that the appliance mains, the appliance does not is plugged in. operate: Cooling system has been • Too high environment temperature. working continuously for a long •... -
Page 20: Information On Appliance Noise
WE RESERVE THE RIGHT TO CHANGES THAT TO NOT AFFECT THE APPLIANCE FUNCTIONALITY. Instructions for use of the appliance can also be found on our website at www.gorenje.com / < http://www.gorenje.com /> COMBI HZS3167 en (01-17)
Need help?
Do you have a question about the RK6161AW and is the answer not in the manual?
Questions and answers