
Related Manuals for Gorenje RK 62395 DW


Summary of Contents for Gorenje RK 62395 DW
- Page 1 Instructions for use Upright refrigerator - freezer Downloaded from Fridge-Manual.com Manuals...
-
Page 2: Table Of Contents
Thank you for your confi dence in buying our appliance and congratulations on the excellent choice. We hope it will successfully serve its purpose for many years. Upright refrigerator - freezer (hereinafter: the appliance) is combined from two parts: top part is refrigerator and bottom part is upright freezer. -
Page 3: Before Fi Rst Operation
Before fi rst operation • The appliance is manufactured in compliance with all relevant safety standards; however, it is recommended that persons with impaired physical, motional, or mental abilities, or persons with inadequate experience and knowledge, do not use the appliance without due supervision. The same recommendation applies to minors using the appliance. - Page 4 The symbol on the product or on its packaging indicates that this product may not be treated as household waste. Instead it shall be handed over to the applicable collection point for the recycling of electrical and electronic equipment. By ensuring this product is disposed of correctly, you will help prevent potential negative consequences for the environment and human health, which could otherwise be caused by inappropriate waste handling of thisproduct.
-
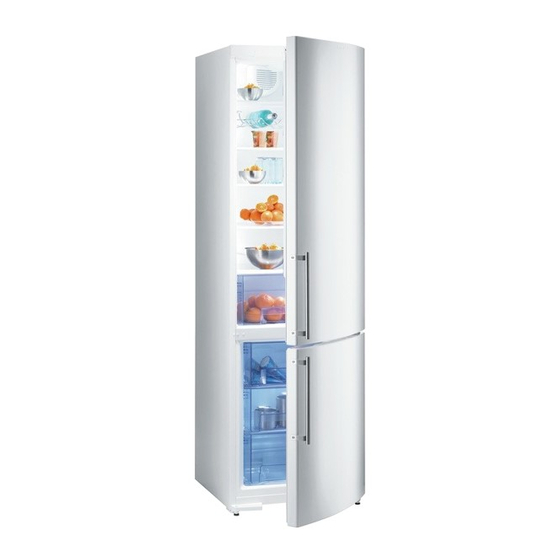
Page 5: Appliance Description (Equipment May Vary With Model)
Appliance description (equipment may vary with model) A Refrigerator (traditional and NO FROST appliance) 1 Control panel 2 Fan* 3 Interior illumination light 4 Shelf (adjustable height) 5 Foldable egg tray (closed 6, open 12 eggs) 6 Crisp tray 7 Door trays (options: deep, shallow, cover or no cover)* 8 Bottle tray with holder* 15 Leg*... - Page 6 A Refrigerator 1 Control panel 2 Fan* 3 Interior illumination light 4 Shelf (adjustable height) 5 Foldable egg tray (closed 6, open 12 eggs) 6 Crisp tray 7 Door trays (options: deep, shallow, cover or no cover)* 8 Bottle tray with holder* 15 Leg 16 Wheel B Freezer...
-
Page 7: Installation And Connection
Installation and connection Selecting the location • Place the appliance in dry and well aired room. The appliance operates best at temperature ranges indicated in the chart below. Relevant class of the appliance is indicated on the rating plate. Class Ambient temperature SN (subnormal) from +10°C to +32°C... - Page 8 • Bottom front corners of the appliance is fi tted with handles to facilitate moving (certain models only). The appliance may stand independently or adjacent to a furniture element or wall. Be sure to leave enough space for the opening of the door, to avoid damage to the appliance or personal injury.
-
Page 9: Reverse Door Swing
Reverse door swing Required tools: socket spanner nr. 8, screwdriver, torx 25. Caution! After unscrewing of before fi xing hinges, hold the door to prevent it from falling and damaging. 1. Remove upper hinge cover (save it for eventual later use), remove also the cover on the opposite side of the upper hinge cover (on the opposite side you will insert the attached cover during the assembly), and remove the cover on the opposite... -
Page 10: Control Panel - Appliance With Electronical Regulation
Control panel - appliance with electronical regulation CONTROL UNIT I Model with knobs CONTROL UNIT II Model without knobs A Temperature selector and ON/OFF button B Green LED: illuminated when the appliance is in operation* C Freezer alarm off button* D Red LED: fl... - Page 11 The ON/OFF button The appliance is switched on by turning the button A towards Max. Green LED is on (certain models only). The appliance is switched off when the arrow on the button points to the ON/OFF mark (the appliance, however, is still under mains power). Setting freezer •...
- Page 12 Freezer Alarm The sound alarm is activated if the freezer temperature rises (certain models only) above the allowed level (intermittent tone) and red lamp is fl ashing (D). • The alarm can be turned off by pressing the Alarm Off button C, while the red light goes off automatically when the temperature inside the freezer reaches desired level and there is no danger for perishable goods.
- Page 13 Refrigerator/freezer Use the rotating switch A to select the appliance section whose selector temperature you wish to see on the display, and whose temperature you may set by using the knob E. ON/OFF button and ON/OFF button temperature selector Use the knob A to select the freezer, and switch the appliance on with a 3-second long press of the knob E.
- Page 14 High temperature freezer Sound alarm starts in case of excessively high temperature of alarm the freezer (intermittent beep), red light (D) is fl ashing. • Alarm is switched of by pressing the knob C. Red light goes off automatically when the freezer is cooled suffi ciently and there is no danger for stored food to get foul.
- Page 15 CONTROL UNIT IV Appliance with two compressors Valve and no frost system appliance A Freezer ON/OFF button B Green signal lamp: indicates freezer operation C Refrigerator ON/OFF button D Green signal lamp: indicates refrigerator operation E Intensive freezing ON/OFF button F Orange signal lamp: intensive freezing in operation G Intensive cooling ON/OFF button H Orange signal lamp: intensive cooling in operation...
- Page 16 temperature in a respective compartment actually falls below these values. • Valve and no frost system appliance - Switch the appliance on/off by pressing the button A for 3 seconds. Both the refrigerator and the freezer are started, green signal lamps B and D are on. In this mode you can switch off the refrigerator only by pressing button C for 3 seconds (green signal lamp 2 is off).
- Page 17 is cooled enough for safe storage of food. During the fi rst start of the appliance there is a 24 hour delay of the temperature alarm to avoid unnecessary alarm operation.. Intermittent alarm sound - power failure signal If the temperature of the refrigerator or freezer is raised too much as a consequence of power failure, sound alarm is activated (intermittent tone), red signal lamp is on, and the display fl...
-
Page 18: Control Panel - Appliance With Mechanical Regulation
Control panel - appliance with mechanical regulation CONTROL UNIT V Model without fan Model with fan A Temperature setting and ON/OFF button B Illumination ON/OFF push-button Downloaded from Fridge-Manual.com Manuals... -
Page 19: Temperature Setting
ON/OFF button The appliance is switched on by turning the button A in clockwise direction, towards Max. The appliance is switched off when the dot is positioned against (the appliance is still powered). Temperature setting • Temperature of the refrigerator is set with button A which can be positioned between the Min and Max range. -
Page 20: Recommended Distribution Of Food
When the fan is on, a red dot is indicated on the switch. Note: When the fan is activated, power consumption is increased and temperature in the refrigerator drops. Hence, we recommend resetting the temperature in the appliance: - when the fan is activated: between “Min” and (dashed line), - without the fan: area between and “Max”. -
Page 21: Storing Fresh Food
Storing fresh food Important precautions Proper use of the appliance, adequately packed food, correct temperature and hygienic precautions have for storing fresh food substantial impact on the quality of stored food. Always respect the best before date, printed on the packaging. - Page 22 Interior accessories and Equipment depends on the model. space distribution • Shelves can be optionally placed on the guides inside the appliance. They are protected against pulling out completely by accident. To remove the shelf, raise the back part level off and pull it out.
-
Page 23: Storage Of Food In The Cool´n´fresh
Storage of food in the COOL´N´FRESH The COOL´N´FRESH drawer provides storage of wide selection of fresh food longer than in the traditional refrigerator. Food remains fresh for long time and it preserves its taste and nutritive ingredients. It reduces decay and loss of mass, so fruit and vegetables are more fresh and natural. -
Page 24: Important Precautions
Important precautions Freeze only such food which is suitable for freezing for freezing of fresh food and can sustain low temperatures. Food should be of adequate quality and fresh. Select adequate packaging for each kind of food and pack it correctly. The packaging should be air tight and well sealed without leaking since this could cause substantial vitamin loss and dehydration. -
Page 25: Defrosting The Appliance
Defrosting frozen food Partially thawed or defrosted foods should be used as soon as possible. Cold air preserves the food but it does not destroy microorganisms which rapidly activate after defrosting and make foods perishable. Partial defrosting reduces the nutritional value of food, especially fruits, vegetables and readymade meals. -
Page 26: Cleaning
• Clean the interior of the appliance and wipe it dry (see chapter Cleaning). • Before reloading food into the freezer switch the appliance on. Defrosting traditional • Defrosting of NO FROST freezer is automatic. Periodic freezer appearance of frost layer eventually disappears automatically. Cleaning Prior to any cleaning. -
Page 27: Troubleshooting Guide
Troubleshooting guide Fault: Cause/Remedy The appliance does not operate • Check if there is power in the socket and if the appliance is after connection to the mains: switched on. Cooling system operates • Ambient temperature too high. continuously without intermittent •... -
Page 28: Noise Level
Fault: Cause/Remedy Bulb replacement: • Before replacing the light bulb, disconnect the appliance form the power supply. Using the screwdriver remove the cover, replace the bulb with a new one (E 14, max. same voltage as the factory one and fi t back the cover. •...
Need help?
Do you have a question about the RK 62395 DW and is the answer not in the manual?
Questions and answers