
Related Manuals for Gorenje RK6191EW4


Summary of Contents for Gorenje RK6191EW4
- Page 1 DETAILED INSTRUCTIONS FOR USE OF UPRIGHT REFRIGERATOR AND FREEZER www.gorenje.com www.gorenje.com...
- Page 2 Link to the EU EPREL database The QR code on the energy label supplied with the appliance provides a web link to the registration of this appliance in the EU EPREL database.
-
Page 3: Table Of Contents
CONTENTS INTRODUCTION 4 IMPORTANT NOTES AND PRECAUTIONS 4 BEFORE USING THE APPLIANCE FOR THE FIRST TIME 5 IMPORTANT SAFETY INSTRUCTIONS 8 IMPORTANT INFORMATION ON THE USE OF APPLIANCE 9 ENVIRONMENT PROTECTION 10 ADVICE FOR SAVING POWER WITH REFRIGERATION APPLIANCES APPLIANCE 11 INSTALLATION AND CONNECTION DESCRIPTION 15 REVERSING THE DOOR OPENING DIRECTION... -
Page 4: Important Notes And Precautions
IMPORTANT NOTES AND PRECAUTIONS BEFORE USING THE APPLIANCE FOR THE FIRST TIME Before connecting the appliance to the power mains, please read carefully the instructions for use which describe the appliance and its correct and safe use. The instructions apply to several appliance types/ models;... -
Page 5: Important Safety Instructions
IMPORTANT SAFETY INSTRUCTIONS WARNING! Risk of fire/flammable materials. The appliance must be connected to the power mains and grounded in compliance with the effective standards and regulations. WARNING! Do not locate multiple portable socket- outlets or portable power supplies at the rear of the appliance. - Page 6 Danger of frostbite Never put frozen food in your mouth and avoid touching frozen food as this may cause frostnip or frostbite. Safety of children and vulnerable persons The appliance is not intended for use by persons (including children) with reduced physical, sensory or mental capabilities, or lack of experience and knowledge, unless they have been given supervision or instruction concerning use of the appliance by a person...
- Page 7 and knowledge if they have been given supervision or instruction concerning use of the appliance in a safe way and understand the hazards involved. Children shall not play with the appliance. Cleaning and user maintenance shall not be made by children without supervision.
-
Page 8: Important Information On The Use Of Appliance
IMPORTANT INFORMATION ON THE USE OF APPLIANCE WARNING! This appliance is intended to be used in household and similar applications such as: – staff kitchen areas in shops, offices and other working environments; - farm houses and by clients in hotels, motels and other residential type environments;... -
Page 9: Environment Protection
Technical information on the appliance Rating plate can be found in the appliance interior. It indicates data on voltage, gross and net volume, type and amount of refrigerant, and information on the climate classes. If the language on the rating plate is not the language of your choice or the language of your country, replace it with the one supplied. -
Page 10: Advice For Saving Power With Refrigeration Appliances
ADVICE FOR SAVING POWER WITH REFRIGERATION APPLIANCES • Install the appliance as specifi ed in the instruction manual. • Do not open the door more often than necessary. • Occasionally make sure air circulation underneath the appliance is unobstructed. • If the gasket is damaged or does not provide a perfect seal for any reason, have it replaced as soon as possible. -
Page 11: Installation And Connection
INSTALLATION AND CONNECTION SELECTING THE ROOM • Install the appliance in a dry and well ventilated room. The appliance will operate correctly if the environment temperature is in the interval specifi ed in the table. The appliance class is indicated on the rating plate / label with the basic information on the appliance. - Page 12 APPLIANCE PLACEMENT Appliance installation should be carried out by at least two persons to avoid any personal injury or damage to the appliance. • The appliance must stand level or tilted slightly to the back. It should be 30 mm stable and placed a solid base.
- Page 13 • The appliance may be free-standing or it may be placed next to a cupboard, a cabinet or a wall. If you place the appliance next to a cupboard, a cabinet or a wall, its power consumption may increase. • There has to be a clearance of at least 50 mm between the appliance and any cabinet above it.
- Page 14 Note: When placing the appliances side by side, the anti-dew (anti-condensation) set has to be purchased and installed! Code for ordering the set: dry room (relative humidity below 60%) Appliances with a height of 1850 mm PLASTIC PLATE GREY 850659 CONNECTING THE APPLIANCE •...
-
Page 15: Reversing The Door Opening Direction
REVERSING THE DOOR OPENING DIRECTION The direction in which the appliance door opens can be reversed. Note: Disconnect the appliance from the power mains before reversing the door opening direction. Tools required: Socket wrench No. 8, shaped screwdriver Flat screwdriver Spanner No. - Page 16 Place the appliance in an upright position. Open the top door and remove the door racks (to prevent damaging them during the procedure). Close the door. Remove the top hinge cap (1). Undo the screws (2) and remove the hinge (3). Hold the door while doing this to prevent it from falling.
- Page 17 Remove the top door from the middle hinge by carefully lifting it straight up. Lay the door onto a smooth surface. Take the (right) cap/cover (4) from the bag and place it on the spot from which the top hinge was removed. Remove and save the cap/cover from the other side (5) to which the hinge will be relocated.
- Page 18 Undo the screw (8) and remove the door retainer (10) and the door stop (9). Then, use a screw (8) to install the door retainer supplied in the bag, and the door stop (9). Keep the door retainer (10) in case you need it later. Undo the screws from the middle hinge and remove it.
- Page 19 Lay the bottom door onto a smooth surface. Undo the screw (8) and remove the door retainer (10) and the door stop (9). Then, use a screw (8) to attach the door retainer supplied in the bag, and the door stop (9). Keep the door retainer (10) in case you need it later.
- Page 20 13. Attach the hinge (14) onto the opposite side using the screws. The screws should be attached in the order shown in the figure below. First, tighten the screw 1, followed by screws 2. Then, screw on the adjustable feet (11). 14.
- Page 21 15. Place the top door in the correct position and use the screws (2) to attach the upper hinge (3). Hold the top door in place while positioning them. 16. Replace the upper hinge cap (1).
- Page 22 Open the top door and replace the door rack; then, close the door. Note: If your model has a handle, then move it to the opposite side by following the instructions below. Remove the top door and lay them onto a smooth surface.
-
Page 23: Appliance Description
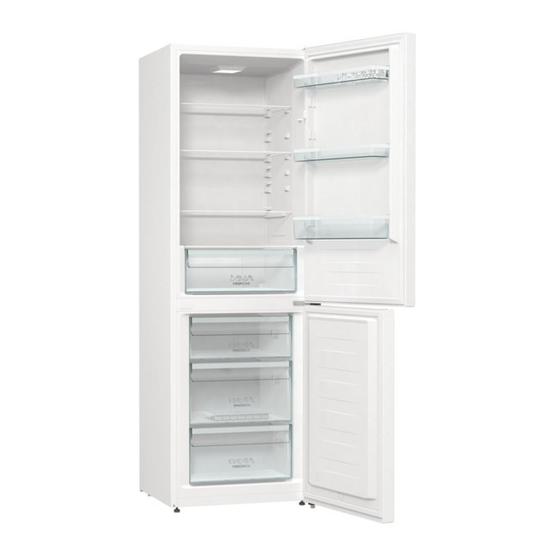
APPLIANCE DESCRIPTION Appliance interior equipment may change according to the appliance model. This product contains a light source of energy efficiency class (G). A Refrigerator 1 Control unit 2 LED lighting 3 Glass shelves 4 CrispZone fruit and vegetables drawer 5 Low door racks 6 Bottle shelf B Freezer... -
Page 24: Operating The Appliance
OPERATING THE APPLIANCE CONTROL UNIT 1 Appliance on/off and temperature setting dial SWITCHING THE APPLIANCE ON/OFF To switch on the appliance, rotate the dial to the left and select a setting between 1 and 7. To switch off the appliance, rotate the dial to position 0 (caution: the appliance is still powered). - Page 25 ADJUSTING THE TEMPERATURE IN THE APPLIANCE • After the appliance is switched on, it may take several hours for the set temperature to be reached. Do not place any food into the refrigerator before the temperature drops to the selected setting. •...
- Page 26 CONTROL UNIT 2 Appliance on/off and temperature setting dial SWITCHING THE APPLIANCE ON/OFF To switch on the appliance, rotate the dial to the left and select a setting between 1 and 7. To switch off the appliance, rotate the dial to position 0 (caution: the appliance is still powered).
- Page 27 ADJUSTING THE TEMPERATURE IN THE APPLIANCE • After the appliance is switched on, it may take several hours for the set temperature to be reached. Do not place any food into the refrigerator before the temperature drops to the selected setting. •...
- Page 28 FREEZER BOOST (SUPER FREEZE) FUNCTION • Use this setting after switching on the appliance for the first time, before cleaning, or 24 hours before inserting a large amount of food. Switching on the freezer boost (super freeze) function: Rotate the A dial to position •...
-
Page 29: Appliance Interior Equipment
APPLIANCE INTERIOR EQUIPMENT (* EQUIPMENT DEPENDS ON THE MODEL) SHELF • You can lay out the empty shelves to your liking across the guides in the refrigerator interior without having to remove them from the refrigerator. To move the shelf or take it out from the refrigerator, slightly lift it at the back, pull it towards you, and then either move it or take it out of the... - Page 30 DOOR RACKS Interior side of the refrigerator door is fitted with racks intended for storing cheese, butter, eggs, yoghurt, and other smaller packages, tubes, cans etc. You may lay out the racks as desired by lifting them slightly from the grooves that hold them in place and moving them to the desired spot, making sure to fit them in the grooves...
-
Page 31: Recommended Distribution Of Food In The Appliance
RECOMMENDED DISTRIBUTION OF FOOD IN THE APPLIANCE Sections in the refrigerator compartment: - upper part: canned food, bread, wine, pastry etc. - middle part: dairy products, ready-made meals, desserts, soft drinks, beer, cooked food, etc. - Fruit and vegetable bin: fresh fruit, vegetables, salads, root vegetables, potatoes, onions, garlic, tomatoes, sauerkraut, turnips etc. -
Page 32: Storing Food In The Refrigerator
STORING FOOD IN THE REFRIGERATOR IMPORTANT WARNINGS REGARDING FOOD STORAGE Correct use of the appliance, appropriate packaging, maintaining the right temperature, and observing the food hygiene standards have a decisive impact on the quality of food storage. Observe the expiry dates for the food, indicated on the packaging. - Page 33 STORING FOOD TYPE OF FOOD Optimum Optimum Approximate storage storage humidity storage time temperature (°C) level (%) Pork -1 to 4 3 days Beef 0 to 4 up to 3 weeks Lamb 0 to 4 14 days Chicken 0 to 4 3 days Fish 0 to 4...
- Page 34 TYPE OF FOOD Optimum Optimum Approximate storage storage humidity storage time temperature (°C) level (%) Leeks 95-100 2 to 3 months Mushrooms 3 to 4 days Parsley 95-100 2 to 3 days Parsnip 98-100 4 to 6 months Radish, winter 95-100 2 to 4 months Horseradish...
- Page 35 TYPE OF FOOD Optimum Optimum Approximate storage storage humidity storage time temperature (°C) level (%) Cherries 0 to 2 90-95 2 to 3 weeks Kiwi, unripe 0 to 2 90-95 2 to 6 months Nectarines 0 to 2 90-95 1 to 3 weeks Oranges 0 to 2 90-95...
-
Page 36: Freezing And Storing Frozen Food
FREEZING AND STORING FROZEN FOOD FREEZING PROCEDURE Maximum amount of fresh food that may be inserted at once is specified on the appliance rating plate. If the amount of food to be frozen exceeds the indicated amount, the quality of freezing will be inferior; in addition, the quality of the food already frozen will deteriorate. -
Page 37: Important Warnings On Freezing
IMPORTANT WARNINGS ON FREEZING Only use the freezer to freeze food appropriate for freezing. Always use quality and fresh food. Select the most suitable packaging for the food and use the packaging correctly. Make sure the packaging is air and water tight so that the food does not dry out and loose its vitamins. -
Page 38: Frozen Food Storage Time
FROZEN FOOD STORAGE TIME RECOMMENDED STORAGE TIME IN THE FREEZER Type of food Time fruit, beef from 10 to 12 months vegetables, veal, poultry from 8 to 10 months Venison from 6 to 8 months Pork from 4 to 6 months finely chopped or ground meat 4 months bread, pastry, cooked meals, lean fish... -
Page 39: Defrosting The Appliance
DEFROSTING THE APPLIANCE AUTOMATIC REFRIGERATOR DEFROSTING Refrigerator does not need defrosting because the ice on the back interior wall is thawed automatically. Any accumulated ice will melt when the compressor unit is inactive. Drops will flow through an opening in the refrigerator rear wall into a tray fitted above the compressor, from where they will evaporate. -
Page 40: Cleaning The Appliance
CLEANING THE APPLIANCE Before cleaning, unplug the appliance from the power mains – switch off the appliance (see chapter Switching the Appliance On/Off) and unplug the power cord from the wall outlet. • Use a soft cloth to clean all surfaces. Cleaners that contain abrasive substances, acids, or solvents are not suitable for cleaning as they may damage the surface. -
Page 41: Troubleshooting
TROUBLESHOOTING Problem: Cause or remedy: Appliance is connected • Make sure there is voltage in the power outlet and to the power mains but that the appliance is switched on. it does not work. • Too high environment temperature. Cooling system •... - Page 42 Problem: Cause or remedy: Droplets on • This is normal. The refrigerator compartment the refrigerator is defrosted automatically, which results in compartment back wall. droplets of water that flows through an opening in the refrigerator compartment back wall into a tray above the compressor unit, from which it evaporates.
-
Page 43: Information About Appliance Noise
INFORMATION ABOUT APPLIANCE NOISE Cooling in refrigerator freezers is made possible by a cooling system that also includes a compressor (and a fan with some appliances), which generates some noise. The level of noise depends on installation, proper use, and age of the appliance. - Page 44 COMBI FS600-20 ESS en (11-21)
Need help?
Do you have a question about the RK6191EW4 and is the answer not in the manual?
Questions and answers