Table of Contents
Advertisement
Quick Links
INSTALLATION/USER MANUAL
• Please read this installation manual completely before installing the product.
• Installation work must be performed in accordance with the national wiring standards by authorized personnel only.
• Please retain this installation manual for future reference after reading it thoroughly.
TYPE : Premium Wired Remote Controller
MODEL : PREMTA000B
www.lg.com
P/NO : MFL62129222
Advertisement
Table of Contents

Related Manuals for LG V-NET ACS PREMTA000B


Summary of Contents for LG V-NET ACS PREMTA000B
- Page 1 • Installation work must be performed in accordance with the national wiring standards by authorized personnel only. • Please retain this installation manual for future reference after reading it thoroughly. www.lg.com TYPE : Premium Wired Remote Controller MODEL : PREMTA000B...
-
Page 2: Caution
TIPS FOR SAVING ENERGY IMPORTANT SAFETY INSTRUCTIONS TIPS FOR SAVING ENERGY IMPORTANT SAFETY INSTRUCTIONS READ ALL INSTRUCTIONS BEFORE USING THE APPLIANCE. Here are some tips that will help you minimize the power consumption when you use the air conditioner. You can use your air conditioner more efficiently by referring to the instructions Always comply with the following precautions to avoid dangerous situations and ensure peak performance of your product below:... -
Page 3: Table Of Contents
IMPORTANT SAFETY INSTRUCTIONS TABLE OF CONTENTS TABLE OF CONTENTS CAUTION In-use Heating Operation TIPS FOR SAVING EN- • Do not clean using powerful detergents like solvent but use soft cloths. Dehumidification Operation There is risk of fire, electric shock, explosion, equipment malfunction or deformation. ERGY Monsoon Dehumidifying Mode •... - Page 4 TABLE OF CONTENTS TABLE OF CONTENTS Time Limit Control Summer Time Setting Zone Type Setting(air conditioner) OPERATION SETTING - Alarm Popup Zone Number Setting(air conditioner) SERVICE SETTING Ventilator Initialization Usage Data Celsius control unit setting (air condi- Air conditioner - Ventilation Control Service Contact tioner) FUNCTION SETTING...
-
Page 5: Part Description
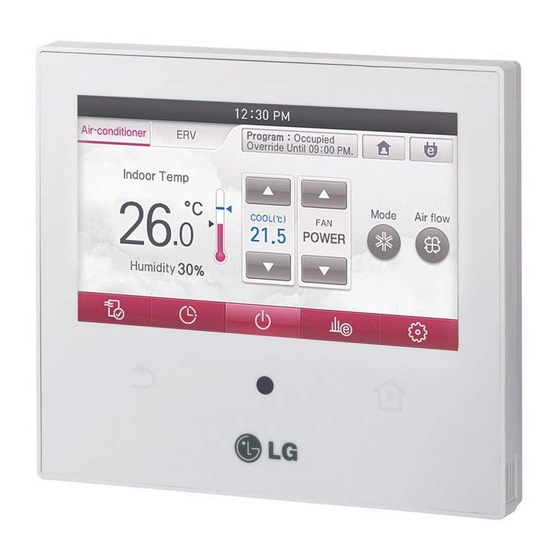
PART DESCRIPTION OPERATION SETTING – Standard Mode On/Off LG Premium Wired remote controller Air conditioner and ventilator will be turned on or off. ● Press remote controller screen 1 time to turn on. - If remote controller operation is not used, screen will go into energy savings mode. -
Page 6: General Cooling Operation
OPERATION SETTING – Standard Mode OPERATION SETTING – Standard Mode General Cooling Operation Power Cooling Maintains proper cooling comfort It performs a strong cooling in a short period of time. ● Press remote controller screen 1 time to turn on. ●... -
Page 7: Heating Operation
OPERATION SETTING – Standard Mode OPERATION SETTING – Standard Mode ● If you press ‘Go Back’, or ‘Home’ button, it will exit from the setting menu. Heating Operation - If there is no button input for about 60 seconds, it automatically exits from the setting menu. Provides warm air to the space. -
Page 8: Dehumidification Operation
OPERATION SETTING – Standard Mode OPERATION SETTING – Standard Mode Dehumidification Operation Monsoon Dehumidifying Mode Removes moisture from the air. This is monsoon region-specific dehumidification function. ● Press remote controller screen 1 time to turn on. ● Press remote controller screen 1 time to turn on. - If remote controller operation is not used, screen will go into energy savings mode. -
Page 9: Fan Only Operation
OPERATION SETTING – Standard Mode OPERATION SETTING – Standard Mode Fan Only Operation Artificial Intelligence / Automatic Operation Only fan will circulate air. Operation provides heating and cooling to satisfy space requirements. ● Press remote controller screen 1 time to turn on. ●... -
Page 10: Set Point Auto Operation (North America Only)
OPERATION SETTING – Standard Mode OPERATION SETTING – Standard Mode ● If it is cooling/heating model, you can control the desired temperature. 2 set point auto operation (North America Only) - Indoor temperature is displayed on the remote controller default screen.(As below the pic- The indoor unit automatically manages room temperature with heating and cooling with extended ture) setting temperature ranges. -
Page 11: Temperature Setting - Standard Mode
TEMPERATURE SETTING – STANDARD MODE TEMPERATURE SETTING – STANDARD MODE TEMPERATURE SETTING – STANDARD MODE NOTE According to Control type setting value Controlling Desired Temperature • 1Set points - You can select the desired temperature from 18 °C~30 °C(64~86 °F) for cooling opera- tion and 16 °C~30 °C(60~86 °F) for heating operation. -
Page 12: Wind Setting - Standard Mode
WIND SETTING – STANDARD MODE WIND SETTING – STANDARD MODE Airflow Control WIND SETTING – STANDARD MODE Fan speed Control ● During the indoor unit operation, press the screen’s ‘Air flow’ button. - It moves to the direction of air flow selection screen. ●... -
Page 13: Operation Setting - Advanced Mode
OPERATION SETTING - ADVANCED MODE OPERATION SETTING - ADVANCED MODE General Cooling Operation OPERATION SETTING - ADVANCED MODE Maintains proper cooling comfort. On/Off ● Press remote controller screen 1 time to turn on. Air conditioner and ventilator will be turned on or off. - If remote controller operation is not used, screen will go into energy savings mode. -
Page 14: Power Cooling
OPERATION SETTING - ADVANCED MODE OPERATION SETTING - ADVANCED MODE ● Press the temperature control button to adjust the desired Indoor temperature. Power Cooling - Indoor temperature is displayed on the remote controller default screen.(As below the pic- It performs a strong cooling in a short period of time. ture) - Depending on the indoor unit type, the desired temperature can be controlled in increments ●... -
Page 15: Heating Operation
OPERATION SETTING - ADVANCED MODE OPERATION SETTING - ADVANCED MODE ● Press the temperature control button to set the desired temperature higher than the indoor Heating Operation temperature. Provides warm air to the space. - Indoor temperature is displayed on the remote controller default screen.(As below the pic- ture) ●... -
Page 16: Dehumidification Operation
OPERATION SETTING - ADVANCED MODE OPERATION SETTING - ADVANCED MODE Dehumidification Operation Monsoon Dehumidifying Mode Removes moisture from the air. This is monsoon region-specific dehumidification function. ● Press remote controller screen 1 time to turn on. ● Press remote controller screen 1 time to turn on. - If remote controller operation is not used, screen will go into energy savings mode. -
Page 17: Fan Only Operation
OPERATION SETTING - ADVANCED MODE OPERATION SETTING - ADVANCED MODE Fan Only Operation Artificial Intelligence / Automatic Operation Only fan will circulate air. Operation provides heating and cooling to satisfy space requirements. ● Press remote controller screen 1 time to turn on. ●... -
Page 18: Set Point Auto Operation (North America Only)
OPERATION SETTING - ADVANCED MODE OPERATION SETTING - ADVANCED MODE ● If it is cooling/heating model, you can control the desired temperature. 2 set point auto operation (North America Only) - Indoor temperature is displayed on the remote controller default screen.(As below the pic- The indoor unit automatically manages room temperature with heating and cooling with extended ture) setting temperature ranges. -
Page 19: Override Control
OPERATION SETTING - ADVANCED MODE OPERATION SETTING - ADVANCED MODE Override control The wired remote controller manages indoor unit status based on programmed control events. User can set timer option at override function and return to original schedule event. The ability to switch temporarily to the current occupancy status Override function. - If the current "occupied"... -
Page 20: Hold
OPERATION SETTING - ADVANCED MODE OPERATION SETTING - ADVANCED MODE ● Touch panel is locked until you release the "Home Leave" mode. Hold It is a function that holds the current mode of operation. If it is on hold, weekly or yearly or holiday schedule cannot be operation. ●... -
Page 21: Zone Control
OPERATION SETTING - ADVANCED MODE OPERATION SETTING - ADVANCED MODE Zone Control NOTE A function to control zone with duct type indoor units. according to installation setting value Wired Remote controller can control maximum 8 zones. • If no function is supported ●... -
Page 22: Temperature Setting - Advanced Mode
TEMPERATURE SETTING – ADVANCED MODE TEMPERATURE SETTING – ADVANCED MODE Check Room Temperature TEMPERATURE SETTING – ADVANCED MODE Controlling Desired Temperature ● Press remote controller screen 1 time to turn on. - If remote controller operation is not used, screen will go into energy savings mode. ●... -
Page 23: Wind Setting - Advanced Mode
WIND SETTING – ADVANCED MODE WIND SETTING – ADVANCED MODE Airflow Control WIND SETTING – ADVANCED MODE Fan speed Control ● During the indoor unit operation, press the screen’s ‘Air flow’ button. - It moves to the direction of air flow selection screen. ●... -
Page 24: Sub Function Setting
SUB FUNCTION SETTING SUB FUNCTION SETTING ● In Vane Angle (Up/Down) Setting screen, press the button of the vane to control the air flow angle. SUB FUNCTION SETTING - Up and down button and check the moving vane. - To set the angles of all the vanes at the same time, select ‘All’ button. Up/Down Vane Angle Setting ●... -
Page 25: Plasma Purification Setting
SUB FUNCTION SETTING SUB FUNCTION SETTING ● Press ‘Save’ button to save the vane angle setting. Plasma Purification Setting - If you exit without pressing the Save button, changed value will not be applied. Improves indoor air quality - When you press the Save button, only the values currently displayed on the screen will be ap- plied. -
Page 26: Energy-Saving Cooling Setting
SUB FUNCTION SETTING SUB FUNCTION SETTING ● If you press ‘Go Back’ or ‘Home’ button, it will exit from the setting menu. Energy-Saving Cooling Setting - If no buttons are pressed within 60 seconds after setting functions, it automatically exits from Energy-Saving cooling function enhances the comfort of the user and to improves the Energy- the setting menu. -
Page 27: Heater Setting
SUB FUNCTION SETTING SUB FUNCTION SETTING ● In additional function setting screen, press ‘Energy Saving’ category’s ‘OFF/ON’ button to set Heater Setting or turn off the desired state. It is the function to reinforce the heating performance by turning on the electric heater during the heating operation. -
Page 28: Fan Auto Setting
SUB FUNCTION SETTING SUB FUNCTION SETTING Fan Auto Setting Select fan operation after performing thermal control of indoor units. If set to 'ON', fan operation keeps on after thermal operation of indoor units. ● During the indoor unit operation, press the screen’s ‘additional function menu’ button. - It moves to additional function selection screen. -
Page 29: Robot Cleaning Setting
SUB FUNCTION SETTING SUB FUNCTION SETTING Robot Cleaning Setting The robot cleaning function is a function to automatically clean the filter with the cleaner installed in the product after using the air conditioner for certain time period. It can be set 30 seconds after stopping the operation. ●... -
Page 30: Ventilation Kit Setting
SUB FUNCTION SETTING SUB FUNCTION SETTING Ventilation kit Setting Function enables operation of an optional ventilation kit with indoor units ● During the indoor unit operation, press the screen’s ‘additional function menu’ button. - It moves to additional function selection screen. NOTE ●... -
Page 31: Humidifier Setting
SUB FUNCTION SETTING SUB FUNCTION SETTING Humidifier Setting Function enables a humidifier if one is installed to maintain space comfort. ● During the product operation, press the screen’s ‘additional function menu’ button. - It moves to additional function selection screen. NOTE Ventilation kit control function may not work in some indoor unit products. -
Page 32: Mosquito Away
SUB FUNCTION SETTING SUB FUNCTION SETTING Mosquito Away Mosquito Away is a device to radiate frequency which mosquitoes don’t like. ● During the indoor unit operation, press the screen’s ‘additional function menu’ button. - It moves to additional function selection screen. NOTE Humidification function may not work in some indoor unit products. -
Page 33: Himalaya Cooling
SUB FUNCTION SETTING SUB FUNCTION SETTING ● The set additional operation is displayed at the top right of the default screen. Himalaya Cooling Mosquito Away is a device to radiate frequency which mosquitoes don’t like. ● During the indoor unit operation, press the screen’s ‘additional function menu’ button. - It moves to additional function selection screen. -
Page 34: Comfort Saving
SUB FUNCTION SETTING SUB FUNCTION SETTING ● The set additional operation is displayed at the top right of the default screen. Comfort Saving Only products with Comfort Saving function can use this. ● During the indoor unit operation, press the screen’s ‘additional function menu’ button. - It moves to additional function selection screen. -
Page 35: Operation Setting - Ventilator
SUB FUNCTION SETTING OPERATION SETTING - VENTILATION ● The set additional operation is displayed at the top right of the default screen. OPERATION SETTING - Ventilator Air conditioner - Ventilation Control Switching This function is only used when air conditioner and ventilator are connected to one remote con- troller. -
Page 36: General Ventilation Operation Mode
OPERATION SETTING - VENTILATION OPERATION SETTING - VENTILATION General Ventilation Operation Mode Ventilator with DX(Direct eXchanger) Operation Mode You can select the ventilation mode when it is connected to a ventilation product. It uses the heat exchanger inside the ventilation product to perform the ventilation operation function at the same time of cooling or heating operation. -
Page 37: Fan Speed Setting - Ventilator
FAN SPEED SETTING - Ventilator ADDITIONAL MODE SETTING - Ventilator FAN SPEED SETTING - Ventilator ADDITIONAL MODE SETTING - Ventilator Fan speed Control Fast Mode Remove sentence. It quickly performs ventilation in a short period of time. It is a function for more efficient operation of the ventilation function through the fast mode, which is an additional function of the ventilation product. -
Page 38: Timer & Program
TIMER & PROGRAM TIMER & PROGRAM ● In the easy timer setting menu screen, press ‘Disable/Enable’ button to set or turn off the easy TIMER & PROGRAM timer. Simple Reservation "Setting has the option to be set between 1-7 hours in 1 hour increments. ●... -
Page 39: Sleep Reservation
TIMER & PROGRAM TIMER & PROGRAM ● If you press ‘Cancel’ or ‘Home’ button, it will exit from the setting menu. Sleep Reservation - If no buttons are pressed for 60 seconds, it will automatically exit from the setting menu. Sleep Reservation Places the unit into sleep mode or lets the unit know to stop at a certain time. - Page 40 TIMER & PROGRAM TIMER & PROGRAM ● In the Sleep Reservation Setting menu screen, press ‘Disable/Enable’ button to set or turn off ● If you press ‘Cancel’ or ‘Home’ button, it will exit from the setting menu. this function. - If no buttons are pressed for 60 seconds, it will automatically exit from the setting menu. ●...
-
Page 41: Turn-On Reservation
TIMER & PROGRAM TIMER & PROGRAM ● In the Turn-On Reservation Setting menu screen, press ‘Disable/Enable’ button to set or turn Turn-On Reservation off ‘Turn-On Reservation’. The unit is instructed to turn on at a set time automatically. ● Press the remote controller screen’s ‘Timer Setting menu‘ button. - It moves to the Timer Setting menu screen. -
Page 42: Turn-Off Reservation
TIMER & PROGRAM TIMER & PROGRAM ● If you press ‘Cancel’ or ‘Home’ button, it will exit from the setting menu. Turn-Off Reservation - If no buttons are pressed for 60 seconds, it will automatically exit from the setting menu. The indoor unit is automatically turned off at the a set time. - Page 43 TIMER & PROGRAM TIMER & PROGRAM ● In the OFF Timer Setting menu screen, press ‘Disable/Enable’ button to set or turn off the OFF ● If you press ‘Cancel’ or ‘Home’ button, it will exit from the setting menu. Timer. - If no buttons are pressed for 60 seconds, it will automatically exit from the setting menu.
-
Page 44: Create And Edit 7-Days Pattern
TIMER & PROGRAM TIMER & PROGRAM ● Naming of the 7-Days pattern. Create and Edit 7-Days Pattern - You can select the name according to the desired usage among the pattern name list by se- You can create and edit 7-day patterns that can be applied to weekly and yearly schedules lecting the pattern name edit box. - Page 45 TIMER & PROGRAM TIMER & PROGRAM ● Through the event edit, set the desired controls. ● Set the detail event. - The Edit button will change to Save, so you can save your control settings. - When setting up a specific time through the weekly schedule screen, start by pressing the up or down smaller arrows located above and below the "ON"...
-
Page 46: 7-Days Pattern Deletion
TIMER & PROGRAM TIMER & PROGRAM ● You can register up to 5 events per day of week. ● Press Save, once the event has been deleted. - The following warning display will pop up on the screen if you try to schedule over 5 events. - If you exit without pressing the Save button, the changes will not be applied. -
Page 47: 7-Days Pattern - Day Of Week Event Copy/Paste
TIMER & PROGRAM TIMER & PROGRAM ● The following confirmation message window is displayed. 7-Days Pattern – Day of Week Event Copy/Paste - Press ‘OK’ button to delete. ● In the weekly timer setting screen, press ‘Edit’. - It enters the weekly timer edit mode. ●... -
Page 48: Weekly Schedule
TIMER & PROGRAM TIMER & PROGRAM Weekly Schedule You can set the weekly schedule events in the unit of a week. Note : Once you set the weekly schedule, the function will continue until it is cancelled. ● Press the remote controller screen’s ‘Timer Setting menu’ button. - It moves to the Timer Setting menu screen. -
Page 49: Yearly Schedule
TIMER & PROGRAM TIMER & PROGRAM ● In the yearly schedule screen, press the desired time area. Yearly Schedule - Yearly Timer event is created. You can set yearly schedules that can be applied by month. It uses the weekly schedule to perform the Yearly schedule function. ●... -
Page 50: Delete Yearly Schedule
TIMER & PROGRAM TIMER & PROGRAM ● Press the ‘Save’ button to save the set desired reservation. Holiday - If you exit this screen before pressing the Save button, the changes will not be applied. It automatically stops on the set date. If the operation is set, the operation stops at every o’clock. - Page 51 TIMER & PROGRAM TIMER & PROGRAM ● Press empty to add a scheduled Holiday event. ● In the Holiday Timer screen, press ‘Done’ button one more time to complete the addition of Holiday. - It moves to Add Holiday screen. - If you exit without pressing the ‘Done’...
-
Page 52: Delete Holiday
TIMER & PROGRAM TIMER & PROGRAM ● Press ‘Home’, ‘Go Back’, or ‘Home’ button to exit from the setting screen. Delete Holiday ● In the Holiday screen, press ‘Edit’. - It is changed to the state that you can delete a Holiday. - ‘Delete’... -
Page 53: Energy
ENERGY ENERGY ● In the Energy Saving menu screen, press ‘Weekly’ button to view the weekly energy usage ENERGY goal and the usage amount. - The energy usage is displayed as a bar graph for each day of the week. The bars are color Check Energy Usage coded to indicate if the usage is under (green), near (yellow) or over (red) the target/goal en- ergy setpoint. -
Page 54: Target Energy Consumption
ENERGY ENERGY ● The guide to the energy consumption display is as follows. Target Energy Consumption It is displayed in 3 stages (good, normal, bad) compared to the previous year’s information. This function is that user can set daily amount target usage. - The display compares each year at the same month (year over year). -
Page 55: Operation Time Limit
ENERGY ENERGY ● In the Target Energy Consumption setting screen, press ‘Disable/Enable’ button to select Operation Time Limit whether to set the target amount. This function is that user can set daily amount target usage. After setting the daily target value, weekly and monthly targets will be calculated and applied au- tomatically. -
Page 56: Time Limit Control
ENERGY ENERGY ● In the Operation Time Limit setting screen, press ‘Disable/Enable’ button to select whether to Time Limit Control set the target amount. It is the function to save energy by operating the product only for the set time and automatically stopping the operation after starting the product operation. -
Page 57: Alarm Popup
ENERGY ENERGY ● In the Time Limit Control Setting screen, press the Enable button to begin setting a time limit. Alarm Popup This function allows you to set up a popup notice message for the Power Consumption and Op- eration Time Restriction feature. It will be displayed on the remote controller once a percentage threshold is reached (i.e., 80%, 90% etc. -
Page 58: Initialization Usage Data
ENERGY ENERGY ● Press ‘Disable/Enable’ button to set or turn off the category to use. Initialization Usage Data - Once you press Enable, the notice determination period (daily/weekly/monthly) will be dis- This function is used to initialize energy and time usage information. Once you initialize the data, played on the screen. -
Page 59: Function Setting
ENERGY FUNCTION SETTING ● Select the checkbox to the left of ‘Initialization Usage Data‘. FUNCTION SETTING Lock Setting – All Lock, On/Off Lock, Mode Lock This function locks the remote controller’s button operation to prevent the unauthorized opera- tion by children or others. ●... -
Page 60: Lock Setting - Temperature Lock
FUNCTION SETTING FUNCTION SETTING ● In 1Set Point Control type) Press ‘Cancel‘, ‘Go Back’, or ‘Home’ button to exit from the setting Lock Setting – Temperature Lock screen. The Temperature Lock function locks the ability to set the temperature beyond a preset value setting. -
Page 61: Filter Sign Check
FUNCTION SETTING FUNCTION SETTING ● If you press ‘Cancel’, ‘Go Back’, or ‘Home’ button, it will exit from the setting screen. Filter Sign Check This function gives you the option to view a "Filter Sign" message so that you can check the sta- tus of the condition of the filter and gauge when it should be changed. -
Page 62: Elevation Grill Setting
FUNCTION SETTING FUNCTION SETTING ● Example) If indoor unit has a function to display the remaining time, Elevation Grill Setting - If you unit has the capability to display the remaining time until the filter cleaning alarm, the This function allows you to operate the elevation grill for indoor unit filter cleaning. following screen below is displayed in the current time display area. -
Page 63: Robot Cleaning
FUNCTION SETTING FUNCTION SETTING ● Press ‘Back’, ‘Go Back’ or ‘Home’ button to exit from the setting menu. Robot Cleaning Robot cleaning is the function for the cleaner attached to the product to perform automatic filter cleaning after certain time of the air conditioner usage. Set the robot cleaning to operate manu- ally or automatically. -
Page 64: Auto Dry
FUNCTION SETTING FUNCTION SETTING Auto Dry Change Temperature Auto dry removes moisture by drying the inside of the indoor unit after cooling operation once This function allows you to set the temperature to automatically switch between cooling and the indoor unit is turned OFF. heating operation as setup in the artificial intelligence operation mode. -
Page 65: Example Of Using The Change Temperature Function
FUNCTION SETTING FUNCTION SETTING ● Press ‘Cancel’, ‘Go Back’ or ‘Home’ button to exit from the setting screen. Wireless Module AP mode Wireless Module AP mode function that wireless module change to AP mode. ● Press the screen’s ‘Set’ button. - It moves to the settings menu. -
Page 66: Zone Name Setting
FUNCTION SETTING FUNCTION SETTING ● Push each zone button, then select a desired zone name. Zone Name Setting Zone Control settings allow you to select zone name. ● Press the screen’s ‘Set’ button. - It moves to the settings menu. ●... -
Page 67: Override Set Time
FUNCTION SETTING FUNCTION SETTING Override Set Time Home Leave Set Temperature Override Set Time function can only be used in 2 Set Control mode. Home Leave Set Temperature function is used in 2 Set control mode. When timed override is used, the set time will be a default value. When customer operate as home leave mode, this setting temperature value will be applied. -
Page 68: Dead Band
FUNCTION SETTING FUNCTION SETTING Dead Band NOTE Dead Band function is used with a 2 Set control mode. Dead Band function only can use in 2 set control mode. When heating and cooling desired temperatures have been changed, the set value will maintain a •... -
Page 69: Delay Time - Ventilator
FUNCTION SETTING FUNCTION SETTING ● Press ‘Done’ button to save the changed Delay Time. Delay Time - Ventilator - If you exit without pressing ‘Done’ button, your changes will not be applied. Ventilation mode is activated after the preset delay time. ●... -
Page 70: User Setting
USER SETTING USER SETTING ● After setting the year, month, day, and day of week, press ‘Save’ button to save the settings. USER SETTING - If you exit without pressing the Save button, your changes will not be applied. - If you press the Save button, it will exit from the setting screen with your changes applied. Date Setting This functions allows you to set the current date to be displayed on the remote controller. -
Page 71: Time Setting
USER SETTING USER SETTING ● Press ‘▲’, ‘▼’ buttons to set ‘AM/PM’, hour, and minute, and then press the ‘Save’ button to Time Setting apply the settings. This functions allows you to set the current time to be displayed on the remote controller. - If you exit without pressing the Save button, your changes will not be applied. -
Page 72: Password Setting
USER SETTING USER SETTING ● Press ‘OFF/ON’ button to set whether to apply the password. Password Setting - Pressing "ON" will display 4 numeric boxes in order to enter your 4 digit code. This function allows you to set a password so that children or others cannot change the remote controller setting without permission. -
Page 73: Main Screen Display Setting
USER SETTING USER SETTING ● In order to change the password, you will be asked to input the current password as verifica- Main Screen Display Setting tion. When done, move to entering the new password code in the "Input New Password" This function allows you to show or hide certain elements on the remote controller’s default screen. -
Page 74: Lcd Brightness In Idle
USER SETTING USER SETTING ● Press ‘Hide/Show’ button to set the which elements should display on the default screen. LCD brightness in idle Note that the elements are dependant on the type of unit in operation. This function allows you to adjust the brightness of the remote controller’s standby screen. ●... -
Page 75: Screen Saver Timer Setting
USER SETTING USER SETTING ● Set the desired screen brightness percentage by and press ‘Save’ button to save the setting. Screen Saver Timer Setting - If you exit without pressing the Save button, your changes will not be applied. This function adjusts the length of time that the screen will stay on before turning off (sleep - Your choices are: 0% / 10% / 20% / 30%. -
Page 76: Schedule Initialization
USER SETTING USER SETTING ● In the setting screen, choose the amount of time screen will stay on before it goes into sleep mode Schedule Initialization and then press ‘Save’ button to save the setting. It is the function to initialize all timer settings of the remote controller. - If you exit without pressing the Save button, your changes will not be applied. -
Page 77: Touch Beep
USER SETTING USER SETTING ● Press the check box, and press ‘Done’ button to initialize all timer settings of the remote controller. Touch Beep - Pressing the Done button, it will exit from the setting screen. This function allows you to choose whether or not you would like a touch screen sound effect. ●... -
Page 78: Home Theme
USER SETTING USER SETTING ● Press ‘Sound’ category’s ‘Disable/Enable’ button to set whether to use the touch beep. Home theme - If you select ‘Disable’, no sound effect will occur when you press the keypad display. You can change the amount of information you would like displayed on the home screen. There - If you select ‘Enable’, you will have an audible beep for key presses on the display. -
Page 79: Temperature Unit Setting
USER SETTING USER SETTING ● Select the desired Screen Mode and press the Save button. Temperature Unit Setting Standard mode displays only the frequently used functions in the main screen. This function allows you to set your unit of measure in whole or half degree increments. ●... -
Page 80: Language Setting
USER SETTING USER SETTING ● Set the temperature unit increments that you want to display, and press ‘Save’ button to save the Language Setting setting. This function allows the user to choose the local language for the display screen. - You can select the temperature control in the units of 1°C / 0.5°C. - If you exit without pressing the Save button, your changes will not be applied. -
Page 81: Control Type Setting(North America Only)
USER SETTING USER SETTING ● Set the language to use, and then press 'Save'. Control Type Setting(North America Only) - If you exit without pressing the Save button, your changes will not be applied. It is the function to set GUI type on the remote controller. - Once the Save button is press, after change value, it will Pop-up window appears. -
Page 82: Summer Time Setting
USER SETTING USER SETTING ● Set the control type to use, and press ‘Save’ button when done. Summer Time Setting - If you exit without pressing the Save button, your changes will not be applied. It is the function to set summer time duration on the remote controller system date and time. - If the setting is changed by pressing the Save button, a pop-up window appears, perform the ini- tialization schedule. -
Page 83: Service Setting
USER SETTING SERVICE SETTING ● Set summer time duration, and press ‘Save’ button when done. SERVICE SETTING - If you exit without pressing the Save button, your changes will not be applied. - If you press the Save button, your changes will be applied and the controller will exit from the set- Service Contact ting screen. -
Page 84: Service Number Registration And Change
SERVICE SETTING SERVICE SETTING ● Check the service number. ● Press ‘Done’ button to save the changed service number. - If the service number is not registered, + 1544 7777 will be displayed. - If you exit without pressing the Done button, your changed value will not be applied. - Once you press the Done button, it will exit from the setting screen. -
Page 85: Model Information
SERVICE SETTING SERVICE SETTING ● Check indoor/outdoor unit and capacity information. Model Information It is the function to check indoor/outdoor unit product type connected to the remote controller and capacity information. ● Press the screen’s Set’ button. - It moves to the settings menu screen. ●... -
Page 86: Remocon Version Information
SERVICE SETTING SERVICE SETTING ● Check software version information of wired remote controller. Remocon version information It is the function to check remote controller model name and software version. This information is useful when having a service call placed. ● Press the screen’s Set’ button. - It moves to the settings menu screen. -
Page 87: Self-Diagnosis For Trouble Mode
SERVICE SETTING INSTALLATION Self-diagnosis for Trouble Mode INSTALLATION It automatically runs a self-diagnosis when there is a trouble detected in the system. Installation of Remote Controller It displays the troble mode number with maintenance CODE. ● Secure the back plate flush to the wall using the provided hardware. <Individual control>... -
Page 88: Group Control
INSTALLATION INSTALLATION ● To remove the remote controller from the back plate, insert a flat head screwdriver in the bot- Group Control tom part separation hole and turn clockwise. Connects and controls 2 or more air conditioner indoor units to one wired remote controller. - There are 2 separation holes at the bottom side. -
Page 89: Air Conditioner And Ventilation Interface
INSTALLATION INSTALLATION ● Change indoor unit’s master/slave setting. Air conditioner and ventilation interface - Change master/slave setting with switch on the indoor unit PCB for ceiling type cassette and ● Use wired remote controller to control when air conditioner indoor unit and ventilation product duct group. -
Page 90: Installer's Setting Options
INSTALLER’S SETTING OPTIONS INSTALLER’S SETTING OPTIONS Installer setting code table INSTALLER’S SETTING OPTIONS How to enter installer setting mode <General air conditioner product code table> Setting Value CAUTION Code Setting Mode Value 1 Value 2 Value 3 Installer setting mode configures the detailed function of the remote controller. 001 : Cooling Test Run If the installer setting mode is incorrectly set, it may cause product failure, user injury, or prop-... -
Page 91: Code Value
INSTALLER’S SETTING OPTIONS INSTALLER’S SETTING OPTIONS Setting Value <Ventilation product code table> Code Setting Mode Value 1 Value 2 Value 3 000 : use basic function only Setting mode Code value Functional product Setting value Function setting in 001 : use basic function & some Master group control indoor unit function DX(Direct Ex-... -
Page 92: Test Run Operation
INSTALLER’S SETTING OPTIONS INSTALLER’S SETTING OPTIONS Test Run Operation (air conditioner / DX type ventilator) Central control address (air conditioner /General, DX type ventilator) Test Run (air conditioner / DX(Direct Expenditure) type ventilator) This function allows the user to set the central control address of the indoor units during the cen- You must perform test operation after the product installation. -
Page 93: Esp Setting
INSTALLER’S SETTING OPTIONS INSTALLER’S SETTING OPTIONS h ESP setting value input can be 0~255 ESP setting (air conditioner / Gerneral, DX type ventilator) This function allows you to set the fan speed step value for each speed rate. ESP wind amount stage wind amount ESP wind amount stage wind amount... -
Page 94: Ceiling Height Selection (Air Conditioner)
INSTALLER’S SETTING OPTIONS INSTALLER’S SETTING OPTIONS ● At the Value 1 field, press the ‘▲’, ‘▼’ button to select the sensor location setting value and Ceiling height selection (air conditioner) press ‘Done’ button to apply the indoor temperature detection sensor location setting. This function adjusts the wind amount stages according to the ceiling height for the ceiling type - If you do not press ‘Done’... -
Page 95: Static Pressure Setting (Air Conditioner)
INSTALLER’S SETTING OPTIONS INSTALLER’S SETTING OPTIONS ● At the Value 1 field, press the ‘▲’, ‘▼’ button to select static pressure selection setting value, Ceiling height Function and press ‘Done’ button to apply the static pressure level setting. - If you do not press ‘Done’ button, your settings will not be applied. Fan speed operates one step slower than the default value. - Page 96 INSTALLER’S SETTING OPTIONS INSTALLER’S SETTING OPTIONS Remote controller master / slave setting Remote controller Function (air conditioner / Gerneral, DX type ventilator) During the group control, the indoor units are operated based on the remote con- Master This function sets configuration for the master/slave setting through the remote controller. troller.
-
Page 97: Dry Contact Mode Setting (Air Conditioner / Dx Type Ventilator)
INSTALLER’S SETTING OPTIONS INSTALLER’S SETTING OPTIONS ● At the Value 1 field, press the ‘▲’, ‘▼’ button to select operation setting value, and press Dry contact mode setting (air conditioner / DX type ventilator) ‘Done’ button to apply the master / slave setting. What is a dry contact? - If you do not press ‘Done’... -
Page 98: Fan Speed Fixing (Air Conditioner / Dx Type Ventilator)
INSTALLER’S SETTING OPTIONS INSTALLER’S SETTING OPTIONS Fan speed fixing (air conditioner / DX type ventilator) Celsius / Fahrenheit Switching (air conditioner) It is the function to apply different fan speeds automatically for each thermal control status. This function is used for switching the display between Celsius and Fahrenheit.(Optimized only for U.S.A) h Variable: When COMP is ON, operate as the set fan speed, and when COMP is OFF, operate at ‘ROW’... -
Page 99: Zone Type Setting(Air Conditioner)
INSTALLER’S SETTING OPTIONS INSTALLER’S SETTING OPTIONS Zone Type Setting(air conditioner) Zone Number Setting(air conditioner) This function is only available on some products. This function is only available on some products. It is possible to setup zone new type or old one of the product which is available to install the Zone Number is to set the number of installed zones. -
Page 100: Celsius Control Unit Setting (Air Conditioner)
INSTALLER’S SETTING OPTIONS INSTALLER’S SETTING OPTIONS Celsius control unit setting (air conditioner) Emergency Heater Setting(air conditioner) Celsius control unit setting you to set the temperature adjustment unit in the unit of 1˚C or 0.5˚C. This function is only available on some products This function will set the Emergency Heater Setting. -
Page 101: Setting Of Function Control During Group Control (Air Conditioner)
INSTALLER’S SETTING OPTIONS INSTALLER’S SETTING OPTIONS Setting of Function control during group control (air conditioner) This function enables the control of the common functions or some functions based on the mas- ter indoor unit during the group control. ● Press and hold ‘wireless remote controller signal receiver part’ of the remote controller for 3 seconds or longer to enter the installer function. -
Page 102: External Devices Of Indoor Unit Setting (Air Conditioner)
INSTALLER’S SETTING OPTIONS INSTALLER’S SETTING OPTIONS External Devices Of Indoor Unit Setting (air conditioner) Indoor unit address verification (air conditioner) At the Code field, select when air cleaner/heater/humidifier/elevation grill/ventilation KIT/refrigerant This function allows you to check the address of the indoor unit designated by the outdoor unit. leakage detection sensor are newly installed to the indoor unit or when an installed KIT is removed. -
Page 103: Setting Temperature Range (Air Conditioner)
INSTALLER’S SETTING OPTIONS INSTALLER’S SETTING OPTIONS Setting temperature range (air conditioner) In case of the setting temperature range option2( 31:001), please note that the setting of the re- mote controller (with cable) can be altered under below circumstances. (Changes in setting ex- This function using in 2 Set control mode. -
Page 104: Static Pressure Step Setting(Air Conditioner)
INSTALLER’S SETTING OPTIONS INSTALLER’S SETTING OPTIONS Static Pressure Step Setting(air conditioner) Guard timer(air conditioner) This function is applied to only duct type. Setting this in other cases will cause malfunction. It is a function that sets the minimum running time of outdoor unit cycle mode when switching from cooling mode to heating mode and vice versa during Auto Operation mode. -
Page 105: Primary Heater Control Setting(Air Conditioner)
INSTALLER’S SETTING OPTIONS INSTALLER’S SETTING OPTIONS Fan operation in the cooling mode and thermal off conditions Primary Heater control setting(air conditioner) (air conditioner) It is a function that sets the outdoor unit to operate with auxiliary heat source and the heater to run with main heat source in heating mode. -
Page 106: Air Conditioner Fan Operation Interlocked With Ventilation (Air Conditioner)
INSTALLER’S SETTING OPTIONS INSTALLER’S SETTING OPTIONS Air conditioner Fan operation interlocked with ventilation Indoor unit Auto-Start setting(air conditioner) (air conditioner) It is a function that sets whether to restore the indoor unit operation by resuming the previous power-on state or as power-off state in the power failure compensation. It is a function that sets the availability of air conditioner FAN movement when only the ventila- tion is running while air conditioner is off, in case of interlock of the air conditioner operation with ●... -
Page 107: Occupancy Duration Time Setting(Air Conditioner)
INSTALLER’S SETTING OPTIONS INSTALLER’S SETTING OPTIONS Occupancy Duration Time Setting(air conditioner) Setting for Simple Dry contact unit It is a function that sets the light-on/occupancy duration after motion is detected when installing This function is used when simple dry contact unit is additionally installed in the indoor unit or the an occupancy sensor. -
Page 108: Product Direction (General Ventilator)
INSTALLER’S SETTING OPTIONS INSTALLER’S SETTING OPTIONS Product direction (General ventilator) Value Setting for Simple Dry contact unit It is the function to set the direction of the ventilation product. Default – Simple Dry contact Auto identification ● Press and hold ‘wireless remote controller signal receiver part’ of the remote controller for 3 Simple Dry contact : Not installed seconds or longer to enter the installer function. -
Page 109: Express Ventilation Priority (General, Dx Type Ventilator)
INSTALLER’S SETTING OPTIONS INSTALLER’S SETTING OPTIONS Express ventilation priority (General, DX type ventilator) Humidification of Stand-alone Ventilation mode (General, DX type ventilator) It is the function to set the priority of the air supply and air discharge during the express ventila- It is the function to set whether to use the humidification function during the ventilation product tion operation. -
Page 110: Humidification Of Ventilation With Heating Operation (Dx Type Ventilator)
INSTALLER’S SETTING OPTIONS INSTALLER’S SETTING OPTIONS Humidification Of Ventilation With Heating Operation (DX type ventilator) Ventilator Fan Speed Alignment (General ventilator) It is the function to set the heating humidification function of the direct ventilation to be auto- It is the function to change the standard fan speed of the ventilation product. matic or manual.
Need help?
Do you have a question about the V-NET ACS PREMTA000B and is the answer not in the manual?
Questions and answers