Heltun HE-HT01 User Manual
Heating thermostat
Hide thumbs
Also See for HE-HT01:
- User manual (19 pages) ,
- User manual (32 pages) ,
- Quick start manual (92 pages)
Table of Contents
Advertisement
Quick Links
Advertisement
Table of Contents

Related Manuals for Heltun HE-HT01


Summary of Contents for Heltun HE-HT01
- Page 1 HEATING THERMOSTAT HE-HT01 USER MANUAL for Hardware v.12 & Firmware v.2.2...
-
Page 2: Table Of Contents
Table of Contents Overview .................................... 3 Technical Specifications ..............................3 Functions & Features ................................. 4 Installation ..................................5 Disassembly ..................................6 Touch Panel Operation ..............................6 Operation Modes ................................7 COM - Comfort Mode (Heat) ............................7 TIME - Temperature Schedule Mode (Auto Changeover) .................... 7 DRY - Fast Floor Drying Mode (Dry Air) ........................ -
Page 3: Overview
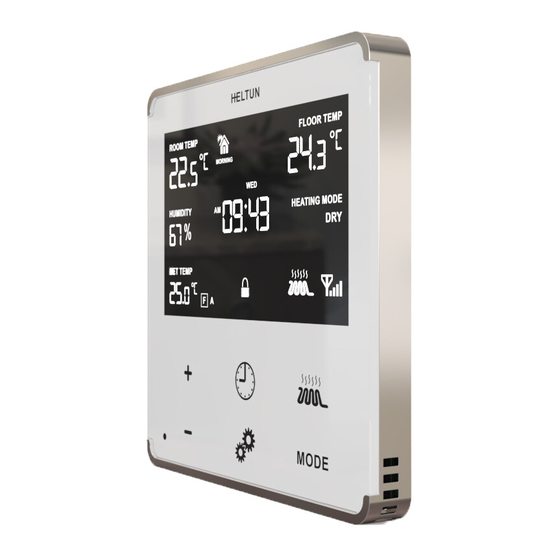
This is the user manual for HELTUN HE-HT01 Advanced Programmable Thermostat for Heating Systems. The HE-HT01 is elegantly designed and ‘Impossibly Smart’ providing wireless over-the-Internet control of your home’s heating system. The HE-HT01 is ‘Impossibly Thin’ on the wall yet packed with features to help you save energy while providing the ultimate comfort and convenience. -
Page 4: Functions & Features
Temperature limiter: 40.0°C • Temperature hysteresis selection range: 0.2°C to 10.0°C • Relay output NO / NC mode • HELTUN Advanced Zero-Cross Relay switching technology • Time format: 24 or 12 hours (AM/PM) • LCD brightness: Automatic adjustment (depending on ambient light) Manual adjustment (10 levels). -
Page 5: Installation
WARNING: Electrical power must be switched off during installation. 1. Placement of the HE-HT01 is of utmost importance for proper operation and must be away from sunlight and sources of direct heat. We recommend installing the HE-HT01 approximately 1.5 meters above the floor. -
Page 6: Disassembly
‘snaps’ into position all the way around. 7. Next, switch On the main power at the circuit breaker (see photo above). The HE-HT01 will start up showing the original default factory settings. -
Page 7: Operation Modes
Note: The minimum Set Point is 1.0°C and the maximum Set Point is 37.0°C. The HE-HT01 has two working modes: HEATING (switched On) and IDLE (switched Off). In HEATING mode, the heating element icon “ ” will appear near the right bottom corner of the display (to the left of the connectivity icon). The heating element icon will disappear when the HE-HT01 is in IDLE mode. -
Page 8: Dry - Fast Floor Drying Mode (Dry Air)
Note: In your Z-Wave gateway this mode will be shown as “Away”. MAN - Manual Control Mode (Off) In this Mode the HE-HT01 schedules are disabled and the heating state is switched On & Off manually by pressing the Heating Element “... -
Page 9: Z-Wave Network
Note: If the HE-HT01 has previously been part of a Z-Wave network and not Excluded since, Inclusion is not possible without first performing an Exclusion or Factory Reset procedure. Note: If the HE-HT01 is included in the Z-Wave network the antenna icon will appear in the bottom right corner of the main screen with signal strength bars “... -
Page 10: Firmware Ota Update
4. Successful adding will be confirmed by displaying the Antenna with signal strength bars “ ” icon in the bottom right corner of the main screen. Note: The device DSK and QR code are printed on the HE-HT01 back panel plus on the manual included in the HE-HT01 packaging. Firmware OTA Update To wirelessly update the HE-HT01 firmware, follow these steps: 1. -
Page 11: Associations
Note: It is not recommended to modify this group. Group 2 – “Basic Set On/Off: Relay”: is assigned to the HE-HT01 operating state. It sends a Basic Set command with value 0 (Off) when it goes to IDLE state and sends 255 (ON) when it goes into HEATING state. Max supported nodes: 1 Settings Menu To enter the Settings Menu, press and hold the Gear “... -
Page 12: Z-Wave
Parameter 01 (“ГEg”) – Frequency Region The HE-HT01 has Z-Wave 700 series chip inside which allows to use the device in different Z-Wave frequencies. If there is a need to use the device in the frequency different from the factory default, change the value of this Parameter according to the frequency list below. -
Page 13: Hardware & Software Versions
” will be shown in the main screen, and the Parameter value will be “ECL”. To include or exclude the HE-HT01 into or from your Z-Wave network, activate Inclusion or Exclusion Mode on your gateway, then go to Parameter 02 in the Device Menu and press the Plus “+”... -
Page 14: Touch Sensitivity
The factory default value is 0. Parameter 08 (“In1”) – External Input Mode The HE-HT01 can be connected to the dry output contacts of an external device (i.e. security system) to control the Thermostat operating modes depending on the state of the external device. - Page 15 If floor temperature is lower than 30°C and the room temperature is lower than 27°C the HE-HT01 will operate in HEATING mode. b) If the floor temperature is higher than 30°C or the room temperature is higher than 27°C then the HE-HT01 will enter IDLE mode which switches off the heater.
-
Page 16: Time Configurations
Parameter 19 (“tCr”) – Time Correction by Main Controller If this Parameter value = 1 and the HE-HT01 is connected to a Z-Wave gateway, the HE-HT01 time and day will be periodically polled and corrected from the gateway. To switch off auto-correction set the Parameter value to 0. The factory default value is 1. -
Page 17: Settings (Available Through Z-Wave Network Only)
Settings (available through Z-Wave network only) All configuration parameters are accessed through Z-Wave COMMAND_CLASS_CONFIGURATION Time Mode Schedule Parameters 41-44 – Schedule Time Use these Parameters to manual set the Morning, Day, Evening and Night times for the Temperature Schedule. The value of these Parameters has format HHMM, e.g. for 08:00 use value 0800 (time without a colon). From 00:00 to 23:59 can be selected. -
Page 18: Association Commands Action
This Parameter defines which Operating Mode the HE-HT01 reverts to if the Basic Set command is received. If the Basic Set command value is 0 (OFF state) the HE-HT01 will go to Manual (MAN) mode and switch Off the heating element (IDLE mode). - Page 19 -100 … 100 1 byte Air Temperature Calibration in °C, value X 10, e.g. 1.0°C=10 2 … 100 1 byte Temperature Hysteresis in °C, value X 10, e.g. 0.5°C=5 1 byte Time correction by controller 0, 1 1 byte Time format։ 0=24 hour, 1=12 hour(am/pm) 0, 1 1 byte Week Day...
-
Page 20: Limited Warranty
Limited Warranty HELTUN warrants this product to be free from defects in workmanship or materials, under normal use and service, for a period of one (1) year from the date of purchase by the consumer ("Warranty Period"). HELTUN will extend this Warranty Period to three (3) years from the date of consumer purchase for any consumer who registers his/her product with HELTUN at this website page: bonus.heltun.com.
Need help?
Do you have a question about the HE-HT01 and is the answer not in the manual?
Questions and answers