Heltun HE-HT01 User Manual
Hide thumbs
Also See for HE-HT01:
- User manual (19 pages) ,
- Quick start manual (92 pages) ,
- User manual (20 pages)

Related Manuals for Heltun HE-HT01


Summary of Contents for Heltun HE-HT01
- Page 1 HEATING THERMOSTAT HE-HT01 USER MANUAL for Hardware v.12 & Firmware v.2.2 HE-HT01 USER MANUAL...
-
Page 2: Table Of Contents
Time Configurations ..........................25 SETTINGS (available through Z-Wave network only) ................. 25 Time Mode Schedule ..........................26 Sensors Report Interval .......................... 26 Association Commands Action ....................... 27 PARAMETERS LIST & FACTORY DEFAULTS ..................28 LIMITED WARRANTY ..........................32 HE-HT01 USER MANUAL... -
Page 3: Overview
Based on the latest Z-Wave platform The HE-HT01 integrates a Z-Wave Plus™ v2 700 platform module allowing it to be used with Z-Wave home automation systems. The HE-HT01 supports Z-Wave ‗S0‘ and ‗S2‘... -
Page 4: Technical Specifications
MAN – Manual Control Mode Air Temperature Sensor 4 time schedules for 7 days of the Calibration of External NTC week: Temperature Sensor Morning Temperature set intervals: 1.0°C to 37.0°C Evening Night HE-HT01 USER MANUAL... -
Page 5: Installation
WARNING: ELECTRICAL POWER MUST BE SWITCHED OFF DURING INSTALLATION. 1. Placement of the HE-HT01 is of utmost importance for proper operation and must be away from sunlight and sources of direct heat. We recommend installing the HE- HT01 approximately 1.5 meters above the floor. - Page 6 (Parameter 10 – FSr) – see ―Settings Menu‖ section below. 4. If you will be using an external device to select modes for the HE-HT01 (such as a security system), connect wires from the external device‘s dry contacts according to connection diagrams 1 (or 2 or 3 or 4).
-
Page 7: Disassembly
‗snaps‘ into position all the way around. 6. Next, switch On the main power at the circuit breaker (see photo above). The HE-HT01 will start up showing the original default factory settings. -
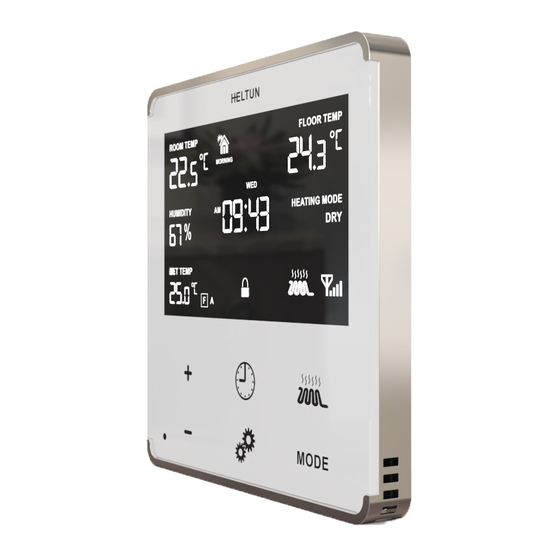
Page 8: Touch Panel Operation
≡ Note: The minimum Set Point is 1.0°C and the maximum Set Point is 37.0°C. The HE-HT01 has two working modes: HEATING (switched On) and IDLE (switched Off). In HEATING mode, the heating element icon will appear near the right bottom corner of the display (to the left of the connectivity icon). -
Page 9: Com - Comfort Mode
The Temperature Schedule (TIME) Mode can adjust home temperatures automatically to align with your personal habits, saving energy while you are away, and maintaining a comfortable temperature while you are active at home. The HE-HT01 can have different Schedules for Morning, Daytime, Evening and Night. -
Page 10: Dry - Fast Floor Drying Mode (Dry Air)
This mode is recommended for use if a high floor temperature is required for a limited period of time. For example, after washing the floor. By choosing DRY Mode, the HE-HT01 will increase the temperature to the selected Set Point for the time specified in the ―Dry Time‖... -
Page 11: Eco - Energy Saving Mode (Energy Save Heat)
Note: The minimum set point for each mode is 1.0°C and the maximum set point is 37.0°C. MAN - Manual Control Mode (Off) In this Mode the HE-HT01 schedules are disabled and the heating state is switched On & Off manually by pressing the Heating Element button. -
Page 12: Z-Wave Network
Wave network (see ―Removing from Z-Wave network‖ below). 4. Start the Inclusion Mode from the gateway/controller. 5. On the HE-HT01 in the Parameter 2 press the Plus ―+‖ button to start the Inclusion process. 6. Note that lines will be moving in the Parameter value position (upper right). -
Page 13: Security
Inclusion Mode the security key should be used during the inclusion process. Security key is the first 5 digits of DSK (device DSK is printed on the HE-HT01 back panel plus on the Security Card included in the packaging). -
Page 14: Firmware Ota Update
≡ Note: The device DSK and QR code are printed on the HE-HT01 back panel plus on the Security Card included in the HE-HT01 packaging. Firmware OTA Update To wirelessly update the HE-HT01 firmware, follow these steps: 1. Check the current firmware version (Parameter 3 in the settings). - Page 15 Indicator Unauthenticated or S0) highest granted (S2 Authenticated, S2 Configuration Unauthenticated or S0) Application Status none highest granted (S2 Authenticated, S2 Firmware Update Meta Data Unauthenticated or S0) highest granted (S2 Authenticated, S2 Basic Unauthenticated or S0) HE-HT01 USER MANUAL...
-
Page 16: Associations
Note: It is not recommended to modify this group. Group 2 – “Basic Set On/Off: Relay”: is assigned to the HE-HT01 operating state. It sends a Basic Set command with value 0 (Off) when it goes to IDLE state and sends 255 (ON) when it goes into HEATING state. -
Page 17: Settings (Available Through Menu And Z-Wave Network)
0, 1, 2, 3 Inputs / Mode number for External Outputs Input action: Configuration 1 = COM, 2 = TIME, 1, 2, 3, 4, 5, 6 3 = DRY, 4 = ECO, 5 = VAC, 6 = MAN (Off#) HE-HT01 USER MANUAL... - Page 18 Time Regulation OFF time, 10…240 5…90 Dry Time, min Mode to revert to after completion of Dry mode: 1, 2, 4, 5, 6 1 = COM, 2 = TIME, 4 = ECO, 5 = VAC, 6 = MAN (Off) HE-HT01 USER MANUAL...
-
Page 19: Z-Wave
Z-Wave Parameter 01 (“ГEg”) – Frequency Region The HE-HT01 has Z-Wave 700 series chip inside which allows to use the device in different Z-Wave frequencies. If there is a need to use the device in the frequency different from the factory default, change the value of this Parameter according to the frequency list below. -
Page 20: Hardware & Software Versions
This Parameter allows you to manually check the hardware and firmware versions of the HE-HT01 directly from the device screen. Display information follows this format: Firmware Major Version - displayed at the Hours position, Minor Version - displayed at the Minutes position. -
Page 21: Display Brightness
Display Brightness The HE-HT01 has two brightness levels for its LCD display: Active Level – when any button is pressed the display becomes brighter, and Inactive Level – after 20 seconds of inactivity the display becomes less bright. The actual display brightness may be adjusted (see below). -
Page 22: Temperature Configurations
Ohms (Ω) of the sensor. The selection range is 1 to 100 kiloOhms (kΩ). One 10kΩ NTC floor temperature sensor is included in the HE-HT01 package with a 3- meter connection wire. The factory default value is 10kΩ. - Page 23 (FtL) — to be sure that the value is not too high, and it can be reached. Otherwise the HE-HT01 will stay always in HEATING mode. ≡ Note: For safety reasons the HE-HT01 will enter IDLE mode if the floor temperature reaches 40°C despite Parameter settings. ≡...
- Page 24 This Parameter defines the hysteresis value for temperature control. The HE-HT01 will stabilize the temperature with selected hysteresis. For example, if the SET POINT is set for 25°C and HYSTERESIS is set for 0.5°C the HE-HT01 will change the state to IDLE if the HE-HT01 USER MANUAL...
-
Page 25: Time Configurations
Parameter 19 (“tCr”) – Time Correction by Main Controller If this Parameter value = 1 and the HE-HT01 is connected to a Z-Wave gateway, the HE- HT01 time and day will be periodically polled and corrected from the gateway. To switch off auto-correction set the Parameter value to 0. -
Page 26: Time Mode Schedule
The factory default value is 25. ≡ Note: When the thermostat is turning ON, the consumption data will be sent to the gateway once, even if the value of this Parameter is 0. HE-HT01 USER MANUAL... -
Page 27: Association Commands Action
This Parameter defines which Operating Mode the HE-HT01 reverts to if the Basic Set command is received. If the Basic Set command value is 0 (OFF state) the HE-HT01 will go to Manual (MAN) mode and switch Off the heating element (IDLE mode). If the... -
Page 28: Parameters List & Factory Defaults
Basic Set command value is 0xFF (ON state) the HE-HT01 will change the Mode to the corresponding Parameter value (as follows): 0: No action (ignoring Basic Set commands) 1: COM Mode 2: TIME Mode 3: DRY Mode 4: ECO Mode... - Page 29 2 bytes e.g.08:00 = 0800 0000 … 2359 2 bytes Day start time. Format: HHMM. 0000 … 2359 2 bytes Evening start time. Format: HHMM. 1800 0000 … 2359 2 bytes Night start time. Format: HHMM. 2300 HE-HT01 USER MANUAL...
- Page 30 10 … 370 2 bytes Thursday Night temperature, valueX10 10 … 370 2 bytes Friday Morning temperature, valueX10 10 … 370 2 bytes Friday Day temperature, valueX10 10 … 370 2 bytes Friday Evening temperature, valueX10 HE-HT01 USER MANUAL...
- Page 31 Light sensor values difference to 0, 10 … 99 1 byte send to controller, % 147-170 Reserved by the manufacturer Mode to switch to on Basic Set 0, 1, 2, 3, 1 byte command receive 4, 5, 6 HE-HT01 USER MANUAL...
-
Page 32: Limited Warranty
LIMITED WARRANTY HELTUN warrants this product to be free from defects in workmanship or materials, under normal use and service, for a period of one (1) year from the date of purchase by the consumer ("Warranty Period"). HELTUN will extend this Warranty Period to three (3) years from the date of consumer purchase for any consumer who registers his/her product with HELTUN at this website page: bonus.heltun.com.
Need help?
Do you have a question about the HE-HT01 and is the answer not in the manual?
Questions and answers