Table of Contents
Advertisement
Quick Links
Advertisement
Table of Contents

Related Manuals for National 447TBL


Summary of Contents for National 447TBL
- Page 1 National Optical & Scientific Instruments Inc. 6508 Tri-County Parkway Schertz, Texas 78154 Phone (210) 590-9010 Fax (210) 590-1104 INSTRUCTIONS FOR MODELS #446TBL, #447TBL AND #448TBL STEREOSCOPIC MICROSCOPES Copyright © 1/2/01 National Optical & Scientific Instrument Inc.
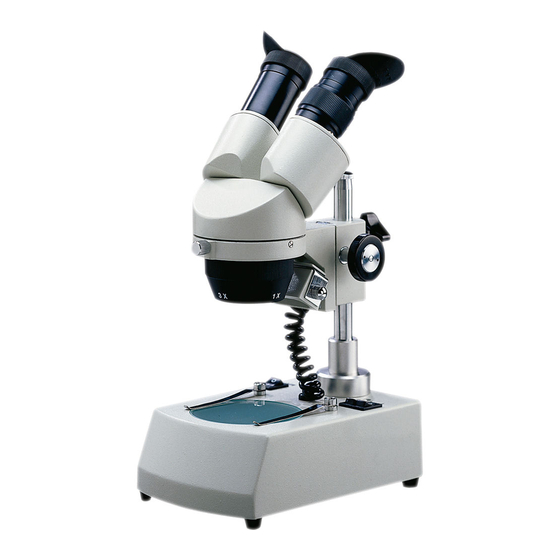
- Page 2 Rubber eyeshields Eyepieces Knurled diopter collar Head of microscope Head retaining screw (one on each side) Post locking knob Head position locking screw Focusing knob Objective turret Light housing locking knob Top light housing Post Power switch Stage Clips Light control switches Locking set screw (located on side)
- Page 3 Page 3 Stereoscopic microscopes are used for viewing 3-dimensional objects, inspection or assembly of small parts, and for dissection of biological specimen. They provide an upright, unreversed image which permits easy manipulation of the object being viewed while looking through the microscope. They are designed for viewing solid objects at low magnification, but they will also permit viewing of some transparent specimen slides.
- Page 4 Page 4 5. There are three rocker type light controls located on top surface of microscope base. MAIN = Turns power on and off “I” = Turns incidental light on (top illumination) “T” = Turns transmitted light on (substage illumination) REMEMBER to never operate bottom (transmitted) light with plastic stage plate in use.
- Page 5 Page 5 E. Looking through left side of microscope with left eye, turn diopter adjustment collar located on left eyepiece until left image is sharp. Note the scale on the diopter collar and its position in relationship to the index mark on the eyepiece tube. You have now adjusted the microscope for your personal vision.
- Page 6 SOURCE OUTLET BEFORE CHANGING BULBS. Both top and bottom lights use the same 12 volt 10 watt tubular type bulb, National #800-400. A. To replace top light bulb ..loosen light housing locking knob to permit removal of light housing.
- Page 7 Page 7 OPTIONAL ACCESSORIES AND PARTS: #615-400 WF15X Eyepieces (pair), increases magnification 50% #800-400 12v 10w Replacement Bulb #801-050 Replacement fuse for 220v version, 0.5 amp #801-100 Replacement fuse for 117v version, 1.0 amp #940-410 Frosted glass stage plate, 80mm #941-460B Black plastic stage plate, 80mm #941-460W...
Need help?
Do you have a question about the 447TBL and is the answer not in the manual?
Questions and answers