Table of Contents
Advertisement
Quick Links
Advertisement
Table of Contents

Subscribe to Our Youtube Channel
Related Manuals for National 104-CLED


Summary of Contents for National 104-CLED
- Page 1 National Optical & Scientific Instruments Inc. 6508 Tri-County Parkway Schertz, Texas 78154 Phone (210) 590-9010 Fax (210) 590-1104 INSTRUCTIONS FOR MODEL 104-CLED ELEMENTARY COMPOUND MICROSCOPE Copyright © 4/12/05 National Optical & Scientific Instrument Inc.
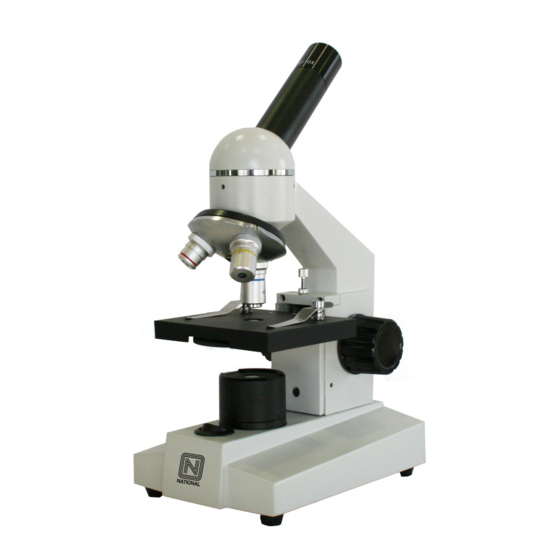
- Page 2 Ocular lens (eyepiece) Eyepiece tube Objective turret (nosepiece) Objective lens Stage stop screw Stage stop locking nut Stage clips Stage Focusing knob Disc diaphragm Illuminator housing Fuse Illuminator switch Base AC Cord...
- Page 3 INTRODUCTION Thank you for your purchase of a National microscope, It is a well-built, precision instrument and carefully checked to assure that it reaches you in good condition. It is designed for ease of operation and years of carefree use. The information in this manual probably far exceeds what you will need to know in order to operate and maintain your microscope.
- Page 4 B. Place microscope directly in front of you in a manner which permits you to comfortably look into the eyepiece. Note that the head of the microscope rotates 360°, permitting you to operate the microscope from the front or the back, whichever is most convenient. Most users will position the microscope with the arm facing you so that focusing knobs are most convenient to reach.
- Page 5 Insert new LED “bulb”, replace lens housing and tighten hex screw to secure lens housing in place. 2. Replacement of fuse (National #801-160) The fuse is located at right rear side of microscope base. To remove fuse from holder, insert a 6mm screwdriver blade into slot located in rear of fuse holder cap.
- Page 6 TROUBLESHOOTING PROBLEM REASON FOR PROBLEM SOLUTION Light fails to operate. Light switch in off position. Turn light switch on. Fuse blown. Replace fuse. LED bulb burned out. Replace LED. Disc diaphragm has not “clicked” Turn disc diaphragm until it “clicks” into into proper position and is position.
Need help?
Do you have a question about the 104-CLED and is the answer not in the manual?
Questions and answers