
Related Manuals for Hoover HOC3358IN


Summary of Contents for Hoover HOC3358IN
- Page 1 USER INSTRUCTIONS OVENS INSTRUCCIONES DE USO HORNOS EMPOTRABLES CANDY HOOVER GROUP S.R.L. • Via Comolli 16 • 20861 Brugherio (MB) - Italy...
- Page 2 General Warnings • When you open the door after you have finished shatter. cooking, a few drops of water may come out of the • The oven must be switched off before removing door. It depends on the type of food you have the removable parts.
- Page 3 compromise the safety of the appliance and invalidate the guarantee. • Any excess of spilled material should be removed before cleaning. • A long power supply failure during an occurring cooking phase may cause a malfunction of the monitor. ln this case contact customer service. •...
-
Page 4: Table Of Contents
Summary General Instructions 1.1 Safety indications 1.2 Electrical safety 1.3 Recommendations 1.4 Installation 1.5 Waste management 2.1 Overview Product Description 2.2 Accessories 2.3 First use Use of the Oven 3.1 Display description 3.2 Cooking modes Oven Cleaning and Maintenance 4.1 General notes on cleaning 4.2 Hydro Easy Clean Function 4.3 Maintenance •... -
Page 5: General Instructions
1. General Instructions We thank you for choosing one of our products. For the best results with your oven, you should read this manual carefully and retain it for future reference. Before installing the oven, take note of the serial number so that you can give it to customer service staff if any repairs are required. -
Page 6: Product Description
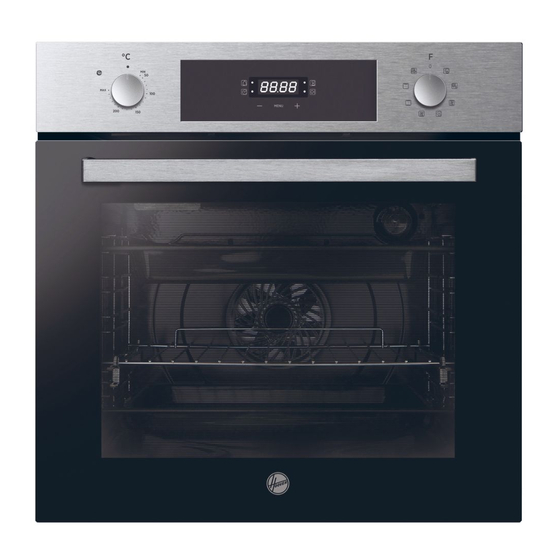
2. Product Description 2.1 Overview 1. Control panel 2. Shelf positions (lateral wire grid if included) 3. Metal grill 4. Drip pan 5. Fan (behind the steel plate) 6. Oven door 2.2 Accessories (According to model) Lateral wire grids Drip pan Collects the residues that drip during the cooking of foods on the grills. -
Page 7: Use Of The Oven
3. Use of the Oven (According to model) 3.1 Display description WARNING : the first operation to carry out after the oven has been installed or following the interruption 1. Thermostat selector knob of power supply (this is recognizable the display pulsating and showing 12:00 ) is setting the correct time. - Page 8 • The WiFi LED switches on. Write here your serial number for future reference. Hereby, Candy Hoover Group Srl declares that the radio equipment is in compliance with Directive 2014/53/EU and with the relevant Statutory Requirements (for the UKCA market). The full text of the declaration of conformity is available at the following internet address: www.candy-group.com...
-
Page 9: Cooking Modes
3.2 Cooking Modes T °C Function T °C Function (Depends on the oven model) Range Dial Suggested LAMP: Turns on the oven light. DEFROST: When the dial is set to this position. The fan circulates air at room temperature around the frozen food so that it defrosts in a few minutes without the protein content of the food being changed or altered. -
Page 10: Oven Cleaning And Maintenance
4. Oven cleaning and maintenance 4.1 General notes on cleaning The lifecycle of the appliance can be extended through regular cleaning. ACCESSORIES Wait for the oven to cool before carrying out manual cleaning operations. Clean accessories with a wet, soapy sponge before rinsing and drying them: Never use abrasive detergents, steel wool or sharp objects for cleaning, so avoid using abrasive detergents. -
Page 11: Removal And Cleaning Of The Glass Door
REMOVAL AND CLEANING OF THE GLASS DOOR 1. Open the oven door. 2.3.4. Lock the hinges, remove the screws and remove the upper metal cover by pulling it upwards. 5.6. Remove the glass, carefully extracting it from the oven door (NB: in pyrolytic ovens, also remove the second and third glass (if present)). 7. -
Page 12: Changing The Bulb
CHANGING THE BULB 1. Disconnect the oven from the mains supply. 2. Undo the glass cover, unscrew the bulb and replace it with a new bulb of the same type. 3. Once the defective bulb is replaced, replace the glass cover. 5. - Page 13 Indicaciones de seguridad • Cuando abra la puerta después de haber color amarillo verdoso. Esta operación debe terminado de cocinar, pueden salir unas gotas de realizarla un profesional debidamente cualificado. Si agua de la puerta. Depende del tipo de alimentos la toma de corriente es incompatible con el enchufe que haya cocinado.
- Page 14 Resumen Advertencias generales 1.1 Recomendaciones de seguridad 1.2 Seguridad eléctrica 1.3 Recomendaciones 1.4 Instalación 1.5 Gestión de residuos 2.1 Descripción general Descripción del producto 2.2 Accesorios 2.3 Primer uso Utilización del horno 3.1 Descripción de la pantalla 3.2 Modalidades de cocción Limpieza y mantenimiento del horno 4.1 Notas genéricas de limpieza 4.2 Función Hydro Easy Clean...
- Page 15 1. Advertencias Generales Le agradecemos que haya elegido uno de nuestros productos. Para utilizar el horno de forma óptima es aconsejable leer con atención este manual y conservarlo para poder consultarlo en el futuro. Antes de instalar el horno, anote el número de serie para poder facilitárselo al personal del servicio de asistencia técnica en caso de solicitar su intervención.
- Page 16 2. Descripción del producto 2.1 Descripción general 1. Panel de control 2. Posiciones de las bandejas (y del soporte elevado si corresponde) 3. Rejilla metálica 4. Bandeja 5. Ventilador (detrás de la placa de acero) 6. Puerta del horno 2.2 Accesorios (De acuerdo con el modelo) Soportes laterales Bandeja Recoge los residuos que gotean durante la cocción de alimentos con las...
- Page 17 3. Utilización del horno ( De acuerdo con el modelo 3.1 Descripción de la pantalla ATENCIÓN: la primera operación que hay que efectuar después de la instalación o después de 1. Perilla selectora del termostato una interrupción de la corriente (este tipo de situaciones se reconocen al observar que en la 2.
- Page 18 Escriba aquí su número de serie para futuras consultas. Por la presente, Candy Hoover Group Srl declara que el equipo de radio cumple con la Directiva 2014/53/EU y con los requisitos legales relevantes (para el mercado UKCA). El texto completo de la declaración de conformidad está...
- Page 19 3.2 Modalidades de cocción Mando T°C Rango FUNCIÓN ( dependiendo del modelo selector establecida de T°C LAMPARA: Conecta la luz interior DESCONGELACIÓN: Funcionamiento de la turbina de cocción que hace circular el aire dentro del espacio del horno. Ideal para realizar una descongelación previa a una cocción.
- Page 20 4. Limpieza y mantenimiento del horno 4.1 Notas genéricas de limpieza La vida útil del aparato se prolonga si se limpia a intervalos regulares. Espere a JUNTA DE LA PUERTA DEL HORNO que el horno se enfríe antes de llevar a cabo las operaciones de limpieza Si se ensucia, la junta se puede limpiar con una esponja ligeramente húmeda.
- Page 21 EXTRACCIÓN Y LIMPIEZA DE LA PUERTA DE VIDRIO 1. Abra la puerta del horno. 2.3.4. Bloquee las bisagras, desenrosque los tornillos y extraiga la cubierta metálica superior tirando hacia arriba. 5.6. Extraiga el vidrio con mucho cuidado de la contrapuerta del horno (N. B.: si se trata de un horno pirolítico, extraiga también el segundo y el tercer vidrio si los hubiera).
- Page 22 SUSTITUCIÓN DE LA BOMBILLA 1. Desenchufe el horno de la red eléctrica. 2. Suelte la cubierta de vidrio, desenrosque la bombilla y sustitúyala por una nueva del mismo modelo. 3. Una vez sustituida la bombilla defectuosa, vuelva a atornillar la cubierta de vidrio. 5.
- Page 23 INSTALLATION INSTALACIÓN 560 mm Opening Apertura 460mm x 15 mm 595 mm 580 mm 546 mm 595 mm 22 mm If the furniture is equpped with a bottom at the back part, provide an opening for the power supply cable. Si el mueble tiene panel posterior, haga un orificio para el cable de alimentación.
Need help?
Do you have a question about the HOC3358IN and is the answer not in the manual?
Questions and answers