
Related Manuals for C&T Solution CT-DBT0x


Summary of Contents for C&T Solution CT-DBT0x
- Page 1 USER’S MANUAL CT-DBX0x 3.5” Industrial Single Board Computer with Intel® Atom™ Processor E3800...
-
Page 2: Table Of Contents
CT-DBT0X l User’s Manual Table of Contents Prefaces …………………………………………………….……………………………………………. 04 Revision …………………………………………………………………………………………..……………….……….. 04 Disclaimer ………………………………………………………..…….…….………………………….……………….. 04 Copyright Notice …………………………………….…………………….…………………………………………… 04 Trademarks Acknowledgment …………..………………………………………………………....04 Environmental Protection Announcement …………………………….………………….…………..….. 04 Safety Precautions ………………………………………….……………………………….…………….………..05 Technical Support and Assistance …………………………………….…………….…………….………….. 06 Conventions Used in this Manual ………………………………………………………………….….………. 06 Chapter 1 Product Introductions ………………………………………………………..…... - Page 3 CT-DBT0X l User’s Manual Jumper Settings ………..…….……………............25 2.5.1 Backlight Power (JP1) ………….………………………………………..……………… 25 2.5.2 Panel Power (JP2) ……………….………………………………………..……………… 25 2.5.3 Clear CMOS (JP8) ………….…….………………………………………..……………… 25 Chapter 3 Features & Interfaces ………………………………………………………..… 26 Processor ……………………….………………………………..………….………………..………. 27 BIOS ……………………………..…………………………..…………….…………..…..………… 27 System Memory ……….…………..……………………..…………………………………..…... 27 Graphics ………………………………………..…………………………..………..……….……….
-
Page 4: Prefaces
Preface CT-DBT0X l User’s Manual Prefaces Revision Revision Description Date Initial release 2015/04/13 Correct USB_1/2 connector drawing; 2015/05/06 POWER_CONN & COM2-4 connector descriptions Modify COM_2/3/4 connector table and drawing 2015/12/08 Remove E3827 sku 2020/07/22 Disclaimer All specifications and information in this User’s Manual are believed to be accurate and up to date. C&T Solution Inc. -
Page 5: Safety Precautions
Preface CT-DBT0X l User’s Manual Safety Precautions Before installing and using the equipment, please read the following precautions: Put this equipment on a reliable surface during installation. Dropping it or letting it fall could cause damage. The power outlet shall be installed near the equipment and shall be easily accessible. -
Page 6: Technical Support And Assistance
Preface CT-DBT0X l User’s Manual Technical Support and Assistance 1. Visit the C&T Solution Inc website at www.candtsolution.com where you can find the latest information about the product. 2. Contact your distributor, our technical support team or sales representative for technical support if you need additional assistance. -
Page 7: Chapter 1 Product Introductions
Chapter 1 Product Introductions... -
Page 8: Product Description
Chapter 1: Product Introductions 1.1 Product Description The CT-DBT0x is a single board computer in 3.5” SBC form factor featuring the Intel® Atom™ Processor E3800 Series in FCBGA1170 package on 22nm process technology in a single chip solution. One 240- pin SODIMM sockets supports non-ECC/unbuffered DDR3L 1333MHz memory up to 4GB. -
Page 9: Specifications
CT-DBT0X l User’s Manual Chapter 1: Product Introductions 1.2 Specifications 1 x FAN connector Processor • Rear I/O • Intel® Atom™ Processor E3845 (1.91GHZ/4C/10W) 1 x HDMI • Intel® Atom™ Processor E3815 (1.46GHZ/1C/5W) 1 x VGA • Intel® Celeron® Processor J1900 (2.0GHZ/4C/10W) 1 x RS-232/422/485 •... -
Page 10: Available Models
CT-DBT0X l User’s Manual Chapter 1: Product Introductions 1.3 Available Models Model No. Processor Ordering Information Part Number Atom™ E3845 CT-DBT01-E3845 6-DBT0101S100-P0 Atom™ E3815 CT-DBT01-E3815 6-DBT0103S100-P0 CT-DBT01 Celeron® J1900 CT-DBT01-J1900 6-DBT0104S100-P0 Celeron® N2807 CT-DBT01-N2807 6-DBT0105S100-P0 Atom™ E3845 CT-DBT02-E3845 6-DBT0201S100-P0 Atom™ E3815... -
Page 11: Block Diagram
CT-DBT0X l User’s Manual Chapter 1: Product Introductions 1.4 Block Diagram... -
Page 12: Chapter 2 Mechanical Specifications
Chapter 2 Mechanical Specifications... -
Page 13: Dimensions
Chapter 2: Jumper & Connectors CT-DBT0X l User’s Manual 2.1 Dimensions Units: mm 53.4 99.7 98.38 98.43 98.38 97.96 98.06 96.15 87.97 85.78 74.92 74.74 67.04 59.44 48.53 46.23 44.39 42.55 30.35 29.48 27.84 27.37 22.61 22.29 16.89 12.83 11.13 8.76... -
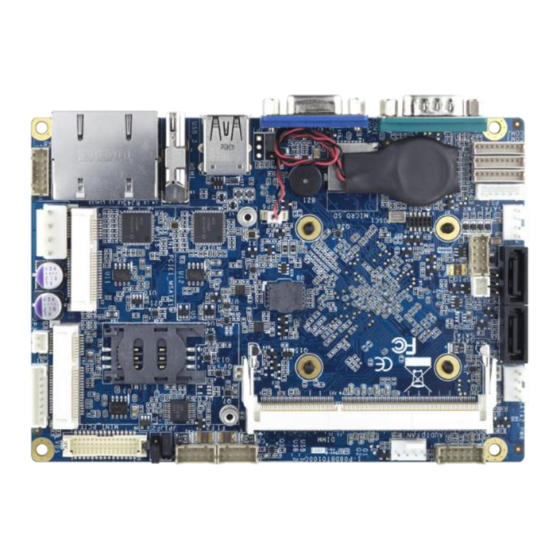
Page 14: Board Layout
CT-DBT0X l User’s Manual Chapter 2: Jumper & Connectors 2.2 Board Layout AUDIO USB_1 USB_2 JP1、JP2 DIMM MINI_PCIE2 SATA2_PWR SATA2 SIM1 PCIE1_MSATA SATA1 GPIO SATA1_PWR MICRO_SD COM4 COM3 COM2 RJ45 USB_3 HDMI COM1 2.2.1 Connectors & Jumpers Connector Description Connector... -
Page 15: Jumpers Definition
Chapter 2: Jumper & Connectors CT-DBT0X l User’s Manual 2.3 External Connectors COM1 USB 2.0 HDMI 2.3.1 Serial Port COM1 2.3.1.1 RS-2332 Mode Signal Signal DCD, Data Carrier Detect DSR, Data Set Ready RXD, Receive Data RTS, Ready To Send... -
Page 16: Vga Connector
CT-DBT0X l User’s Manual Chapter 2: Jumper & Connectors 2.3.1.4 COM1 RS-232/422/485 Mode Selection To set the COM mode, boot the system into BIOS Setup Utility and select Advanced > F81866 Super IO configuration. You will see the following screen. -
Page 17: Usb 3.0 Connector
CT-DBT0X l User’s Manual Chapter 2: Jumper & Connectors 2.3.3 USB 3.0 Connector Signal Signal USB +5V USB_SSRX- USB_D- USB_SSRX+ USB_D+ GND_DRAIN USB_SSTX- USB_SSTX+ 2.3.4 USB 2.0 Connector Signal USB +5V USB_D- USB_D+ 2.3.5 HDMI Connector Signal Signal HDMI_TX2_DP_B HDMI_TX2_DN_B... -
Page 18: Internal Connectors
CT-DBT0X l User’s Manual Chapter 2: Jumper & Connectors 2.4 Internal Connectors 2.4.1 Front Panel Audio Connector (AUDIO) Connector Type: 2x6-pin pitch 2.00mm wafer connector Signal Signal MICIN_L MICIN_R MIC1_JD AGND LOUT_L LOUT_R FRONT_JD AGND LIN_L LIN_R LINE1_JD AGND 2.4.2 Backlight Control Connector (CN1) Connector Type: 2x6-pin pitch 2.00mm wafer connector... -
Page 19: Lpc Connector (Dbg)
CT-DBT0X l User’s Manual Chapter 2: Jumper & Connectors 2.4.4 LPC Connector (DBG) Connector Type: 2x5 pin pitch 1.27mm box header Signal Signal +3.3V LPC_AD3 LPC_AD2 RESET_DBG LPC_AD1 CLOCK_DEBUG LPC_AD0 LPC_FRAME 2.4.5 Fan Connector (FAN) Connector Type: 1x4 pin pitch 2.54mm wafer connector... -
Page 20: Reset Button Pin Header (Jp4)
CT-DBT0X l User’s Manual Chapter 2: Jumper & Connectors 2.4.8 Reset Button Pin Header (JP4) Connector Type: 1x2-pin pitch 2.00mm wafer connector Signal RESET_BUTTON_N 2.4.9 Battery Pin Header (JP6) Connector Type: 1x2-pin pitch 1.25mm wafer connector Signal 2.4.10 I2C Pin Header (I2C1) Connector Type: 1x3-pin pitch 2.54mm pin header connector... -
Page 21: Lvds Connector: Lvds
CT-DBT0X l User’s Manual Chapter 2: Jumper & Connectors 2.4.12 LVDS Connector: LVDS Connector Type: 2x15-pin pitch1.25mm LVDS connector Signal Signal LVDS_B3- LVDS_B3+ LVDS_B_CLK- LVDS_B_CLK+ LVDS_B2- LVDS_B2+ LVDS_B1- LVDS_B1+ LVDS_B0- LVDS_B0+ LVDS_I2C_DAT LVDS_I2C_CK LVDS_A3+ LVDS_A3- LVDS_A_CLK+ LVDS_A_CLK- LVDS_A2+ LVDS_A2- LVDS_A1+... -
Page 22: Mini-Pcie Slot #1 (Pcie1_Msata)
CT-DBT0X l User’s Manual Chapter 2: Jumper & Connectors 2.4.14 Mini-PCIe Slot #1 (PCIE1_MSATA) PCIe x1 only (CT-DBT01 BOM option) Definition Definition Definition WAKE# Reserved Reserved +3.3V Reserved USB_D+ Reserved Reserved PERST# Reserved PERn0 Reserved +1.5V +3.3Vaux LED_WWAN# CLKREQ# PERp0... -
Page 23: Mini-Pcie Slot #2 (Mini_Pcie1)
Chapter 2: Jumper & Connectors CT-DBT0X l User’s Manual 2.4.15 Mini-PCIe Slot #2 (MINI_PCIE1) PCIe x1 & USB 2.0 Definition Definition Definition WAKE# Reserved Reserved +3.3V Reserved USB_D+ Reserved Reserved PERST# Reserved PERn0 Reserved +1.5V +3.3Vaux LED_WWAN# CLKREQ# PERp0 Reserved... -
Page 24: Sata Signal Connectors: Sata1_2
CT-DBT0X l User’s Manual Chapter 2: Jumper & Connectors 2.4.18 SATA Signal Connectors: SATA1-2 Connector Type: 1x4-pin pitch 3.96mm wafer connector Signal SATA_TX+ SATA_TX- SATA_RX- SATA_RX+ 2.4.19 SATA Power Connectors (SATA1/2_PWR) Connector Type: 4-pin pitch 2.54mm connector Signal +12V 2.4.20 USB 2.0 Pin Header (USB_1/2) 2x5-pin pitch 2.0mm wafer header connector... -
Page 25: Jumper Settings
Chapter 2: Jumper & Connectors CT-DBT0X l User’s Manual 2.5 Jumper Settings 2.5.1 Backlight Power (JP1) Function Setting Jumper +12V 1-2 closed +5V (Default) 2-3 closed 2.5.2 Panel Power (JP2) Function Setting Jumper +3.3V (Default) 1-2 closed 2-3 closed 2.5.3 Clear CMOS (JP8) -
Page 26: Features & Interfaces
Chapter 3 Features & Interface... -
Page 27: Processor
LVDS support is provided by a Realtek RTD2136R-CG DP-to-LVDS converter with dual channel 24-bit output up to 1920x1200 resolution. 3.5 USB The CT-DBT0x supports 1x USB 3.0 and 1x USB 2.0 external ports, and 4x internal USB 2.0 ports. 3.6 Ethernet The CT-DBT0x features 1x 10/100/1000BASE-TX Ethernet by Intel I210IT GbE Controller supporting WOL/PXE. -
Page 28: Expansion
The index port is the base address +0 and the data port is the base address +1. To access the GPIO register, write index to the index port, and then read/write from/to data port. The configuration on the CT-DBT0x is described as below. Index Port... -
Page 29: Watchdog Timer
CT-DBT0X l User’s Manual Chapter 3: Features & Interface Registers Description GPIO Input / Output Select GPIO8x Configuration Registers (Index port=0xA00, Data port=0xA01, Offset=0x88) Bit 7 Bit 6 Bit 5 Bit 4 Bit 3 Bit 2 Bit 1 Bit 0... -
Page 30: Chapter 4 Driver Installation
Chapter 4 Driver Installation... - Page 31 Chapter 4: Driver Installation CT-DBT0X l User’s Manual The drivers for the CT-DBT0x can be found on the driver DVD included with the system. Install the following drivers in the order listed. 1. Chipset 2. Graphics 3. Audio 4. LAN 5.
-
Page 32: Chapter 5 System Bios
Chapter 5 System BIOS... -
Page 33: Advanced
Chapter 5: System BIOS CT-DBT0X l User’s Manual The BIOS provides an interface to modify the configuration. When the battery is removed, all the parameters will be reset. Turn on the computer and press <DEL> or <F2> to enter the setup screens. -
Page 34: Acpi Settings
Chapter 5: System BIOS CT-DBT0X l User’s Manual 5.1.1 ACPI Settings Enable ACPI Auto Configuration: Enables or disables BIOS ACPI Auto Configuration. Enable Hibernation: Enable or Disable system ability to Hibernate. ACPI Sleep state: Select the highest ACPI sleep state the system will enter when the SUSPEND button is pressed. - Page 35 Chapter 5: System BIOS CT-DBT0X l User’s Manual 5.1.2.1 Serial Port 1 Configuration Device Type Select: Choose from RS-232, RS-422 and RS-485. 5.1.2.2 Serial Port 2-4 Configuration...
-
Page 36: Hardware Monitor
Chapter 5: System BIOS CT-DBT0X l User’s Manual 5.1.3 Hardware Monitor 5.1.4 Serial Port Console Redirection Serial port console redirection settings. -
Page 37: Cpu Configuration
Chapter 5: System BIOS CT-DBT0X l User’s Manual 5.1.5 CPU Configuration Intel Virtualization Technology: When enabled, a VMM can utilize the additional hardware capabilities provided by Vanderpool Technology Power Technology: Configure the power management features. -
Page 38: Sata Configuration
Chapter 5: System BIOS CT-DBT0X l User’s Manual 5.1.6 SATA Configuration The BIOS automatically detects the presence of SATA device and the hardware installed in the SATA ports will be showed in the configuration. Each port can be enabled or disabled individually. -
Page 39: Lpss & Scc Configuration
Chapter 5: System BIOS CT-DBT0X l User’s Manual 5.1.8 LPSS & SCC Configuration SCC SD Card Support: Options: Disable, Enable. LPSS I2C #2 Support: Options: Disable, Enable. 5.1.9 Network Stack Configuration... -
Page 40: Csm Configuration
CT-DBT0X l User’s Manual Chapter 5: System BIOS 5.1.10 CSM Configuration GateA20 Active: [Upon Request] – GA20 can be disabled using BIOS services. [Always] – do not allow disabling GA20; this option is useful when any RT code is executed above 1MB. -
Page 41: Sdio Configuration
CT-DBT0X l User’s Manual Chapter 5: System BIOS 5.1.11 SDIO Configuration SDIO Access Mode: Auto Option: Access SD device in DMA mode if controller supports it, otherwise in PIO mode. DMA Option: Access SD device in DMA mode. PIO Option: Access SD device in PIO mode. -
Page 42: Usb Configuration
CT-DBT0X l User’s Manual Chapter 5: System BIOS 5.1.12 USB Configuration Legacy USB Support: Auto option disables legacy support if no USB devices are connected. Disable option will keep USB devices available only for EFI applications. XHCI Hand-off: This is a workaround for OSes without XHCI hand-off support. The XHCI ownership change should be claimed by XHCI driver. -
Page 43: Security Configuration
Chapter 5: System BIOS CT-DBT0X l User’s Manual 5.1.13 Security Configuration XE EOP Message: Send EOP Message Before Enter OS. Intel® AT: Enable/Disable BIOS AT Code from Running. Intel® AT Platform PBA: Enable/Disable BIOS AT Code from Running. -
Page 44: Chipset
CT-DBT0X l User’s Manual Chapter 5: System BIOS 5.2 Chipset 5.2.1 Northbridge Configuration... - Page 45 Chapter 5: System BIOS CT-DBT0X l User’s Manual 5.2.1.1 Intel IGD Configuration IGD Turbo Enable: Enable/Disable: IGD Turbo. GFX Boost: Enable/Disable GFX Boost. PAVC: Enable/Disable Protected Audio Video Control. DVMT Pre-Allocated: Select DVMT 5.0 Pre-Allocated (Fixed) Graphics Memory size used by the Internal Graphics Device.
- Page 46 CT-DBT0X l User’s Manual Chapter 5: System BIOS 5.2.1.2 LCD Control Primary IGFX Boot Display: Default setting is “VBIOS Default”. “CRT”selects VGA, “EFP” selects DisplayPort, “LFP” selects LVDS. LCD Panel Type: Default setting is “1024x768 LVDS 24-bit”.
-
Page 47: Southbridge Configuration
CT-DBT0X l User’s Manual Chapter 5: System BIOS 5.2.2 Southbridge Configuration High Precision Timer: Enable or Disable the High Precision Event Timer. Restore AC Power Loss: Select AC power state when power is re-applied after a power failure. 5.2.2.1 USB Configuration... -
Page 48: Security
CT-DBT0X l User’s Manual Chapter 5: System BIOS 5.2.2.2 PCI Express Configuration 5.3 Security Administrator’s and User’s passwords could be set. If ONLY the Administrator’s password is set, then this only limits access to Setup and is only asked for when entering Setup. -
Page 49: Security Boot Menu
CT-DBT0X l User’s Manual Chapter 5: System BIOS 5.3.1 Security Boot Menu Secure Boot: Secure Boot can be enabled if the System running in User mode with enrolled Platform Key (PK) and CSM function is disabled. Secure Boot Mode: Secure Boot mode selector. ‘Custom’ Mode enables users to change... -
Page 50: Boot
Chapter 5: System BIOS CT-DBT0X l User’s Manual 5.4 Boot Setup Prompt Timeout: Number of seconds to wait for setup activation key. 65535 (0xFFFF) means indefinite waiting. Bootup NumLock State: Select [Enable] or [Disable] for the keyboard NumLock state. Quiet Boot: Enables or Disables Quiet Boot option. -
Page 51: Chapter 6 Address Map
Chapter 6 Address Map... -
Page 52: I/O Port Address Map
Chapter 6: Address Map CT-DBT0X l User’s Manual 6.1 I/O Port Address Map The assignments of the I/O port addresses for the CT-DBT0x under Windows® 7 Ultimate 64-bit are shown below. - Page 53 Chapter 6: Address Map CT-DBT0X l User’s Manual I/O Port Address Map (cont'd)
- Page 54 Chapter 6: Address Map CT-DBT0X l User’s Manual I/O Port Address Map (cont'd)
-
Page 55: Interrupt Controller (Irq) Map
Chapter 6: Address Map CT-DBT0X l User’s Manual 6.2 Interrupt Controller (IRQ) Map The interrupt controller map for the CT-DBT0x under Windows® 7 Ultimate 64-bit is shown below. - Page 56 Chapter 6: Address Map CT-DBT0X l User’s Manual Interrupt Controller (IRQ) Map (cont'd)
- Page 57 Chapter 6: Address Map CT-DBT0X l User’s Manual Interrupt Controller (IRQ) Map (cont'd)
- Page 58 Chapter 6: Address Map CT-DBT0X l User’s Manual Interrupt Controller (IRQ) Map (cont'd)
- Page 59 Chapter 6: Address Map CT-DBT0X l User’s Manual Interrupt Controller (IRQ) Map (cont'd)
- Page 60 CT-DBT0X l User’s Manual Chapter 6: Address Map Interrupt Controller (IRQ) Map (cont'd)
- Page 61 CT-DBT0X l User’s Manual Chapter 6: Address Map Interrupt Controller (IRQ) Map (cont'd)
- Page 62 CT-DBT0X l User’s Manual Chapter 6: Address Map Interrupt Controller (IRQ) Map (cont'd)
-
Page 63: Memory Map
Chapter 6: Address Map CT-DBT0X l User’s Manual 6.3 Memory Map The memory map of DRAM for the CT-DBT0x under Windows® 7 Ultimate 64-bit is shown below. - Page 64 CT-DBT0X l User’s Manual Chapter 6: Address Map Memory Map (cont'd)
- Page 65 Copyright 2016 C&T Solution Inc. All Rights Reserved www.candtsolution.com...
Need help?
Do you have a question about the CT-DBT0x and is the answer not in the manual?
Questions and answers