Advertisement
Available languages
Available languages
Quick Links
Advertisement

Related Manuals for Roland 417741A


Summary of Contents for Roland 417741A
- Page 1 Owner’s Manual...
- Page 2 Before using this unit, carefully read the leaflet. After reading, keep the document(s) where it will be available for immediate reference. Copyright © 2017 ROLAND CORPORATION * This document explains the specifications of the product at the time that the document was issued. For the latest information, refer to...
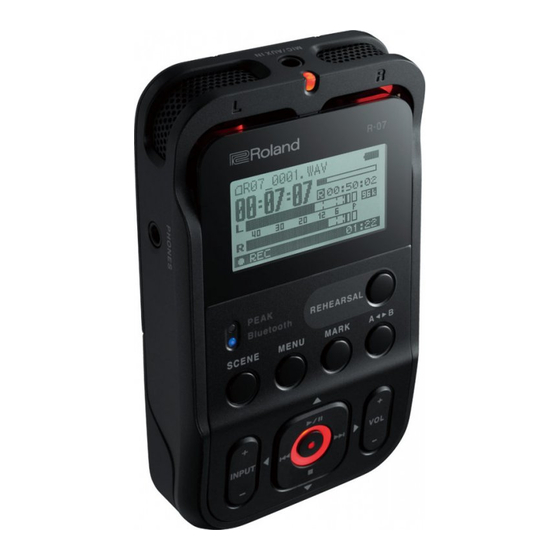
- Page 3 Panel Descriptions Built-in mics Remote indicator This is a stereo mic built into the unit. Operation Status Recording Blinking (slow) Record-standby Display Blinking (fast) Input overload This shows various types of information for the R-07. [REHEARSAL] button PEAK indicator This button automatically sets the This will light when the input volume is appropriate recording level.
- Page 4 Panel Descriptions ] button ] button Press this button to start playback, or to Press this button to select the next file. For pause playback or recording. a WAV file that contains marks, this button advances to the next mark. By holding This button also moves the cursor upward down this button, you can fast-forward in the screen, or changes the value of the...
- Page 5 Panel Descriptions MIC/AUX IN jack Use this if you want to connect an external mic, audio device or electronic musical instrument. [POWER] switch USB port Slide this switch toward POWER to turn Use a commercially available USB cable to PHONES jack the power on/off (p.
- Page 6 Panel Descriptions microSD card slot Insert the microSD card into this slot. When the R-07 is shipped from the factory, a microSD card is inserted. Tripod mounting socket This socket lets you attach the R-07 to a Built-in speaker commercially available camera tripod. This is the R-07’s internal speaker.
- Page 7 Panel Descriptions Main Screen Here we’ll explain the principal icons and information shown in the main screen. Playing / Stopped Song name Power supply status (USB /batteries Elapsed playback time Song length Sampling rate of the song being played Peak Output level Current time Play/stop status (PLAY/STOP)
- Page 8 Getting Ready 3. Install the batteries. 1. Turning the Power On/Off Install two AA batteries in the compartment, making sure that the polarity (+/– orientation) is correct. Types of batteries that can be used • Alkaline battery (AA, LR6) • Rechargeable Ni-MH battery (AA, HR6) NOTE The R-07 cannot rechargeable Ni-MH batteries.
- Page 9 Getting Ready Remaining battery indication Note when using the R-07 on batteries • When the remaining battery power runs low, a battery low icon • If you handle batteries improperly, you risk explosion and fluid appears in the upper right of the display. When this appears, leakage.
- Page 10 Getting Ready 3. Setting the Date and Time 4. Using Headphones After you turn on the power for the first time, you’ll need to set the The R-07 has a built-in speaker. You can listen to the playback internal clock as follows. The date and time you specify are used as through this speaker, or you can connect headphones for listening.
- Page 11 Getting Ready 4. Use [ ] to choose “Yes,” and then press [ ]. The display indicates “Pairing... ” , and this unit waits for a response from the Bluetooth device. When pairing succeeds, the display indicates “Completed. ” and sound can be output from the Bluetooth device.
- Page 12 Recording 1. Recalling Settings for Specific Purposes The R-07 provides settings that are suitable for various recording situations. These settings are called “scenes. ” 1. Press [SCENE] to access the “Scene” screen, and use [ ] to change the Scene setting. Scene Explanation Sample Rate Rec Mode...
- Page 13 Recording * 2xWAV-16 bit, 2xWAV-24 bit, MP3 and WAV+MP3 can be selected 2. Specifying the Recording Quality only if the Sample Rate is 44.1 kHz or 48.0 kHz. * If you select WAV+MP3, the setting is fixed at WAV-16 bit and You can specify the audio quality with which the recording will be MP3-128 kbps.
- Page 14 Recording 4. Point the mic toward the source NOTE you want to record, and press • Acoustic feedback might occur if you [REHEARSAL]. record while an external speaker is connected. Turning “Rec Monitor Sw” The recording level will automatically OFF prevents acoustic feedback. be set according to the loudest volume that occurs during the specified Rehearsal Time.
- Page 15 By using a device that is able to create audio CDs, such as the fast-forward. Normal playback will resume when you release the Roland CD-2 series, you can create an audio CD from files that were button. recorded on the R-07. For more about the CD-2 series, refer to the Roland website.
- Page 16 1. Turn on the Bluetooth function of the mobile device. 1. Installing the App “R-07 Remote” 1. From the web browser of your mobile device, access the following URL. http://roland.cm/r-07 From the page that appears, install the app that’s appropriate for your mobile device. MEMO The explanation here uses the iPhone as an example.
- Page 18 • リファレンス・ガイド R-07 本体にセットされています。 R-07 で録音したり再生したり 本機のすべての機能について解説しています。 するときに必要なメモリー・カードです。 * 電池(アルカリ電池(単 3 形)× 2) PDF マニュアルの入手方法 * 取扱説明書 1. パソコンなどで下記の URL を入力します。 http://www.roland.co.jp/manuals/ 本書です。常に手元において、いつでも参照できるようにして ください。 2. 製品名「R-07」を選んでください。 * 安全上のご注意チラシ 本機を正しくお使いいただくために、ご使用前にこのチラシを よくお読みください。お読みになったあとは、すぐに見られる ところに保管しておいてください。 * ローランド ユーザー登録カード R-07 のユーザーとして登録していただくための登録カードで...
- Page 19 各部の名称とはたらき 内蔵マイク リモート・インジケーター 本体内蔵のステレオ・マイクです。 動作 状態 点灯 録音中 点滅 (ゆっくり) 録音待機状態 ディスプレイ 点滅(はやい) 過大入力 R-07 のさまざまな情報を表示します。 PEAK インジケーター [REHEARSAL]ボタン 入力の音量が大きすぎる場合に点灯し 自動的に、適切な入力レベルを設定し ます。 ます。 Bluetooth インジケーター [A B]ボタン Bluetooth スピーカーやヘッドホンを ファイルの途中の 2 点間(A-B の区間) 登録する(P. 10)ときに点滅します。 を繰り返し再生させることができます。 ファイル内に A マークと B マークをつ Bluetooth スピーカーやヘッドホンが...
- Page 20 各部の名称とはたらき [ ]ボタン [ ]ボタン 再生を開始させたり、再生や録音を一 次のファイルを選択します。マークが付 時停止させたりします。 いた WAV ファイルでは、次のマーク に進みます。押し続けると、その間ファ また、ディスプレイ上のカーソル位置 イルを早送りします。 を上方向に移動させたり、選択項目の 値を変更したりします。 再生中、停止状態のどちらの状態でも 操作できます。 また、カーソルの右キー(カーソルを 右方向に移動)として機能したり、選 [ ]ボタン 択項目の値を変更したりします。 ファイルの頭出しをしたり前のファイ ルを選択したりします。マークが付いた VOL[+] [−]ボタン WAV ファイルでは、前のマークに戻り ます。押し続けると、その間ファイル 内蔵スピーカー、PHONES 端子や を早戻します。 Bluetooth 機器から出力される音量を 調節します。 再生中/停止状態のどちらの状態でも 操作できます。 [ ]ボタン また、ディスプレイ上のカーソル位置...
- Page 21 各部の名称とはたらき MIC/AUX IN 端子 外部マイク、オーディオ機器や電子楽 器を接続するときに使用します。 [POWER]スイッチ USB 端子 スイッチを POWER 側にスライドさせ 市販の USB ケーブルでパソコンと接続 PHONES 端子 て、 電源のオン/オフを切り替えます (P. します。 R-07 で録音したファイルをパソ ヘッドホンや外部スピーカーを接続し 8) 。電源をオンにした状態でスイッ コンに移動したり、パソコンから R-07 ます(P. 10) 。 チを右側に固定すると、HOLD がオン に WAV や MP3 をコピーして再生させ になります。 たりすることができます。 HOLD をオンにしておくと、すべての ※...
- Page 22 各部の名称とはたらき microSD カード・スロッ ト microSD カードを差し込むスロットで す。工場出荷時には microSD カードが セットされています。 三脚取り付け用ネジ穴 市販のカメラ用三脚が取り付けできる 内蔵スピーカー ネジ穴です。 本体内蔵のスピーカーです。 (ネジ穴のサイズは 1/4 インチです。 ) 電池ケース ストラップ取り付け穴 電池を入れます(P. 8) 。 市販のストラップを取り付けることが できます。 microSD カードについて ※ メモリー・カードのメーカーや種類によっては、本機で正しく録音や再生ができないことがあります。 ...
- Page 23 各部の名称とはたらき 基本画面 基本画面に表示される主なアイコンや情報について説明します。 再生/停止 曲名 電源供給の状態(USB /電池 ) 再生経過時間 曲の長さ 再生する曲のサンプリング周波数 出力レベル ピーク 現在時刻 再生/停止の状態(PLAY / STOP) リバーブの状態(ON / OFF) 再生速度(ON / OFF) リピートの状態(ON / OFF) 録音 曲名 電源供給の状態(USB /電池 ) 録音経過時間 メモリー・カードの録音可能残り時間 録音するときのサンプリング周波数 入力レベル ピーク 現在時刻 録音/録音待機の状態(REC / STANDBY) リミッター/...
- Page 24 準備する 扱いに注意してください。 1. 電源を入れる/電源を切る 3. 電池をセットします。 +/−極を間違えないようにして、電池(単 3 形)2 本を電池 使用できる電池の種類 ケースに入れます。 • アルカリ電池(単 3 形) • 充電式ニッケル水素電池(単 3 形) ご注意 ! − R-07 本体で充電式ニッケル水素電池を充電することは − できません。お使いの充電式ニッケル水素電池専用の充 電器を用意してください。 4. 電池ケースの蓋を閉めます。 1. 電源がオフになっていることを確認します。 5. [ POWER]スイッチを POWER 側に数秒間スライド 電源がオンになっている場合は、オフにします。R-07 の させて、電源をオンにします。 [POWER]スイッチを POWER 側にスライドさせると、電源 のオン/オフを切り替えられます。...
- Page 25 準備する R-07 を電池でお使いになるときの注意 電池残量表示 • 電池容量が少なくなると、ディスプレイの右上に電池残量不足 • 電池の使いかたを間違えると、破裂したり、液漏れしたりする のアイコン が表示されます。早めに新しい電池と交換し 恐れがあります。 「安全上のご注意」 「使用上のご注意」 ( 「安全 てください。 上のご注意」チラシ)に記載の電池に関する注意事項を守って 電池容量が少ないまま使い続けると、 「バッテリーが低下して 正しくお使いください。 います」と表示され、 最終的に R-07 のすべての機能が停止しま • 新しい電池と一度使用した電池や違う種類の電池を混ぜて使用 す。 しないでください。 電池寿命(アルカリ電池使用時) • 長時間使用しないときは、電池の液漏れ防止などのためにも本 体から電池を抜いておくことをおすすめします。 連続再生時 約 15 時間 • 液漏れを起こした場合は、柔らかい布で電池ケースについた液 連続録音時 約 15 時間 をよくふきとってから新しい電池を入れてください。また、漏...
- Page 26 準備する 3. 日付と時刻を設定する 4. ヘッ ドホンを使う 初めて電源を入れたときは、次の手順で内蔵時計を設定してく R-07 にはスピーカーが内蔵されています。そのままでも再生音 ださい。ここで設定した日時は、録音したファイルの情報(タ を聞くことができますが、ヘッドホンを接続して聞くこともで イム・スタンプ)として利用されます。 きます。また、 Bluetooth ヘッドホンと R-07 を接続して、 無線 で再生音を聞くこともできます。 1. [ MENU]を押して「メニュー」画面を表示させ、 ※ 他の機器と接続するときは、誤動作や故障を防ぐため、必ずす [ ]/[ ]で「時計」を選んで、 [ ]を押します。 べての機器の音量を絞り、すべての機器の電源を切ってくださ ご注意 ! い。 • 内蔵時計は電池から電力を供給されて動作します。電池が抜 Bluetooth ヘッ ドホンと接続する かれた状態が数時間続くと内蔵時計の設定は元に戻ってしま います(初期状態) 。この初期状態で電源をオンにすると「日 付/時刻を設定してください」のメッセージが表示されます。...
- Page 27 準備する 3. [ ]/[ ]で「音声機器登録」を選び、 [ ]を押 します。 4. [ ] / [ ] で 「Yes」 を選び、 [ ]を押します。 「ペアリング中 ...」と表示され、本機 は Bluetooth 機器からの応答を待ち ます。 ペアリングが成功すると「完了しました」と表示されて、 Bluetooth 機器から音を出力できます。 ペアリング済みの Bluetooth 機器を接続する 1. [ MENU]を押して「メニュー」画面を表示させ、 ] / [ ] で 「Bluetooth」 を選び、 [ ] を押します。 [...
- Page 28 録音する 1. 目的に合わせた設定を読み出す R-07 には、録音目的に合わせた設定が用意されています。この設定を「シーン」と呼びます。 1. [ SCENE]を押して「シーン」画面を表示させ、 [ ]/[ ]でシーンを変更します。 シーン 説明 サンプルレート 録音モード リミッター ローカット 入力レベル 手動で設定するときに選びます。 大音量でないバンド演奏や、アコー 音楽 HiRes スティック楽器の演奏に適した高 96kHz WAV-24bit 音質の設定です。 音楽 CD CD 品質の設定です。 44.1kHz WAV-16bit MP3- 音楽長時間 長時間録音用の設定です。 44.1kHz 192kbps ライブハウスなどでの大音量の演 大音量ライブ 44.1kHz WAV-16bit 奏に適した設定です。...
- Page 29 録音する シーンを選んだあとでも、 サンプルレート、 録音モード、 リミッ 2xWAV-16bit、2xWAV-24bit、 ター、ローカットと入力レベルの値は変更できます。変更した WAV+MP3、MP3-64kbps、MP3- 設定を保存することもできます。 96kbps、MP3-128kbps、MP3- 録音モード 変更した設定の保存のしかたや、リミッターやローカットにつ 160kbps、MP3-192kbps、MP3- いて詳しくは、リファレンス・ガイド(PDF)をご覧ください。 224kbps、MP3-320kbps、WAV- 16bit(初期値) 、WAV-24bit 2. 録音の音質を設定する ※ 2xWAV-16bit、2xWAV-24bit、MP3 と WAV+MP3 は、サ ンプルレートが 44.1kHz、48.0kHz のときしか選べません。 録音する音質を設定することができます。 ※ WAV+MP3 は、 WAV-16bit、 MP3-128kbps 固定になります。 音質設定はサンプリング周波数と録音モードの組み合わせで設 定します。音質によってファイルのサイズが異なり、microSD 3. [ SCENE]を押して、基本画面に戻ります。 カードに録音できる時間も異なります。...
- Page 30 録音する ておくと、ボタンが誤って押されても録音が止まったり入力 マニュアル、 30 秒、 1 分 (初期値) 、 3 分、 リハーサル時間 レベルが変わったりしません。 5 分 ご注意 ! 3. [ MENU]を 2 回押して、基本画面に戻ります。 • 外部スピーカーを接続したまま録 音すると、ハウリングを起こすこと 4. 録りたい音源にマイクを向け があります。 「録音モニタ」を OFF て、 [REHEARSAL]ボタンを押 にすると、ハウリングを起こさな します。 いようにすることができます。 設定したリハーサル時間内の最大の • MIC/AUX IN 端子にマイクや機器を接続している場合は、内 音量に合わせて、入力レベルが自動的に設定されます。また、 蔵マイクは使用できません。内蔵マイクを使用する場合には、...
- Page 31 再生する/録音データを活用する R-07で再生する パソコンで活用する 市販の USB ケーブルでパソコンと接続し、録音したファイル 1. 基本画面を表示させます。 をパソコンに転送します。 2. [ ]/[ ]で、再生したいファイルを選びます。 ※ パソコンへのファイルの転送方法については、リファレンス・ メモ ガイド(PDF)をご覧ください。 ディスプレイに「No Song」と表示されている場合は、現在 録音したファイルをパソコン上の音楽制作用の DAW やビデ オ編集ソフトなどで利用することもできます。取り込み可能な のフォルダ内に R-07 で再生できるファイルがないことを意味 します。 フォーマットや、取り込み方はお使いのソフトウェアの取扱説 明書などをご覧ください。 「No Card」と表示されている場合は、 microSD カードがセッ トされていないことを意味します。 オーディオCDを作成する 3. [ ]を押して、ファイルを再生します。 ローランド CD-2 シリーズのようなオーディオ CD を作成す REC /...
- Page 32 モバイル機器から R-07 を遠隔操作できるようになります。 ※ iOS と Android に対応したアプリです。 1. モバイル機器の Bluetooth 機能をオンにします。 1. アプリ 「R-07 Remote」 をインス トー ルする 1. モバイル機器の web ブラウザーから、以下の URL に アクセスします。 メモ http://roland.cm/r-07 表示されたページから、お使いのモバイル機器に合ったアプリ 操作説明は iPhone を使った場合の一例です。詳しくは、モ をインストールしてください。 バイル機器の取扱説明書をご覧ください。 ※ モバイル機器の Bluetooth 設定に表示された「R-07」をタップ 2. R-07を設定する しないでください。...
- Page 33 Bedienungsanleitung...
- Page 34 Lesen Sie vor Inbetriebnahme des Geräts die Hinweise in diesem Informationsblatt. Copyright © 2017 ROLAND CORPORATION * Dieses Dokument beschreibt die technischen Daten des Produkts bei Veröffentlichung dieses Dokuments. Ggf. aktualisierte Informationen zu diesem Produkt finden Sie auf der Roland- Internetseite.
- Page 35 Beschreibung der Bedienoberfläche Integrierte Mikrofone Remote-Anzeige Dieses ist ein Stereo-Mikrofon. Bedienvorgang Status leuchtet Aufnahme blinkt (langsam) Aufnahmebereitschaft Display Übersteuerung des blinkt (schnell) Eingangs Hier werden verschiedene Informationen für den R-07 angezeigt. [REHEARSAL]-Taster PEAK-Anzeige stellt automatisch den richtigen leuchtet, wenn das Eingangssignal Aufnahmepegel ein.
- Page 36 Beschreibung der Bedienoberfläche ]-Taster ]-Taster Drücken dieses Tasters startet das Playback Drücken Sie diesen Taster, um die nachfolgende bzw. unterbricht das Playback oder die Datei auszuwählen. Wenn eine WAV-Datei Aufnahme. ausgewählt ist, die eine Markierung besitzt, wird durch Drücken dieses Tasters die nachfolgende Mit diesem Taster wird auch der Cursor im Marker-Position angewählt.
- Page 37 Beschreibung der Bedienoberfl äche MIC/AUX IN-Buchse zum Anschluss eines externen Mikrofons, Audiogeräts oder elektronischen Musikinstruments. [POWER]-Schalter USB-Anschluss Wenn Sie diesen Schalter in Richtung Verwenden Sie ein handelsübliches USB-Kabel für PHONES-Buchse POWER ziehen, wird das Gerät die Verbindung zu einem Rechner. Damit können zum Anschluss eines Kopfhörers (S.
- Page 38 Beschreibung der Bedienoberfläche microSD Kartenschacht Stecken Sie die microSD-Karte in diesen Kartenschacht. Ab Werk ist im R-07 eine microSD-Karte eingesteckt. Dreibein-Gewinde Mithilfe dieses Gewindes können Integrierter Lautsprecher Sie den R-07 an ein handelsübliches Dieses sind die internen Lautsprecher Dreibein-Stativ für Kameras befestigen. des R-07.
-
Page 39: Off
Beschreibung der Bedienoberfläche Haupt-Display Im Display werden die folgenden Symbole und Informationen angezeigt. Playback/Aufnahme Songname Stromversorgungs-Status (USB /´Batterien abgelaufene Spielzeit Songlänge Sampling Rate des spielenden Songs Ausgabe- Übersteuerungs-Anzeige Lautstärke aktuelle Zeitposition Play/Stop-Status (PLAY/STOP) Reverb-Status (ON /OFF) Wiederhol-Status (ON /OFF) Abspiel-Geschwindigkeit (ON /OFF) Aufnahme Song-Name... - Page 40 Vorbereitungen 3. Setzen Sie die Batterien ein. 1. Ein- und Ausschalten Setzen Sie zwei AA-Batterien in das Fach und achten Sie dabei auf die korrekte Ausrichtung (Polarität). Batterien, die verwendet werden können • Alkaline-Batterien (AA, LR6) • wieder aufladbare Ni-MH-Batterie (AA, HR6) WICHTIG Der R-07 kann wieder aufladbare Ni-MH Batterien nicht selber aufladen.
- Page 41 Vorbereitungen Anzeige für die Batteriespannung Verwendung des R-07 mit Batteriebetrieb • Wenn die Spannung der Batterien nachlässt, erscheint ein • Die unsachgemäße Behandlung von Batterien kann dazu führen, entsprechendes Symbol oben rechts im Display. Tauschen dass diese explodieren oder auslaufen. Beachten Sie daher immer Sie in diesem Fall die alten gegen neue Batterien aus.
- Page 42 Vorbereitungen 3. Einstellen von Datum und Uhrzeit 4. Verwendung eines Kopfhörers Wenn Sie das Gerät das erste Mal einschalten, müssen Sie die Der R-07 besitzt einen eingebauten Lautsprecher und einen interne Uhr wie nachfolgend beschrieben einstellen. Das Datum Kopfhöreranschluss. Sie können auch einen Drahtlos-Kopfhörer über und die Uhrzeit werden als Zeitstempel für die aufgenommenen Bluetooth verwenden und den Sound des R-07 kabellos abhören.
- Page 43 Vorbereitungen 3. Wählen Sie mit [ ]/[ ] „Pairing Audio” und drücken Sie [ ]. 4. Wählen Sie mit [ ] „Yes” und drücken Sie [ ]. Im Display erscheint „Pairing...“ und das Gerät wartet auf eine Reaktion des externen Bluetooth-Geräts. Nach erfolgreicher Kopplung erscheint im Display „Completed”...
-
Page 44: Off
Die Aufnahme 1. Abrufen von Voreinstellungen für eine Aufnahme Der R-07 besitzt verschiedene Voreinstellungen, aus denen Sie je nach Aufnahmesituation auswählen können. Diese Voreinstellungen werden als „Scenes“ bezeichnet. 1. Drücken Sie [SCENE], um das „Scene”-Display auszurufen und wählen Sie mit [ ] die gewünschte Scene- Einstellung aus. - Page 45 Die Aufnahme * Wenn als Sample Rate 44.1 kHz oder 48.0 kHz eingestellt ist, kann 2. Bestimmen der Aufnahmequalität nur eine der Einstellungen 2xWAV-16 bit, 2xWAV-24 bit, MP3 oder WAV+MP3 ausgewählt werden. Sie können bestimmen, mit welcher Audioqualität die Aufnahme * Wenn Sie WAV+MP3 auswählen, ist der REC Mode „WAV-16 bit und durchgeführt werden soll.
- Page 46 Die Aufnahme 4. Richten Sie das Mikrofon auf die WICHTIG Aufnahmequelle und drücken • Wenn das Gerät mit einem externen Sie [REHEARSAL]. Lautsprecher verbunden ist, können Rückkopplungen entstehen. Setzen Der Aufnahmepegel wird auf Sie in diesem Fall den Parameter „Rec Grundlage des am lautesten erkannten Monitor Sw”...
- Page 47 Sie können die mit dem R-07 erstellen Aufnahmen mithilfe eines Die REC/PLAY-Anzeige leuchtet grün. Audiogeräts, das CDs brennen kann (z.B. die Roland CD-2 Serie) auf einer Audio-CD speichern. Weitere Informationen über die CD-2 Während des Playback können Sie durch Halten von [ ] die Serie finden Sie auf der Roland-Website.
- Page 48 Mobilgerät ein. 1. Installieren der App „R-07 Remote” 1. Wählen Sie mit dem auf dem Mobilgerät installierten Webbrowser die folgende Internetseite aus. http://roland.cm/r-07 Installieren Sie die zum verwendeten Mobilgerät passende app. 2. Einstellungen für den R-07 HINWEIS Als Beispiel wird hier ein iPhone verwendet. Weitere Informationen 1.
- Page 49 Mode d’emploi...
- Page 50 Copyright © 2017 ROLAND CORPORATION * Ce document décrit les caractéristiques techniques de ce produit à la date de publication du document. Pour les informations les plus récentes, consultez le site Web de Roland.
- Page 51 Description de l’appareil Microphones intégrés Témoin de télécommande Un microphone stéréo est intégré sur Opération État l’appareil. Éteint Enregistrement en cours Clignote Enregistrement en Écran (lentement) attente Cet écran affiche différents types Clignote Surcharge en entrée d’informations sur le R-07. (rapidement) Témoin PEAK Bouton [REHEARSAL]...
- Page 52 Description de l’appareil Bouton [ Bouton [ Appuyez sur ce bouton pour démarrer la Appuyez sur ce bouton pour sélectionner le fichier suivant. Pour un fichier WAV lecture ou pour interrompre la lecture ou contenant des repères, ce bouton permet l’enregistrement.
- Page 53 Description de l’appareil Prise MIC/AUX IN Utilisez-la si vous souhaitez connecter un microphone externe, un dispositif audio ou un instrument de musique électronique. Commutateur [POWER] Port USB Faites glisser ce commutateur vers la Utilisez un câble USB disponible dans Prise PHONES le commerce pour le raccorder à...
- Page 54 Description de l’appareil Fente de carte microSD Insérez la carte microSD dans cette fente. À la sortie d’usine, une carte microSD est insérée dans le R-07. Support de montage du trépied Ce support permet de fixer le R-07 à un Haut-parleur intégré...
- Page 55 Description de l’appareil Page principale Cette section décrit les principales icônes et informations affichées dans la page principale. En cours de lecture / À l’arrêt Nom du morceau Alimentation électrique (USB /piles Temps de lecture écoulé Durée du morceau Fréquence d’échantillonnage du morceau lu Niveau de sortie Crête Fonction de lecture/...
- Page 56 Mise en route 3. Insérez les piles. 1. Mise sous tension/hors tension Insérez deux piles AA dans le compartiment, en vous assurant que la polarité (orientation +/–) est correcte. Types de piles compatibles • Pile alcaline (AA, LR6) • Pile Ni-MH rechargeable (AA, HR6) REMARQUE Le R-07 ne peut pas recharger les piles Ni-MH.
- Page 57 Mise en route Indicateur de niveau de charge restant des piles Remarque concernant l’utilisation du R-07 avec des piles • Lorsque les piles faiblissent, une icône de niveau de charge faible • Si vous ne manipulez pas correctement les piles, il peut se produire une apparaît en haut à...
- Page 58 Mise en route 3. Réglage de l’heure et de la date 4. Utilisation d’un casque Le R-07 est équipé d’un haut-parleur intégré. Vous pouvez écouter Après la première mise sous tension de l’appareil, vous devrez régler la lecture via ce haut-parleur, ou vous pouvez connecter un casque l’horloge interne comme suit.
- Page 59 Mise en route 4. Utilisez [ ] pour choisir « Yes » puis appuyez sur [ ]. Le message « Pairing... » (Association en cours) s’affiche à l’écran, et l’appareil attend une réponse de l’appareil Bluetooth. Une fois l’association terminée, l’écran indique « Completed » (Terminé) et le son peut être envoyé depuis l’appareil Bluetooth. Connexion d’un appareil Bluetooth déjà...
-
Page 60: 100Hz
Enregistrement 1. Rappel de réglages à des fins spécifiques Le R-07 fournit des réglages adaptés à divers cas d’enregistrement. Ces réglages sont appelés des « scenes ». 1. Appuyez sur [SCENE] pour accéder à l’écran « Scene » et utilisez [ ] pour modifier le réglage Scene. Scene Description Sample Rate Rec Mode... - Page 61 Enregistrement * Vous ne pouvez sélectionner 2xWAV-16 bit, 2xWAV-24 bit, MP3 et 2. Spécification de la qualité d’ e nregistrement WAV+MP3 que si Sample Rate est défini sur 44.1 kHz ou 48.0 kHz. * Si vous sélectionnez WAV+MP3, le réglage est fixé à WAV-16 bit et Vous pouvez spécifier la qualité...
- Page 62 Enregistrement 4. Orientez le micro vers la source REMARQUE que vous voulez enregistrer, puis • Un effet Larsen acoustique peut se appuyez sur [REHEARSAL]. produire si vous enregistrez alors qu’un haut-parleur externe est Le niveau d’enregistrement est réglé connecté. Tournez « Rec Monitor automatiquement en fonction du Sw »...
- Page 63 [ ] pour effectuer une la gamme Roland CD-2, vous pouvez créer un CD audio à partir avance rapide. La lecture normale reprend lorsque vous relâchez des fichiers enregistrés sur le R-07. Pour plus d’informations sur la le bouton.
- Page 64 * L’application prend en charge iOS et Android. 1. Installation de l’application « R-07 Remote » 1. Depuis le navigateur Web de votre appareil mobile, accédez à l’URL suivante. http://roland.cm/r-07 Depuis la page qui s’affiche, installez l’application correspondant à MÉMO votre appareil mobile.
- Page 65 Manuale dell’Utente...
- Page 66 Dopo la lettura, tenete il documento(i) a portata di mano per future consultazioni. Copyright © 2017 ROLAND CORPORATION * Questo documento illustra le specifiche del prodotto nel momento in cui il documento è stato redatto. Per le informazioni più recenti, fate riferimento al sito Web Roland.
- Page 67 Descrizione del pannello Microfoni incorporati Indicatore Remote Questo è un microfono stereo incorporato Operazione Stato nell’unità. Acceso Registrazione Lampeggio Standby- Display (lento) registrazione Questo mostra vari tipi di informazioni Lampeggio (rapido) Sovraccarico in ingresso per l’R-07. Tasto [REHEARSAL] Indicatore PEAK Questo tasto imposta automaticamente il Questo si illumina quando il volume in livello di registrazione corretto.
- Page 68 Descrizione del pannello Tasto [ Tasto [ Premete questo tasto per avviare la Premete questo tasto per selezionare riproduzione, o per porre in pausa la il file successivo. In un file WAV che riproduzione o la registrazione. contiene marcatori, questo tasto avanza al marcatore successivo.
- Page 69 Descrizione del pannello Presa MIC/AUX IN Usatela se volete collegare un microfono esterno, un dispositivo audio o uno strumento musicale elettronico. Interruttore [POWER] Porta USB Fate scorrere questo interruttore verso Usate un cavo USB disponibile in Presa PHONES POWER per accendere e spegnere (p. commercio per collegarla al computer.
- Page 70 Descrizione del pannello Slot card microSD Inserite la card microSD in questo slot. Quando l’R-07 lascia la fabbrica, una card microSD è già inserita. Foro montaggio treppiede Vi permette di montare l’R-07 su un Diffusore incorporato treppiede per fotocamera disponibile in Questo è...
- Page 71 Descrizione del pannello Schermata principale Qui spieghiamo le icone principali e le informazioni che appaiono nella schermata principale. Riproduzione / Arresto Nome del brano Stato alimentazione (USB /batterie Tempo di riproduzione trascorso Durata del brano Frequenza di campionamento del brano riprodotto Picco Livello di uscita Stato di riproduzione/arresto...
- Page 72 Preparazione 3. Installate le batterie. 1. Accensione e spegnimento Installate due batterie AA nello scomparto, accertandovi che la polarità (orientamento +/–) sia corretta. Tipi di batterie utilizzabili • Batterie alcaline (AA, LR6) • Batterie Ni-MH ricaricabili (AA, HR6) NOTA L’R-07 non è in grado di ricaricare le batterie Ni-MH. Dovete usare un carica-batteria progettato per batterie ricaricabili Ni-MH.
- Page 73 Preparazione Indicazione della carica restante della batteria Note utilizzando l’R-07 a batterie • Quando la carica restante nella batteria si sta esaurendo, appare • Se le batterie vengono usate in modo improprio, possono esplodere un’icona nella parte superiore destra del display che indica o perdere liquidi.
- Page 74 Preparazione 3. Impostare data e ora 4. Usare le cuffie Dopo aver acceso l’unità per la prima volta, dovete impostare L’ R-07 ha un diffusore incorporato. Potete ascoltare la riproduzione l’orologio interno come segue. La data e l’ora che specificate tramite questo diffusore, o potete collegare delle cuffie per l’ascolto.
- Page 75 Preparazione 3. Usate [ ]/[ ] per selezionare “Pairing Audio” e premete [ ]. 4. Usate [ ] per scegliere “Yes,” e poi premete [ ]. Il display indica “Pairing... ” , e questa unità attende una risposta dal dispositivo Bluetooth. Quando l’abbinamento si conclude, il display indica “Completed.
- Page 76 Registrazione 1. Richiamare impostazioni per scopi specifici L’R-07 offre impostazioni che sono adatte a varie situazioni di registrazione, chiamate “scene. ” 1. Premete [SCENE] per accedere alla schermata “Scene”, e usate [ ] per cambiare l’impostazione Scene. Scena Spiegazione Sample Rate Rec Mode Limiter Low Cut Input Level...
- Page 77 Registrazione * 2xWAV-16 bit, 2xWAV-24 bit, MP3 e WAV+MP3 possono essere 2. Specificare la qualità di registrazione selezionati solamente se Sample Rate è 44.1 kHz o 48.0 kHz. * Se selezionate WAV+MP3, l’impostazione è fissa su WAV-16 bit e Potete specificare la qualità audio con cui avviene la registrazione. MP3-128 kbps.
- Page 78 Registrazione 4. Puntate il microfono verso la NOTA sorgente che volete registrare, e • Potrebbe generarsi del feedback premete [REHEARSAL]. acustico quando registrate mentre è collegato un microfono esterno. Il livello di registrazione viene Impostando “Rec Monitor Sw” su OFF impostato automaticamente secondo si previene il feedback acustico.
- Page 79 Utilizzando un dispositivo in grado di creare CD audio, come il Durante la riproduzione, potete tenere premuto [ ] per Roland CD-2, potete creare un CD audio dai file che sono stati riavvolgere, o [ ] per avanzare velocemente. La riproduzione registrati sull’R-07.
- Page 80 * La app supporta iOS e Android. 1. Installare la App “R-07 Remote” 1. Dal browser web del vostro dispositivo mobile, accedete al seguente URL. http://roland.cm/r-07 Dalla pagina che appare, installate la app appropriata per il vostro MEMO dispositivo mobile.
- Page 81 Manual del usuario...
- Page 82 Copyright © 2017 ROLAND CORPORATION * Este documento recoge las especificaciones del producto en el momento de la publicación del documento. Para obtener la información más reciente, visite el sitio web de Roland.
- Page 83 Descripción de los paneles Micrófonos integrados Indicador remoto Se trata de micrófonos estéreo integrados Operación Estado en la unidad. Iluminado Grabando Parpadeo Grabación en espera Pantalla (lento) Muestra los distintos tipos de información Parpadeo Sobrecarga de entrada para la R-07. (rápido) Indicador PEAK Botón [REHEARSAL]...
- Page 84 Descripción de los paneles Botón [ Botón [ Pulse este botón para iniciar la Pulse este botón para seleccionar el reproducción o para hacer una pausa en la archivo siguiente. En un archivo WAV que reproducción o en la grabación. ya tiene un marcador, este botón avanza al siguiente marcador.
- Page 85 Descripción de los paneles Conector MIC/AUX IN Sirve para conectar un micrófono externo, un dispositivo de audio o un instrumento musical electrónico. Interruptor [POWER] Puerto USB Deslice este interruptor hacia la posición Utilice un cable USB de venta en comercios Conector PHONES POWER para apagar o encender la para conectar la unidad a su ordenador.
- Page 86 Descripción de los paneles Ranura para tarjetas microSD Inserte la tarjeta microSD en esta ranura. La R-07 lleva insertada una tarjeta microSD cuando se entrega de fábrica. Rosca de montaje para trípode Esta rosca sirve para acoplar la R-07 a Altavoz integrado un trípode para cámaras de venta en Es el altavoz interno de la R-07.
- Page 87 Descripción de los paneles Pantalla principal Aquí se explican los iconos principales y la información que se muestra en la pantalla principal. Reproducción en curso/detenida Nombre de la canción Fuente de alimentación y su estado (USB /pilas Tiempo de reproducción transcurrido Duración de la canción Frecuencia de muestreo de la canción que...
- Page 88 Preparativos 3. Coloque las pilas. 1. Encendido y apagado de la unidad Coloque dos pilas AA en el compartimento asegurándose de que la polaridad (orientación de los polos +/–) es correcta. Tipos de pilas que se pueden usar • Pilas alcalinas (AA, LR6) •...
- Page 89 Preparativos Indicación de carga restante de las pilas Precauciones al utilizar R-07 con pilas • Cuando las pilas se están agotando, en la esquina superior derecha • La incorrecta manipulación de las pilas presenta un riesgo de de la pantalla aparece el icono para indicar que las pilas explosión y fugas de líquido.
- Page 90 Preparativos 3. Ajuste de fecha y hora 4. Uso de los auriculares La primera vez que encienda la unidad, tendrá que ajustar su reloj La R-07 tiene un altavoz integrado. Puede escuchar la reproducción interno tal y como se explica a continuación. La fecha y la hora por este altavoz o puede conectar unos auriculares y escucharla a que especifique aquí...
- Page 91 Preparativos 4. Use [ ] para seleccionar “Yes” y, a continuación, pulse [ ]. La pantalla muestra el mensaje “Pairing... ” y la unidad espera la respuesta del dispositivo Bluetooth. Si la sincronización se ha realizado correctamente, la pantalla muestra el mensaje “Completed. ” y el sonido se puede emitir ahora por el dispositivo Bluetooth.
- Page 92 Grabación 1. Recuperación de ajustes para fines específicos La R-07 proporciona ajustes que son adecuados para diversas situaciones de grabación. Estos ajustes se denominan “escenarios”. 1. Pulse [SCENE] para acceder a la pantalla “Scene” y use [ ] para cambiar el ajuste Scene. Sample rate Rec mode Input level...
- Page 93 Grabación * 2x WAV de 16 bits, 2x WAV de 24 bits, MP3 y WAV+MP3 solo se 2. Especificación de la calidad de grabación pueden seleccionar si la frecuencia de muestreo (Sample Rate) se ha definido como 44,1 kHz o 48,0 kHz. Puede especificar la calidad de audio con la que desea realizar la * Si selecciona WAV+MP3, el ajuste se fija como WAV de 16 bits y MP3 grabación.
- Page 94 Grabación 4. Oriente el micrófono hacia la NOTA fuente que desea grabar y pulse • Podría producirse un retorno acústico [REHEARSAL]. si graba con un altavoz externo conectado. Si define “Rec Monitor Sw” El nivel de grabación se ajustará como OFF se evita un posible retorno automáticamente en función del acústico.
- Page 95 Durante la reproducción, mantenga pulsado [ ] para retroceder por ejemplo la serie CD-2 de Roland, puede crear un CD de audio ] para avanzar rápido. La reproducción normal se reanudará con los archivos que haya grabado en la R-07. Para obtener más cuando suelte el botón.
- Page 96 * La aplicación admite sistemas iOS y Android. 1. Instalación de la aplicación “R-07 Remote” 1. Desde el navegador web de su dispositivo móvil, acceda a la siguiente URL. http://roland.cm/r-07 Desde la página que aparece, instale la aplicación correspondiente RECUERDE para su dispositivo móvil.
- Page 97 Manual do proprietário...
- Page 98 Copyright © 2017 ROLAND CORPORATION * Este documento explica as especificações do produto no momento em que o documento foi emitido. Para obter as informações mais recentes, consulte o site da Roland.
- Page 99 Descrições do painel Microfones integrados Indicador remoto Este microfone estéreo está integrado ao Operação Status equipamento. Aceso Gravando Piscando (lento) Espera da gravação Tela Piscando Sobrecarga de entrada Mostra diversas informações do R-07. (rápido) Botão [REHEARSAL] Indicador PEAK Esse botão define automaticamente o nível Ele acenderá...
- Page 100 Descrições do painel Botão [ Botão [ Pressione esse botão para iniciar a Pressione esse botão para selecionar o reprodução ou dar pausa na reprodução próximo arquivo. Em um arquivo WAV ou gravação. que contém marcas, esse botão avança para a próxima marca. Manter esse botão Esse botão também move o cursor para pressionado permite avançar no arquivo.
- Page 101 Descrições do painel Conector MIC/AUX IN Use-o se quiser conectar um microfone externo, dispositivo de áudio ou instrumento musical eletrônico. Chave [POWER] Porta USB Deslize essa chave na direção POWER para Use um cabo USB comercialmente Plugue PHONES disponível para conectar o gravador ao seu ligar/desligar o gravador (p. 8).
- Page 102 Descrições do painel microSD slot do cartão Insira o cartão microSD neste slot. Quando o R-07 sai da fábrica, um cartão microSD é inserido. Soquete de montagem do tripé Este soquete permite conectar o R-07 a um Alto-falante integrado tripé de câmera opcional, vendido à parte. Esse é...
- Page 103 Descrições do painel Tela principal A seguir, explicaremos os principais ícones e as informações mostradas na tela principal. Durante a reprodução / Parado Nome da música Status da fonte de alimentação (USB /pilhas Tempo de reprodução decorrido Duração da música Taxa de amostra da música reproduzida Nível de saída Pico...
- Page 104 Preparação 3. Instale as pilhas. 1. Ligar/desligar o equipamento Instale duas pilhas AA no compartimento, certificando-se de que a polaridade (orientação +/–) está correta. Tipos de pilhas que podem ser usadas • Pilha alcalina (AA, LR6) • Pilha de Ni-MH recarregável (AA, HR6) OBSERVAÇÃO O R-07 não recarrega pilhas Ni-MH.
- Page 105 Preparação Indicação de bateria restante Observe os itens a seguir quando utilizar o R-07 com pilhas • Quando a bateria estiver fraca, um ícone de bateria fraca • Se manipular as pilhas de maneira incorreta, haverá o risco de será exibido na parte superior direita da tela. Quando isso ocorrer, explosão e vazamento de fluido.
- Page 106 Preparação 3. Configuração da data e hora 4. Uso de fones de ouvido Após ligar o gravador pela primeira vez, você deverá configurar o O R-07 tem um alto-falante integrado. Você pode ouvir a reprodução através desse alto-falante ou conectar fones de ouvido relógio interno da seguinte maneira.
- Page 107 Preparação 4. Use [ ] para selecionar “Yes” e então pressione [ ]. A tela indica “Pairing... ” e este equipamento aguarda uma resposta do dispositivo Bluetooth. Quando o pareamento for bem-sucedido, a tela mostrará “Completed. ” e o som poderá ser enviado a partir do dispositivo Bluetooth.
- Page 108 Gravação 1. Recuperação de configurações para fins específicos O R-07 fornece configurações adequadas para várias situações de gravação. Essas configurações são chamadas “cenas”. 1. Pressione [SCENE] para acessar a tela “Scene” e use [ ] para alterar a configuração Scene. Cena Explicação Sample Rate Rec Mode...
- Page 109 Gravação * 2xWAV-16 bit, 2xWAV-24 bit, MP3 e WAV+MP3 podem ser 2. Especificação da qualidade da gravação selecionados apenas se Sample Rate for 44.1 kHz ou 48.0 kHz. * Se você selecionar WAV+MP3, a configuração será definida em Você pode especificar a qualidade do áudio da gravação. WAV-16 bit e MP3-128 kbps.
- Page 110 Gravação 4. Aponte o microfone na direção OBSERVAÇÃO da fonte de áudio que desejar • Pode ocorrer microfonia se você gravar e pressione [REHEARSAL]. gravar enquanto um alto-falante externo estiver conectado. Configurar O nível da gravação será configurado “Rec Monitor Sw” como “OFF” evita a automaticamente, conforme o volume microfonia.
- Page 111 Ao usar um dispositivo capaz de criar CDs de áudio, como a série voltar ou [ ] para avançar. A reprodução normal será retomada Roland CD-2, você pode criar um CD de áudio dos arquivos que quando você soltar o botão. foram gravados no R-07. Para obter mais informações sobre a série OBSERVAÇÃO...
- Page 112 1. Ative a função Bluetooth do dispositivo móvel. 1. Instalação do aplicativo “R-07 Remote” 1. A partir do navegador web do seu dispositivo móvel, acesse a seguinte URL. http://roland.cm/r-07 Na página exibida, instale o aplicativo que é apropriado ao seu dispositivo móvel. LEMBRETE A explicação aqui usa o iPhone com exemplo.
- Page 113 Handleiding...
- Page 114 Bewaar de documenten na het lezen op een plaats waar u ze onmiddellijk kunt raadplegen. Copyright © 2017 ROLAND CORPORATION * Dit document geeft uitleg over de specificaties van het product op het ogenblik dat het document werd uitgegeven. Raadpleeg de website van Roland voor de laatste informatie.
- Page 115 Paneelbeschrijvingen Ingebouwde microfoons Indicator afstandsbediening Er is een stereomicrofoon in het apparaat Bediening Status ingebouwd. Opgelicht Opnemen Knipperend Opname-stand-by Display (langzaam) Dit geeft de verschillende typen informatie Knipperend (snel) Overbelasting ingang voor de R-07 weer. [REHEARSAL]-knop PEAK-lampje Met deze knop wordt automatisch het Dit lampje brandt als het ingangsvolume juiste opnameniveau ingesteld.
- Page 116 Paneelbeschrijvingen ]-knop ]-knop Druk op deze knop om het afspelen te Druk op deze knop om het volgende starten of om het afspelen of opnemen te bestand te selecteren. Voor een WAV-bestand dat markeringen bevat, gaat pauzeren. deze knop naar de volgende markering. Met deze knop kunt u ook de cursor Als u deze knop ingedrukt houdt, kunt u naar boven op het scherm verplaatsen...
- Page 117 Paneelbeschrijvingen MIC/AUX IN-aansluiting Gebruik dit als u verbinding wilt maken met een externe microfoon, audioapparaat of elektronisch muziekinstrument. [POWER]-schakelaar USB-poort Schuif deze schakelaar naar POWER om het Gebruik een in de handel verkrijgbare PHONES-aansluiting USB-kabel om deze op uw computer aan apparaat in of uit te schakelen (p. 8).
- Page 118 Paneelbeschrijvingen microSD kaartsleuf Plaats de microSD-kaart in deze sleuf. Als de R-07 uit de fabriek wordt verzonden, is een microSD-kaart geplaatst. Bevestigingsstuk voor statief Met dit bevestigingsstuk kunt u de Ingebouwde luidspreker R-07 op een in de handel verkrijgbaar Dit is de interne luidspreker van de R-07. camerastatief bevestigen.
- Page 119 Paneelbeschrijvingen Hoofdscherm In dit gedeelte worden de belangrijkste pictogrammen en informatie uitgelegd die op het hoofdscherm worden weergegeven. Afspelen / Gestopt Titel nummer Status van stroomvoorziening (USB /batterijen Verlopen afspeeltijd Lengte nummer Samplefrequentie van het afgespeelde nummer Uitgangsniveau Piek Huidige tijd Afspeel/stop-status (PLAY/STOP) Galmstatus (ON /OFF)
- Page 120 Voorbereiding 3. Plaats de batterijen. 1. Het apparaat in-/uitschakelen Plaats twee AA-batterijen in de houder. Zorg ervoor dat de polariteit (+/-) correct is. Typen batterijen die kunnen worden gebruikt • Alkalinebatterij (AA, LR6) • Oplaadbare Ni-MH-batterij (AA, HR6) LET OP De R-07 kan geen Ni-MH-batterijen opladen.
- Page 121 Voorbereiding Weergave van resterend batterijvermogen Opgelet wanneer u de R-07 gebruikt met batterijen • Wanneer de batterijspanning laag is, verschijnt een pictogram • Als u batterijen niet correct gebruikt, loopt u het risico op met een batterij met lage spanning bovenaan rechts op ontploffing en lekkage van vloeistof.
- Page 122 Voorbereiding 3. De datum en tijd instellen 4. De hoofdtelefoon gebruiken Als u het apparaat voor de eerste keer inschakelt, stelt u de interne De R-07 heeft een ingebouwde luidspreker. U kunt de weergave klok als volgt in: De datum en tijd die u opgeeft, worden gebruikt als beluisteren via deze luidspreker, maar u kunt ook een hoofdtelefoon tijdsstempel voor de bestanden die worden opgenomen.
- Page 123 Voorbereiding 4. Gebruik [ ] om “Yes” te selecteren en druk vervolgens op [ ]. Op het display verschijnt “Pairing... ” en dit apparaat wacht op een respons van het Bluetooth-apparaat. Wanneer het koppelen lukt, verschijnt “Completed” op het scherm en kan het geluid worden uitgevoerd vanaf het Bluetooth-apparaat.
- Page 124 Opnemen 1. Instellingen oproepen voor specifieke doeleinden De R-07 levert instellingen die geschikt zijn voor verschillende opnamesituaties. Deze instellingen worden “scènes” genoemd. 1. Druk op [SCENE] om het scherm “Scene” te openen en gebruik [ ] om de scène-instelling te wijzigen. Scene Uitleg Sample Rate Rec Mode...
- Page 125 Opnemen * U kunt 2xWAV-16 bit, 2xWAV-24 bit, MP3 en WAV+MP3 alleen 2. De opnamekwaliteit bepalen selecteren als de Sample Rate 44.1 kHz of 48.0 kHz is. * Als u WAV+MP3 selecteert, wordt standaard WAV-16 bit en U kunt bepalen welke geluidskwaliteit de opname zal hebben. MP3-128 kbps ingesteld.
- Page 126 Opnemen 4. Richt de microfoon op de LET OP opnamebron en druk op • Er kan akoestische feedback optreden [REHEARSAL]. als u opneemt terwijl een externe luidspreker is aangesloten. Als u Het opnameniveau wordt automatisch “Rec Monitor Sw” op OFF zet, wordt ingesteld op basis van het luidste akoestische feedback voorkomen.
- Page 127 ] om vooruit te spoelen. Normaal afspelen wordt Roland CD-2-serie, kunt u een audio-cd maken van bestanden die hervat als u de knop loslaat. zijn opgeslagen op de R-07. Raadpleeg de website van Roland voor LET OP meer informatie over de CD-2-serie.
- Page 128 1. Schakel de Bluetooth-functie van het mobiele apparaat in. 1. De app “R-07 Remote” installeren 1. Open de volgende URL vanaf de webbrowser van uw mobiel apparaat. http://roland.cm/r-07 Installeer de app die geschikt is voor uw mobiel apparaat vanaf de pagina die verschijnt. MEMO In de onderstaande toelichting wordt de iPhone gebruikt als 2.
- Page 129 Batterien explodieren ou des fuites et provoquer des controls were operated (Auto O function). distributor, as listed on the “Information” au centre de service Roland le plus proche • 異物が内部に入ったり、液体がこぼれ Service Center. ou la dernière utilisation des boutons ou quando: 破裂したり、液漏れしたりしま...
- Page 130 • Neem de stekker vast als u kabels Por la presente, Roland Corporation declara que el tipo de equipo radioeléctrico Bluetooth es conforme con la Directiva 2014/53/UE. para outro onde a temperatura e/ou próprio conector —...
Need help?
Do you have a question about the 417741A and is the answer not in the manual?
Questions and answers